 |
|
ProcessingA/P Transaction ProcessingAdvanced Features
The A/P Modules includes many features and functions, not applicable to all business, which we let you Pick & Choose to enhance your functionality and processing needs. These are detailed in the A/P Global Utilities section of this manual Application Overview
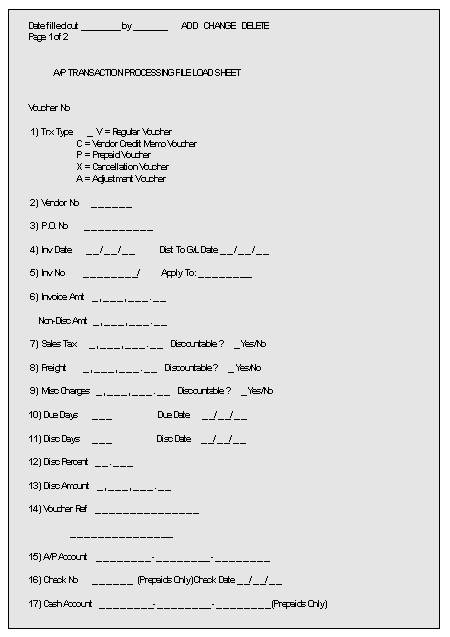
In a manual, non‑computer oriented Accounts Payable system; a voucher is a slip of paper that is used to represent a vendor's invoice. This puts order into the A/P system by making every payable item conform to a single specific format. A number is assigned to each voucher, which can be used whenever the payable item is referred to.
In the A/P Transaction Processing application, a voucher is much the same thing except that the voucher, instead of being a slip of paper, is a record on the Open Item File.
New vouchers (or A/P open items) are entered into the system via the A/P Transaction Processing application. All information about new payables is entered into a temporary file (the A/P Transaction File) and then posted to the Open Item File. (This file could also be called the Voucher File.) It is very easy to make changes to the information that has been entered into the A/P Transaction File before it has been posted, but after posting it is much more difficult. This is because many different files in the A/P package are updated when a new A/P open item is added and the data in all of these files has to be corrected also. Therefore, it is advisable to carefully recheck all information entered into the A/P Transaction File before posting.
If a purchase is made with a manually written check so that the item is already paid for, it can be entered into the system as a prepaid voucher (indicating that payment has already been made).
If the vendor sends a credit memo indicating that you can take credit toward future purchases because of damaged merchandise, or for any other reason, this credit memo is also entered through the A/P Transaction Processing application. This is called a vendor credit memo. If you send the vendor a debit memo to charge him for damaged merchandise, or for any other reason, this would also be entered as a vendor credit memo. (Those who are familiar with accounting will see that it is a reduction in the vendor's A/R (an asset) and so is a credit to him, but it is a reduction in your A/P (a liability) and so is a debit to you.) The term vendor credit memo is used to make it clear that it is the vendor's credit memo that is being represented by the A/P open item (or voucher). When a vendor credit memo is entered, it generally applies to an earlier vendor invoice, although the package will allow entry of credit memos, which do not apply to an earlier invoice.
Once the transactions have been posted, it is possible to change the due date, discount date, and discount amount through the A/P Open Item Adjustment application. If anything else on the voucher needs to be changed (such as the vendor number, or the voucher amount), it can only be done by entering a cancellation voucher through A/P Transaction Processing to delete the original A/P open item and then re‑entering the voucher with the correct data. Assuming that the cancellation voucher and new voucher entered are correct, this will have the desired effect on all files.
Adding a new voucher to the Open Item File increases the total Accounts Payable amount in the general ledger. An accountant would recognize this as a credit, since A/P is a liability account. This credit is counter‑balanced in the general ledger by one or more debits to expense accounts. Distributing the vendor invoice amount among the different expense accounts is known as expense distribution. This can be done automatically by pressing a function key if the vendor automatic distribution feature in the Vendor File is being used.
If freight, miscellaneous charges and taxes are always posted to a particular account, these distributions will be made automatically before you are allowed to enter any distributions. For this reason, you may find that even before you enter any distributions, the screen will show that 1, 2 or 3 distributions have been made. This type of automatic distribution is set up in the A/P Setup application.
The A/P package also allows tracking of expenses by job (see Job Code File). This has nothing to do with the general ledger, but the amounts are distributed in much the same way. The total invoice amount is distributed to one or more jobs. If expenses are tracked by job, it must be done manually on every new A/P transaction entered into the system, since the automatic distribution feature does not allow tracking by job number. The job distributions interface to Elliott's Job Costing package (if installed) to update the actual costs of material or services on the job.
Double Screen vs. Single Screen Transaction Entry
The way distributions are entered is affected by whether or not the Purchase Order & Receiving package is being used. If P/O is installed or the Enter Transaction P/O Data ? flag (#19) in A/P Setup is set to Y, distributions are entered on a second screen. This allows P/O to know exactly which items are being billed for on the invoice, what quantity of each item is being billed for, and the price being paid. If it has this information, it can notice any difference between the vendor invoice and the original purchase order that was sent. These distributions will need to be made manually from the vendor invoice. Normally, one distribution would be made for each item on the invoice. For run instructions and entry field descriptions for this type of entry refer to the Double Screen Transaction Entry section immediately following this Application Overview.
NOTE: When processing A/P transactions for receivings recorded in the Purchase Order & Receiving package, it is important to distribute to the same account number that was entered for the receivings distribution. If batch receivings processing is being used, this should be the Receivings Accrual Account that is entered in P/O Setup and is used to hold the value of the received inventory until the voucher is entered here in A/P. For more information on the Receivings Accrual Account, see the Package Overview section of the P/O manual. If receivings are being recorded online in P/O, this should be the line item account number from the purchase order.
If P/O is not installed and A/P Setup flag #19 is set to N, distributions are entered at the bottom of the first screen. This is designed to simplify transaction entry for users who do not want or need to track purchase order transaction data. For more information and entry field descriptions, refer to the Single Screen Transaction Entry section later in the A/P Transaction Processing chapter.
All of these types of distributions are done by specifying the amount to be distributed to each account number, job number, and purchase order (if appropriate) combination. Entry of distributions could become extremely complex if all of these features were used to the fullest extent, especially if the Purchase Order and Receiving package is being used. If, however, invoices generally apply to a single job and expense account, the distribution process will be greatly simplified. For example, an invoice comes in for a shipment of glue that is for use by job number 100. Only one distribution would need to be entered. If an invoice comes in for a shipment of glue, paint and solvent, that is for use by jobs 100, 200 300 and 400, and there are different expense accounts for glue, paint and solvent, then twelve distributions would need to be entered, and the exact amounts for each distribution would need to be estimated or calculated manually.
If an error is discovered in the A/P distributions of a voucher that has been posted, it can be corrected with an adjustment voucher. This is basically a voucher with a zero invoice amount. The distributions for the voucher also total zero. For example, if $100 was distributed to account 12000‑10000-00000, which should have been distributed to 13000‑10000-00000, then two distributions would be entered on the adjustment voucher: minus $100 to 12000‑10000-00000 and $100 to 13000‑10000-00000. ($100‑) + ($100) = zero.
Run Instructions - Double Screen Transaction Entry
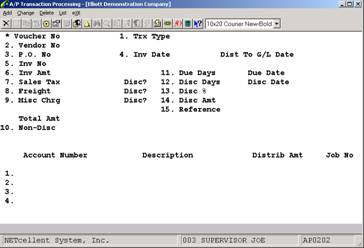
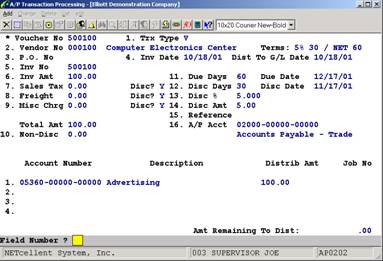
Select A/P Transaction Processing from the pull down A/P Processing window. If the P/O package is installed or A/P Setup flag #19 is set to Y, the following screen will then be displayed:
A/P Double Screen Transaction Entry Screen
The following options are available:
* Select the desired mode from the A/P Transaction Processing menu bar * Enter the voucher information requested on the screen. Enter any distributions on the second screen. * To exit press the ESC or F10 key when the cursor is positioned for entry of the first field on the screen
To return to the menu bar, press the ESC or F10 key. To leave this application, press X for EXIT when positioned at the menu bar. Entry Field Descriptions - Double Screen Transaction Entry
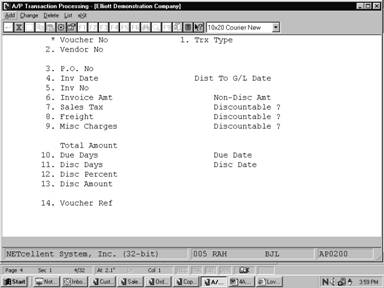
Voucher Information Screen
Fields 16-17 will only appear if the Transaction Type was entered as P for prepaid voucher.
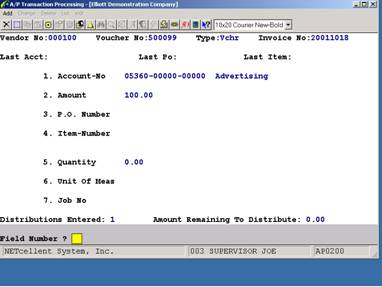
At the top of the second screen the last account number, purchase order number and item number entered are displayed. Use these fields to keep track of where you are on the invoice or load sheet.
At the bottom of this screen are two fields indicating the number of distributions entered and the amount remaining to distribute. If A/P Setup has specified that miscellaneous charges, sales tax and/or freight are to be distributed automatically to a particular account then you may find that the number of distributions entered starts at 1, 2 or 3 before you have entered any. The amount remaining to distribute must be zero before you can leave this screen, there is no way to abort the transaction except by distributing the remaining amount to an account and then going back and deleting the transaction using the delete mode or using change mode to correct the distribution.
Distributions - Double Screen Transaction Entry
|
|
Name |
Type and Description |
|
Voucher No |
6 numeric digits (999999).
In add mode, press the F1 key to get the next sequential voucher number. For example, if the last voucher entered was number 19867, then pressing the F1 key will cause the number 19868 to be assigned to the voucher.
In change mode, the F1 key can be used to bring up transactions in voucher number order. |
|
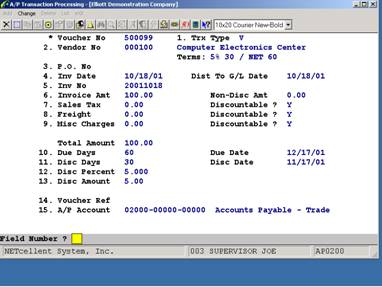
1. Trx Type |
1 alphabetic character.
This field can have one of the following values:
V = Regular Voucher C = Vendor Credit Memo Voucher P = Prepaid Voucher X = Cancellation Voucher A = Adjustment Voucher
Regular Vouchers: These are used to enter a vendor invoice or any other new payable into the system.
Vendor Credit Memo Vouchers: These are used to enter a credit memo received from the vendor into the system. They are also used to enter a debit memo sent to the vendor, since these have the same effect as a credit memo received from the vendor. (See the Application Overview for this application for a more complete explanation.)
Prepaid Vouchers: When merchandise is paid for in advance by check, the check is entered as a prepaid voucher, since the voucher has already been paid when it is entered. This has the same effect as entering a regular voucher and then immediately paying the voucher in full with a manual payment through the Open Item Adjustment application. For vouchers to be shown as fully paid, you must run Manual Check Register from the A/P Reports pull down window. This must be done after posting the new A/P transactions. |
|
Trx Type |
Cancellation Vouchers: These are used to cancel vouchers, which have already been posted to the Open Item File. In order for a cancellation voucher to work, the invoice number, invoice date and the total amount (invoice amount plus miscellaneous amount plus sales tax plus freight) must match that of the original voucher. If you are trying to delete a credit memo, the amount must be a negative and the invoice number entered must be the apply to number of the credit memo, not the actual invoice number. If a voucher has had a payment made toward it, the payment (check) must first be voided before the cancellation is attempted.
Adjustment Vouchers: These are used to correct errors in distributions after the transaction has been posted. If, for example, an amount has been distributed to the wrong account, this could be corrected with an adjustment voucher.
This field defaults to V. |
|
2. Vendor No |
6 alphanumeric characters.
Enter the vendor number of the vendor whose invoice is being vouchered. The vendor's name and terms will display to the right. Pressing the F7 key will allow you to search for the vendor by number or pressing the F8 key will allow you to search for the vendor by name. This is useful in finding a vendor when you do not know the vendor number.
Entering an * will allow you to add a new miscellaneous vendor. The number used will be the next available miscellaneous vendor number. For example, if the voucher number is 123456 then the miscellaneous vendor number will be *23456. The program will then ask you to enter the miscellaneous vendor's name, address, and terms. The default miscellaneous vendor number (*99999) is not allowed to be used in transaction processing and must be entered in Vendor File Maintenance first.
For more information on miscellaneous vendors, refer to the Package Overview section of this manual. |
|
3. P.O. No |
10 alphanumeric characters.
Enter the purchase order number of the purchase order from which the invoice originated. This should appear somewhere on the vendor's invoice. |
|
P.O. No |
This field becomes the purchase order number default to speed entry of distributions. If there is more than one purchase order number on the invoice, you can leave this field blank.
This field is not required. If the payable being entered does not have a purchase order associated with it, leave this field blank. |
|
4. Inv Date |
A date in the standard date format.
Enter the date printed on the invoice. If the payable being entered is not associated with an invoice, enter the statement date. If there is no statement, enter the due date of the payable.
This field defaults to the system date. |
|
Dist To G/L Date |
A date in the standard date format.
Enter the date that will be associated with this document in the Open Item File and in the A/P Distribution File.
After the document is interfaced to General Ledger, it will be posted to the period, which contains this date. This field defaults to the system date. |
|
5. Inv No |
8 alphanumeric characters.
Enter the document number on the invoice. If there is no invoice, you can press the F1 key for a date stamp of the invoice date in the format YYMMDD. Or press the F2 key and the voucher number will be used as the invoice number. Duplicate invoice numbers are not allowed.
This number will be what you will use to refer to the payable for inquiry and for payment. |
|
Apply To |
8 alphanumeric characters.
This field only appears for vendor credit memos. Enter the vendor invoice number to which this vendor credit memo applies. Press the F1 key to default to the invoice number entered in the previous field. |
|
6. Inv Amt |
9 numeric digits with 2 decimal places and an optional minus sign (9,999,999.99‑).
Enter the invoice amount, not including any miscellaneous charges, sales tax and freight. |
|
7. Sales Tax |
9 numeric digits with 2 decimal places and an optional minus sign (9,999,999.99‑).
Enter the sales tax amount shown on the invoice. This field defaults to zero. |
|
Discountable ? |
Y or N.
This question may not appear on the screen, but if it appears, it must be answered.
If sales tax is subject to the early payment discount in this case enter Y, if not enter N. What this is actually asking is ‑ Do you pay tax on the full stated price or do you pay tax on the discount price?. If you pay tax on the full stated price, then tax is not discountable, and so N would be the appropriate answer.
The automatic value and/or default for this field is set in the A/P Setup application. If the value for this field is always the same, the A/P Setup will always give it that value automatically and you will not be required to enter it. |
|
8. Freight |
9 numeric digits with 2 decimal places and an optional minus sign (9,999,999.99‑).
Enter the freight amount shown on the invoice.
This field defaults to zero. |
|
Discountable ? |
Y or N.
This question may not appear on the screen, but if it appears, it must be answered.
If freight charges are subject to the early payment discount in this case, enter Y; if not, enter N. |
|
Discountable ? |
The automatic value and/or default for this field is set in the A/P Setup application. If the value for this field is always the same, the A/P Setup will always give it that value automatically and you will not be required to enter it. |
|
9. Misc Charges |
9 numeric digits with 2 decimal places and an optional minus sign (9,999,999.99‑).
Enter the miscellaneous charges amount shown on the invoice.
This field defaults to zero. |
|
Discountable ? |
Y or N.
This question may or may not appear on the screen; if it appears it must be answered.
If miscellaneous charges are subject to the early payment discount in this case, enter Y; if not, enter N.
The automatic value and/or default for this field is set in the A/P Setup application. If the value for this is always the same, A/P Setup will give it that value automatically and you will not be required to enter it. |
|
Total Amount |
Display only.
This field shows the total amount due for this transaction. |
|
10. Non-Disc |
9 numeric digits with 2 decimal places and an optional minus sign (9,999,999.99-).
If any part of the total amount displayed in the field above is not eligible to be discounted, enter that amount here. When the discount amount is calculated, this amount will not be included in the calculation.
For example, if no early payment discount could be taken on pencils included on an invoice for an assortment of office supplies, you would enter the cost of the pencils here.
This field defaults to zero. |
|
11. Due Days |
3 numeric digits (999).
Enter the number of days after the invoice date that the invoice becomes due. This will default to the Due Days field in the Vendor File. If zero is entered, you will be allowed to enter the due date. |
|
Due Date |
A date in the standard date format.
Enter the date that the invoice is due. |
|
12. Disc Days |
3 numeric digits (999).
Enter the number of days after the invoice date that are allowed before the early payment discount can no longer be taken. This will default to the Discount Days field in the Vendor File. If zero is entered, you will be allowed to enter the discount date. |
|
Disc Date |
A date in the standard date format.
Enter the last date that the early payment discount can still be taken. |
|
13. Disc % |
5 numeric digits with three decimal places (99.999).
Enter the early payment discount percent. This field defaults to the discount percent in the Vendor File.
This will set the default for the early payment discount amount. If you wish to enter the discount amount instead of the percent, enter zero for discount percent. |
|
14. Disc Amt |
9 numeric digits with 2 decimal places and an optional minus sign (9,999,999.99‑).
The default for this field will be calculated, based on the discount percent entered above. |
|
15. Reference |
30 alphanumeric characters.
Enter a description of the voucher. This field can be left blank. This is a Commentary Reference field used to trace invoices, which will appear on the A/P Transaction Edit List and Register and later appear on the A/P Open Item Report and A/P Account Inquiry. |
|
16. A/P Acct |
Enter an account number in the standard format.
This field will only appear if the Multiple A/P Accounts? in A/P Setup is set to Y.
Enter the A/P account, which is affected by the transaction. This could be some liability account other than A/P, if desired.
Pressing the F7 key will allow you to search for the account by number. Pressing the F8 key will allow you to search for the account by description. This is useful in finding an account when you do not know the account number.
Defaults to the default A/P account entered in A/P Setup. |
Fields 17-18 will only appear if the Trx Type was entered as P for Prepaid Voucher.
|
Name |
Type and Description |
|
17. Check No |
An account number in the standard format.
This field will only appear if the Multiple Cash Accounts flag in A/P Setup is set to Y.
Enter the cash account from which the check was drawn.
Pressing the F7 key will allow you to search for the account by number. Pressing the F8 key will allow you to search for the account by description. This is useful in finding an account when you do not know the account number.
Defaults to the default cash account entered in A/P Setup. |
|
Date |
A date in the standard date format.
Enter the date that the invoice is due. |
|
18. Cash Acct |
An account number in the standard format.
This field will only appear if the Multiple Cash Accounts flag in A/P Setup is set to Y. |
|
Cash Acct |
Enter the cash account from which the check was drawn.
Pressing the F7 key will allow you to search for the account by number. Pressing the F8 key will allow you to search for the account by description.
This is useful in finding an account when you do not know the account number.
Defaults to the default cash account entered in A/P Setup. |
At the bottom of this table are two fields indicating the number of distributions entered and the amount remaining to distribute. If A/P Setup has specified that miscellaneous charges, sales tax and/or freight are to be distributed automatically to a particular account then you may find that the number of distributions entered starts at 1, 2 or 3 before you have entered any. The amount remaining to distribute must be zero before you can leave this screen, there is no way to abort the transaction except by distributing the remaining amount to an account and then going back and deleting the transaction using the delete mode or using change mode to correct the distribution.
Distributions For Single Screen Transaction Entry
|
Name |
Type and Description |
|
Account Number |
An account number in the standard format.
Enter the account number of the expense account to which distribution is being made.
In add mode press the F2 key to distribute the remaining invoice amount according to the vendor's automatic distributions.
Press the F7 key to search for the account by number or press the F8 key to search for the account by description. This is useful in finding an account when you do not know the account number. |
|
Distrib Amount |
9 numeric digits with 2 decimal places and an optional minus sign (9,999,999.99‑).
Enter the amount to be distributed to this account number. |
|
Job No |
6 alphanumeric characters.
This field will only be entered if the Use Job Numbers flag (#4) in A/P Setup is set to Y.
Enter the job number of the job, which will be using the merchandise.
In add or change mode, press the F7 key to search for Job numbers. |
A/P Single Screen Transaction Entry Processing
N E W A / P T R A N S A C T I O N E D I T L I S T
Vouch# Vendor Name Invoice# Invoice‑Amt Non‑Disc‑Amt ‑‑‑Due‑&‑Disc‑‑‑ Check‑No A/P‑Account‑No
Trx‑Typ No Terms Inv‑Date Sls‑Tax‑Amt Disc‑Tax ? Days‑‑‑‑‑‑‑‑Date Check‑Date Cash‑Account‑No
Vouc‑Date P.O.# Apply‑To Freight‑Amt Disc‑Frt ? Disc‑% Amount
Misc‑Chrges Disc‑Misc ? Voucher‑Reference
500102 000400 Computers of America 500102 45.60 .00 09/15/89 02000‑10000‑00000
Vchr Terms: 09/15/89 .00 09/15/89
09/15/89 P.O.#: .00 .00
.00 Safe Deposit Box Rental
Account‑No Account‑Description Dist‑Amount Item‑No Quantity Uom Job‑# P.O.‑#
05390‑00000‑00000 Miscellaneous 22.80
05390‑10000‑00000 Miscellaneous 22.80
500103 000400 Computers of America 500103 45.60 .00 10/15/89 02000‑10000‑00000
Vchr Terms: 10/15/89 .00 10/15/89
10/15/89 P.O.#: .00 .00
.00 Safe Deposit Box Rental
Account‑No Account‑Description Dist‑Amount Item‑No Quantity Uom Job‑# P.O.‑#
05390‑00000‑00000 Miscellaneous 22.80
05390‑10000‑00000 Miscellaneous 22.80
500104 000400 Computers of America 500104 45.60 .00 11/15/89 02000‑10000‑00000
Vchr Terms: 11/15/89 .00 11/15/89
11/15/89 P.O.#: .00 .00
.00 Safe Deposit Box Rental
Account‑No Account‑Description Dist‑Amount Item‑No Quantity Uom Job‑# P.O.‑#
05390‑00000‑00000 Miscellaneous 22.80
05390‑10000‑00000 Miscellaneous 22.80
Landed Cost Processing
This step is critical for accurate posting information. In processing of payables, even though your vendor only invoices you for the FOB cost, it is important to know that the PO receiving side has Debits inventory and Credits the receiving accrual account at Landed Cost. Therefore, the correct value A/P system should take out from receiving accrual account is the Landed Cost, not the FOB cost. The difference will go to an account called Landed Cost Variance (LCV) account. The system will do this automatically as long as the right PO number is provided and the distribution to each PO line item is accurately identified. This can be a time consuming process if you do not have the “Receiving Accrual Account Reconciliation” feature turned on. If it is turned on, the A/P voucher process can be a speedy process.
The LCV account contains the value of the estimated additional cost, (freight, duty, insurance…etc.) of the received and entered FOB invoice. The account is waiting for the distribution of freight and duty invoices that will then eventually cause LCV account to wash out. Therefore, it is important that you distribute to the LCV account, not an expense account, when you receive the invoice for freight and duty.
The following diagram is meant to give an illustration of the difference between using FOB and Landed Cost for Inventory valuation:
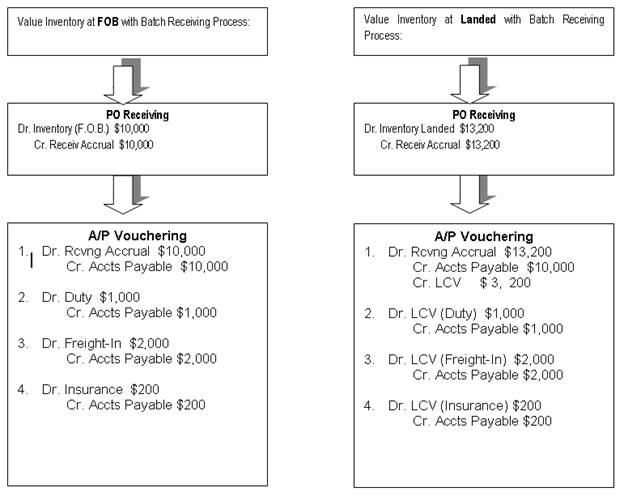
By looking at these account distribution comparisons, the obvious differences are in the Receiving Posting and then the handling of the additional costs in the payables entry. If you value inventory at FOB cost, then during the time of receiving the invoices for freight and duty, you will distribute to expense account.
If you value inventory at Landed cost, then you would distribute it to LCV (Landed Cost Variance), or sometimes referred as Landed Cost Clearing account. The value in this account should wash out itself on the long run. If it does not wash out, then it is most likely caused by the over or under estimation of the landed cost at the time of receiving. You should reconcile this account periodically, and if necessary, make any needed adjustments.
Advanced P.O. Processing
Receiving Accrual Account Reconciliation
Application Overview
The purpose of this feature is to provide a means of reconciliation for the P/O receiving accrual account. If you are using batch receiving, posting a PO receiving updates the General Ledger (via the GL Inventory Interface) by debiting inventory and crediting the receiving accrual account as a temporary liability account. Without enabling this feature in A/P Global Control, there are no sub-ledger detail reports that could be used reconcile the ending balance in the G/L receiving accrual account.
Speedy Voucher Processing
Application Overview
When processing an AP Voucher to Purchase Order Receiving, you to distribute every applicable P.O. line item during the Voucher entry. If you have enabled the A/P Global Control Receiving Account Reconciliation feature, the Speedy AP Voucher Processing feature allows you to enter a voucher and reference it to a P.O. receiving. Once referenced, the system will automatically distribute each line item for you and, as an added bonus, greatly speed up voucher processing.
Both of these features are documented in the A/P Global utilities section of this manual.