The Production Transaction Processing
application allows for reporting progress made toward completing production
work orders. Transaction information will reside in a transaction file until
it is posted through the Post Production Transactions application.
This application has been designed to provide the
user with solutions to many common mis-reporting problems that may occur.
If over-production of an order occurs, components
will be automatically deallocated and have quantity on-hand reduced. Also,
finished goods will have quantity on-hand increased by the reported amount.
This will take place regardless of whether the Work In Process (WIP) feature
was selected when work orders were printed, or if the order was flagged as
"complete" by a previously posted transaction.
Under-production, even to the extreme of reporting
zero (0) items produced, can be handled by flagging the order as complete and
posting the transaction. The technique commonly referred to as
"back-flushing" will then be implemented by the system in this
situation. Any transactions entered against the order after it is flagged as
complete will be treated as over-production (see above).
Negative quantity transactions are also allowed by
the system. You may enter negative quantities up to but not greater than the
total quantity reported for the order to date. Regardless of the order's
status, all quantity allocated and on-hand adjustments will be made
automatically.
When processing Production Transactions for
serialized end items, records are written to the Production Transactions and
Serial/Lot Files simultaneously when answering N to the Any Changes?
question at the bottom of the screen. If the ESC key is pressed at the
Any Changes? question, these files are still updated. If the transaction is
not desired, it must be deleted.
Select Production Transaction Processing
from the pull down BOMP Processing window. The following screen will
then be displayed:
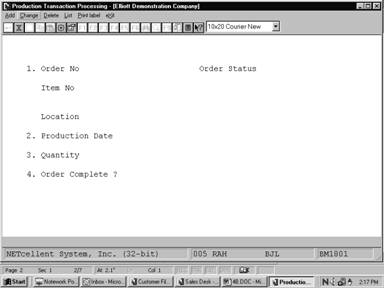
Production
Transaction Processing Entry Screen
The following options are available:
* Select the
desired mode from the Production Transaction Processing menu bar.
* Enter the
data requested on the screen.
To return to the menu bar,
press the ESC or F10 key. To leave this application, press X
for EXIT when positioned at the menu bar.
Entry Field Descriptions
|
Name
|
Type
and Description
|
|
1. Order No
|
6 numeric digits.
Enter the number of the production order on which
progress will be reported. The status, item number, description, location,
and quantity remaining to be produced will be automatically displayed.
In add mode, press the F1
key to display the next production order number and its status information.
In change mode, press the F1 key to display the next production
transaction.
|
|
Order Status
|
Automatically displayed.
The status of the order
number will be displayed as new, work order printed, partially reported, or
complete.
|
|
Item No
|
Automatically displayed.
The number and description
of the item being produced will be displayed.
|
|
Location
|
Automatically displayed.
The location code and
description of where the item is being produced will be displayed.
|
|
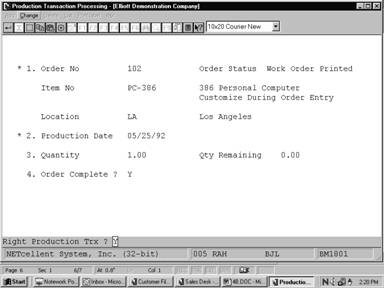
2. Production Date
|
A date in the standard date
format.
Enter the date the items
being reported were produced. In add mode, press RETURN for the
current date. In change mode, press the F1 or RETURN key to
display the next production transaction on file.
|
|
3. Quantity
|
8 numeric digits including 3
decimal places and an optional minus sign.
Enter the quantity of items that are being reported as
produced. This amount will automatically be deducted from the Qty Remaining
field. If the quantity entered is greater than the quantity remaining, the
user will be informed that this will over-produce the order and will be asked
if this is Ok. A quantity of zero is allowed for the purpose of completing
an order. A negative quantity is also allowed to reverse previously reported
production.
Default is the quantity
remaining.
|
|
Qty Remaining
|
Automatically displayed.
This is the difference
between the quantity ordered and the quantity reported so far. When this
quantity reaches zero, the order will be considered complete unless the user
enters N in field #4. A negative quantity will be displayed if more
items have been reported than were ordered.
|
|
4. Order Complete?
|
Y or N.
If the order is considered complete, whether or not
there is a quantity remaining, enter Y. If the order still has items
to be produced, enter N. If there is any quantity remaining, the
default is N. If quantity remaining is less than one, the default is Y.
Note: If
this flag is changed to Y, it may not be changed back to N.
Also, the order will no longer appear on the Production Schedule Report.
|
The
following entry will be requested when lot items are being produced.
|
Name
|
Type
and Description
|
|
5. Lot Number
|
11 alphanumeric characters.
15 alphanumeric characters if not using batch numbers
in BOMP Setup.
Enter the lot number of the
item being produced. For more information on lot transactions, see the Application
Overview section of the Inventory Transaction Processing
application in the I/M manual.
|
|
6. Batch No
|
4 numeric digits.
Enter the batch number of
the item being produced.
|
|
Exp Mo
|
2 numeric digits. (May not
exceed 12)
Enter the expiration month
of the lot.
|
|
Yr
|
2 numeric digits.
Enter the last two digits of
the expiration year for the lot.
|
The
following entry will be requested when serial items are being produced.
|
Name
|
Type
and Description
|
|
Auto Increment Serial
Number ?
|
Y or N.
If Y is entered, the user will be prompted to enter
a serial number and a starting batch number. The application will
automatically assign serial numbers to all items being reported. The first
item will have the starting batch number and each following serial/batch
number will be incremented by one.
If N is entered or if batch numbers are not
specified in BOMP Setup, the user will be prompted to manually enter a
serial number for each item.
Default to N.
|
|
5. Serial Number
|
11 alphanumeric characters.
15 alphanumeric characters if not using batch numbers
in BOMP Setup.
Enter the serial number,
which will be assigned, to the serialized item being produced. Entry is
required.
|
|
6. Batch Number
|
4 numeric digits.
Enter the batch number,
which will be an extension of the item's serial number. Entry is required.
|
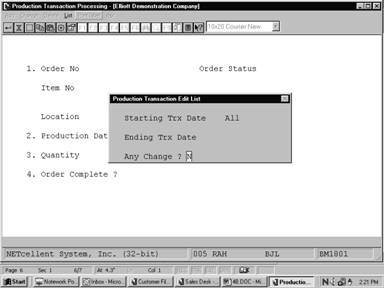
Production Transaction Edit List
|
Name
|
Type
and Description
|
|
Starting Trx Date
|
A date in the standard date
format.
Enter the starting date for
the range of production transactions to be printed. Defaults to All.
|
|
Ending Trx Date
|
A date in the standard date
format.
Enter the ending date for
the range of production transactions to be printed. Defaults to the starting
date.
|
Screens
Transaction Processing
Production Transaction Edit List
P R O D U C T I O N T R A N S A C T I O N E D I T L I S T
Ranges:
All Dates
Order
No Loc Item No Description Quantity Trx Date
Cmpl? Job No Serial/Lot Information
102 LA PC‑386 386 Personal Computer 1.000
05/25/92 Yes
Customize During Order Entry
104 LA PC Parent Item (Mother Board) 1.000 05/25/92
No 00000000A100022
Personal Computer
104 LA PC Parent Item (Mother Board) 1.000 05/25/92
No 00000000A100023
Personal Computer
104 LA PC Parent Item (Mother Board) 1.000 05/25/92
No 00000000A100024
Personal Computer
104 LA PC Parent Item (Mother Board) 1.000 05/25/92
No 00000000A100025
Personal Computer
104 LA PC Parent Item (Mother Board) 1.000 05/25/92
No 00000000A100026
Personal Computer
104 LA PC Parent Item (Mother Board) 1.000 05/25/92
No 00000000A100027
Personal Computer
104 LA PC Parent Item (Mother Board) 1.000 05/25/92
No 00000000A100028
How to Access:
Main Menu è Distribution è
Bill of Material Processor è Process
è Production Transaction Processing è Process è
Plus Work Order
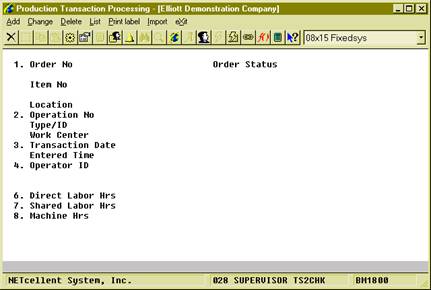
(Figure 1) Production Transaction Processing for Plus Work
Order
This is the traditional way to
create, edit and delete production transactions. The operator needs to enter
all the data of a transaction and is allowed to edit most of the fields, in
most cases. If you are not planning to adopt the time clock system WO+
provides, you can always report production through this interface. Also, the
Transaction Edit List can print out all the details of each transaction before
they are posted. The list will print all warnings and errors a transaction
would encounter during posting so a manager can correct them. Only some
exceptions can be handled through this screen, like reversing a transaction or
overriding a post exception.
What can be done here?
- Add a transaction.
- Edit a transaction. If the
transaction was created through scanning, thus contained a production
number, only certain fields can be modified.
- Delete a transaction. If the
transaction was created through scanning, thus contained a production
number, it cannot be deleted.
- Print the Edit List.
- Import transactions from a CSV
file (not implemented yet).
- Create a reverse transaction
from a posted transaction.
- If a transaction cannot be
posted due to an exception, you can flag the transaction so the post
program will override the exception.
- Change operation data.
Field Description
|
Name
|
Type
and Description
|
|
1. Order No
|
6
numeric digits.
Enter the Work Order Number
to report.
F1
Key - In add mode, choose the next order number. In
change and delete mode, choose the next transaction.
|
|
2. Operation No
|
4
numeric digits.
Enter the operation number
to report.
F7
Key - Search for operation number.
|
|
3. Transaction Date
|
Standard
date format
Enter the date of the
transaction.
F4 Key -
In add mode and if the operation has not been started, you can change the
value of this operator, like Work Center, Default Labor Grade, etc.
In change mode, press the F1
Key or leave this field blank and all transactions for this operation
will be displayed. Enter a specific date and transactions reported on that
date will be displayed.
Defaults
to the system date.
|
|
4. Operator ID
|
10
alpha-numeric characters.
Enter the ID of the operator
who reported this transaction. If an operator ID is given, the system will
use the labor rate of this operator to calculate direct labor cost.
The operator ID cannot be
changed if this transaction was reported through scanning.
F7
Key - Search Operator ID.
|
|
5. Qty Complete / Qty
Received
|
Standard
quantity format.
Enter the quantity of pieces
which are successfully processed for this operation.
F2
Key - In change mode, change the issued material.
F3
Key - In change mode, change the PO information for an
outside process operation.
F5
Key - In change mode, allow this transaction to override
any exception that occurs during the post.
F7
Key - In add mode, select a posted transaction from
history to create a reverse transaction. The reverse transaction has the
opposite values of that in the selected transaction for quantity, hour and
cost.
Defaults
to the quantity completed from a previous operation, but not processed in the
current operation.
|
|
Qty Scrapped / Qty Rejected
|
Standard
quantity format.
Enter
the quantity scrapped during production. The operator cannot report scrap
for Setup Operations.
If this
is an outside process operation in Add mode, the system will prompt for PO
Information after the Rejected Quantity has been entered.
The
default is zero.
|
|
6. Direct Labor Hrs
|
12
numeric digits with 6 decimal places and an optional minus sign.
The direct labor hours used
for this production. If this transaction was created manually, the system
will calculate direct labor cost based on the time and operator’s labor rate,
if provided. If the operator ID is not provided, the system will use the
standard direct labor rate defined in the Operation file.
This field cannot be changed
if the transaction was created through scanning.
Defaults
to the planned direct labor hours, which is calculated based on quantity and
standard direct labor rate (Qty/Hrs, fixed hours, etc.).
|
|
7. Shared Labor Hrs
|
12
numeric digits with 6 decimal places and an optional minus sign.
The shared labor hours used
for this production. If this transaction was created manually, the system
will calculate shared labor cost based on the time and standard shared labor
rate defined in the Operation file.
This field cannot be changed
if the transaction was created through scanning.
Defaults
to the planned shared labor hours, which is calculated based on quantity and
standard direct labor rate (Qty/Hrs, fixed hours, etc.).
|
|
8. Machine Hrs
|
12
numeric digits with 6 decimal places and an optional minus sign.
The machine hours used for
this production.
This field cannot be changed
if the transaction was created through scanning.
Defaults
to the planned machine hours, which is calculated based on quantity and
standard machine rate (Qty/Hrs, fixed hours, etc.).
|
|
9. Order Complete?
|
“Y”
or “N”.
Enter “Y” if this order is
complete and is going to be closed. This field is only available if the transaction
is for the last operation. The status of the order will be examined and if
any error occurs, like when transactions are missing, the system will not
allow the order to be closed.
Default
value is based on the order status. If all conditions are satisfied, the
default is “Y”.
|
|
10. Lot Information
|
If
the parent item is a lot item and the transaction is for the last operation,
the system will prompt for the lot information for the completed parent
items.
If
the Serial/Lot Batch Number is used in BOMP (a flag in BOMP Setup), the
system will prompt for 11 alpha-numeric characters for the Lot Number and 5
alpha-numeric characters for the Batch Number. Otherwise, the system will
simply prompt for 15 alpha-numeric characters for the Lot Number.
Also,
the system will prompt for an expiration month and year.
|
|
Override Post Exception?
|
“Y”
or “N”.
Indicate if the transaction
should post if any exception occurs.
This field cannot be
directly accessed by entering a field number. The operator needs to press
the F5 Key while in the quantity field. Also, the operator is required to
have enough security to change this flag.
Defaults
to “N”.
|
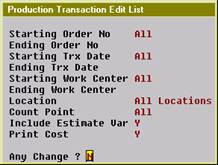
(Figure 2) Production Transaction Edit List Selection
The Transaction Edit List can
print out detailed information for each selected transaction. This includes any
warnings or errors. You can print an edit list before posting and examine the
statistics for any exception that might happen.
|
Name
|
Type
and Description
|
|
Starting/Ending Order No
|
6 numeric digits.
The range of order numbers
to appear on the report. Defaults to All.
|
|
Starting/Ending Trx Date
|
A date in standard date
format.
The date range of the
transactions to appear on the report.
|
|
Starting/Ending Work Center
|
6 alpha-numeric characters.
The work center range to
appear on the report. Defaults to All.
|
|
Location
|
2 alpha-numeric digits, with
wildcard support.
Select the production
location.
|
|
Count Point
|
1 character.
Select the operation type
for the transactions.
Options:
M - Material Issue Point only.
Y -
Y Count Point only.
B -
Both Material Issue Point and Y Count Point only.
Space -
All.
Defaults to All.
|
|
Include Estimate Var?
|
“Y” or “N”.
Enter “Y” to print the cost
variance for those operations which use estimated statistics, like labor
hours per quantity, instead of standard statistics.
Defaults to “N”.
|
|
Print Cost?
|
“Y” or “N”.
Enter “Y” to print the cost
on the edit list. This flag is subject to several security flags and the
BOMP Setup. If the operator is not authorized to view cost, this option will
be not applicable.
Defaults to “N”.
|
Print Label
If labels are needed for the
finished products, this program outputs an item number for the completed pieces
in the selected range of work orders to a CSV file. For example, if 10 pieces
of product in a work order are finished, this program will create 10 records in
the CSV file. A barcode printing program, like Bartender, can be used to print
the barcode labels from the CSV file. You can enable this feature and fine
tune the parameters through the Barcode Printing Global Setup.
Issued Material Reporting
Materials will be used to
manufacture parent items and they can be issued in certain operations based on
the definition in each work order. Those operations which issue material are
called Material Issue Points. In WO+, more than one operation can be a
material issue point. For flexibility, even if an operation is not defined as
a material issue point in the work order, you can still issue material in the
operation. This might be a situation where the operator needs to return some
materials when the order is complete. Also, material usage may be different
between planning and production, therefore the operator can change the issued
quantity or substitute material when reporting.
There are two modes to report
material, Material Verification Mode and Material Confirmation Mode. You can
switch from one mode to another though the BOMP Global Setup field 51, Enforce
Material Verification in Production. The reporting screen will have two
different modes.
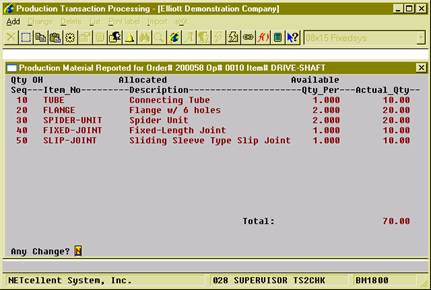
(Figure 3) Issued Material Reporting Screen
How to bring up Issued
Material Reporting?
Elliott will automatically pop up
the Material Reporting screen when an operator is reporting for a material
issue point. The screen will display all materials which are planned to be
issued for this work order. At this point you can verify if the item number
and quantity are correct.
Extra steps are required to bring
up this screen if the operator wants to report issued material for an operation
which is not a material issue point. This is available in Production
Transaction Processing and Work Order Production.
If the operator is reporting
production through Production Transaction Processing, the following steps are
required:
- In Add mode, populate every
field for a transaction.
- Select field 5, Qty
Complete/Qty Received.
- Press the F2 Key to
bring up the Issued Material Reporting screen.
The following are required if
reporting production through Work Order Production:
- Enter a non-zero number in the
Qty Completed field. The system will display “Production Reported” to the
right of the quantity and prompt “Any Change?”
- Answer “Y” to the question and
cursor will move back to the Qty Completed field.
- Press the F5 Key to
bring up the Detail Reporting screen.
- In the Qty Completed/Qty
Received field, press the F2 Key to bring up the Issued Material
Reporting screen.
Even if the operation is a
Material Issue Point, the operator can use the same steps to bring up the
Issued Material Reporting screen.
Depending on the BOMP Global
Setup, the Issued Material Reporting screen can be one of two modes.
Material Confirmation Mode
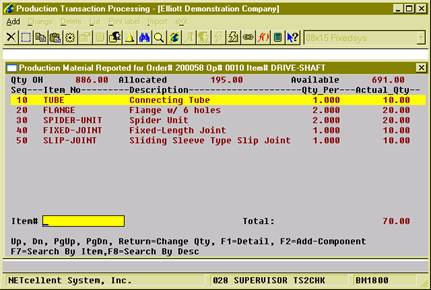
(Figure 4) Issued Material Reporting. Confirmation Mode.
Changing Material.
Setting BOMP Global Setup field 51,
Enforce Material Verification in Production, to “N” will set this screen to
Confirmation mode. In this mode, the system will display all materials based
on the planned quantities in the work order bill of material and prompt, “Any
change?” Respond with “N” to issue material based on this list. Otherwise the
system will bring up the next stage, Change mode.
In Change mode, you can change
the actual issued quantity and add substitute components. The first prompt is
for an item number. Now the following can be performed in this screen:
- Press the Up or Down
Arrow Keys to move the highlight bar. Press Page Up or Page
Down to change to scroll a page at a time.
- Press the Enter Key to
change Actual Issued Quantity for the highlighted component.
- A positive quantity means
issue material with this amount.
- A zero quantity means the
material is not used.
- A negative quantity means the
components are being returned to stock. This is useful when the order is
complete and there are some components left.
- Press the F1 Key to view
and change the material detail. The detail includes material location and
actual issued quantity.
- Press the F2 Key to add
substitute material.
- Press the F7 Key or F8
Key to search the Item file.
- Enter a valid Item Number,
UPC or GTIN.
- If the item is in the list,
the system will move the cursor to that item and ask the operator to
change the actual issued quantity.
- If the item is not in the
list, the system will allow the operator to add the item as substitute
material to the list.
Press the Escape Key to
exit the screen.
Material Verification Mode
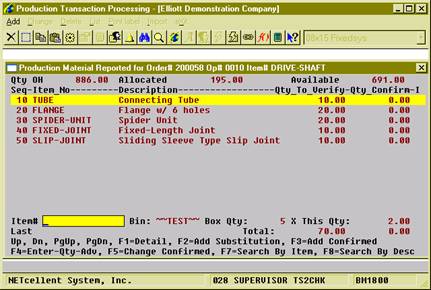
(Figure 5) Issued Material Reporting. Verification Mode.
Setting BOMP Global Setup field 51,
Enforce Material Verification in Production, to “Y” will bring up this screen
in Verification mode. In this mode, the operator needs to enter through every
component required for this work order before exiting the screen. Therefore,
the Confirmed Quantity of each component defaults to zero.
Verify through Accumulation
Each time an operator enters an
item number, the system will accumulate the confirmed quantity of that
component. If 10 pieces of one component are used during the production, the
operator can enter the item number 10 times. The system not only accepts the
Item Number, but the UPC or GTIN can be entered if they are defined.
Quantity to Accumulate
Each time the item number or UPC
is entered, the system will accumulate the confirmed quantity by one. However,
you can define this quantity to be the product of the Package/Box Quantity
and Quantity in Advance for each entry. Package/Box Quantity is
the quantity of a component packaged in one box. For example, the component
TUBE in Figure 32 is packaged 5 per box (see Box Qty: 5) and scanning the
barcode on the box confirms 5 pieces. The Package/Box Quantity is defined in
the Item Master file and a BOMP Global Setup defines which field represents the
package/box quantity. If the GTIN is scanned, the system will use the package
quantity defined in the GTIN. Quantity in Advance is the number of
component units to report. Figure 32 is configured to report 2 boxes of TUBE
(see X This Qty: 2), so when the item is scanned the confirmed quantity of this
component will accumulate 10 pieces.
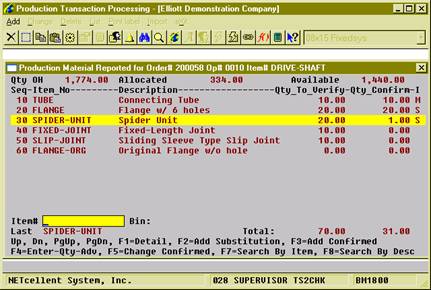
(Figure 6) Issued Material Reporting. Verification Mode.
Reporting
Scan and Manual Entry
The system will record which
input method is used to verify these components, Scan or Manual Entry.
If the barcode tag on each component is scanned for a component, the system
sets entry method for that component to Scanned and an “S” will be
displayed on the right side of the line (see the FLANGE line in Figure 33). If
the confirmed quantity is modified, the line is considered a Manual entry and
an “M” will be displayed on the right side of the line (see the TUBE
line in Figure 33). When a UPC or GTIN is used, the system always considers it
as scanned. Overriding the quantity is always considered a manual entry.
Whether the item number is manually entered or scanned is defined in the BOMP
Global Setup.
Exceptions
Exceptions can occur when
verifying materials. Verifying too few or when a substitute material is to be
used, the system will prompt for a supervisor password. Enter the correct
password to override this exception. The BOMP Global Setup defines which
actions are exceptions.
Functionality
During verification, the cursor
always begins at the Item Number field. Several options are available:
- Press the Up or Down
Arrow Key to move the highlight bar. Press Page Up or Page
Down to scroll a page at a time.
- Scan an UPC or GTIN
Barcode. The system will accumulate the confirmed quantity of the
corresponding component. The system always considers this action as a
scan.
- Scan or type in the Item
Number. The system will accumulate the confirmed quantity of the
corresponding component. The system will consider this action as a scan
or manual entry based on the BOMP Global Setup.
- If the BOMP Global Setup field
“Enter Qty Before or After” is set to “A” for After, the Qty in Advance
field can be changed after the item number has been entered.
- If the BOMP Global Setup field
“Enter Qty Before or After” is set to “B” for Before, the quantity can be
entered in the Item Number field. If a quantity is entered, the system
will use the quantity as Qty in Advance. This quantity can only be a
limited length integer.
- Press the F7 Key or F8
Key to search the Item file.
- Press the F1 Key to view
component detail.
- Press the F2 Key to add
substitute material. When substitute material is added, the confirmed
quantity will be set to zero and a quantity needs to be confirmed for this
material.
- Press the F3 Key to
directly accumulate for the highlighted component. This is always
considered a manual entry. It may be an exception if defined as so in the
BOMP Global Setup.
- Press the F4 Key to
change Quantity in Advance.
- Press the F5 Key to
directly change the confirmed quantity. This is always considered a
manual entry. This is the only way to enter a negative quantity for the
confirmed quantity.
- A positive confirmed quantity
means you are issuing material.
- A quantity of zero means the
material is not used.
- A negative quantity means the
components are being returned to stock. This is useful when the order is
complete and some components are left.
- Press the Escape Key to
exit verification. If any component is under-verified or over-verified,
the system will display a warning.
PO Information
If an operation is an outside
process, the system will prompt for PO related information about the
production. This will happen in the Work Order Production interface when
production starts and when production is reported.
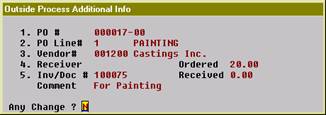
(Figure 7) Outside Process Information
Field Description
|
Name
|
Type
and Description
|
|
1. PO #
|
The
standard PO format is used if the PO package is on. If the PO package is
off, the format is 10 alpha-numeric characters.
The
purchase order number of the outside process. This can be blank. If the PO
package is on, this should be an existing PO but not a blanket PO.
|
|
2. PO Line #
|
3
numeric digits.
The
purchase order line number for the PO of this outside process. This field is
available if a PO number is entered. If the PO package is on, the item
number for this line item should not exist in the item file.
|
|
3. Vendor#
|
6
alpha-numeric characters.
The
vendor number of this outside process. This field is available to change if
the PO number is not entered or the PO package is off. Otherwise, it should
be the same as the vendor number in the purchase order.
|
|
4. Receiver
|
3
alpha-numeric characters.
Receiver
of the outside process.
|
|
5. Inv/Doc #
|
8
alpha-numeric characters.
Invoice
Number or Document Number of the outside process.
If
the PO package is on, a valid invoice/document number should be entered. If
the invoice/document does not exist, the system will create a new one and
prompt for a comment for the record.
|
If the PO package is on, there
are some benefits to linking a BOMP transaction to a PO line item.
- You can reference the data in
BOMP back to Purchase Order.
- If the BOMP Global Setup field 36,
Copy PO FOB Cost to WO+ Outside Process, is “Y”, the system will use the
FOB cost in the PO to calculate the outside process cost instead of that
defined in order routing.
- If the BOMP Global Setup field 37,
Update PO Receiving thru WO+ Outside Proc Rpt, is “Y”, the system will
automatically create a PO Receiving Transaction for the PO when the BOMP
transaction is posted. However, the system will not allow a greater
quantity to be received for the item than listed on the PO.
Follow the instructions below to
change this information after the transaction is created.
Use the following steps when
reporting production through Production Transaction Processing:
- In Add mode, populate every
field for the transaction.
- At Field Number, enter 5 for
the “Qty Complete/Qty Received” field.
- Press the F3 Key to bring
up the Outside Process Additional Information screen.
Use the following steps when
reporting production through Work Order Production:
- Enter a non-zero number in the
Qty Completed field. The system will display a “Production Reported”
literal to the right of the quantity and prompt “Any Change?”
- Answer “Y” and the cursor will
move back to the “Qty Completed” field.
- Press the F5 Key to
bring up the Detail Reporting screen.
- In the “Qty Completed/Qty
Received” field, press the F3 Key to bring up the Outside Process
Additional Information screen.
All fields can be left blank for
this transaction.
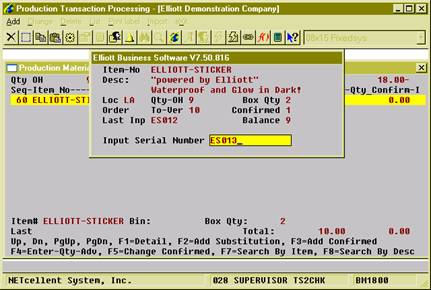
A serial number will need to
reported for serialized parent items or components when the serial number
system is in use.
Serial Number for a Parent
Item
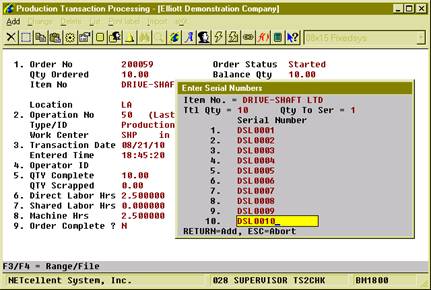
(Figure 8) Parent Item Serial Number Report
After every field of the
transaction has been entered for the last operation, the system will pop up a
screen to let the operator enter the serial numbers for the newly created
serialized parent items. They will need to be entered one by one. If 10
pieces are reported, 10 serial numbers should be entered as well. The
transaction will be aborted if enough serial numbers are not reported.
Serial Number for
Components
The Issued Material Reporting
screen is used to report a serial number for an issued serialized component.
The screen appears different for Confirmation mode and Verification mode. In
Confirmation mode, the system will display an asterisk (*) for components in
which serial numbers have not been reported (see Figure 36). Press Enter on
this item and the Serial Number Reporting screen will pop up after entering the
actual quantity. In Verification mode, the system will pop up a screen to
enter serial numbers one by one after a valid item number has been entered.
The quantity of issued materials is always the same as the number of serial
numbers reported.
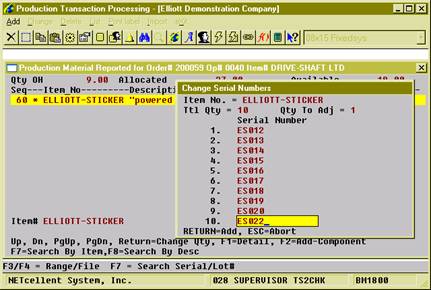
(Figure 9) Component Serial Number Report, Confirmation
Mode
(Figure 10) Component Serial Number Report, Verification
Mode
Lot Number
Lot Number
for Parent Item
Reporting production for a parent
lot item on the last operation will prompt for lot information. In the Work
Order Production interface, the system will pop up a Lot Information screen
after entering an amount in the Qty Completed field.
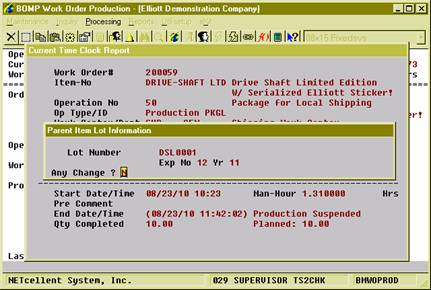
(Figure 11) Lot Number reporting in Work Order Production
|
Name
|
Type
and Description
|
|
Lot Number
|
If
Batch Number is not used, this is 15 alpha-numeric characters. Otherwise, it
is 11 alpha-numeric characters.
Lot
Number for the finished parent item.
|
|
Batch Number
|
4
numeric digits.
Batch
number of the finished lot items. The system will combine the batch number (4
digits) and lot number (11 digits) into a 15 character lot number. Only
available if BOMP Setup field 10, Use Serial/Lot Batch Numbers, is set to
“Y”.
|
|
Exp Mo
|
2
numeric digits. Must be a valid month.
Month
when the lot item expires.
|
|
Yr
|
2
numeric digits.
Year
when the lot item expires.
|
Lot Number for Components
The lot number of issued lot
items needs to be reported. It does not need to be reported immediately when
reporting material. Another process is used to report these lot numbers: Issue
Serial/Lot Component Items.
How to Access:
Main Menu è Distribution è
Bill of Material Processor è Processing
è Issue Lot/Serial Component Items
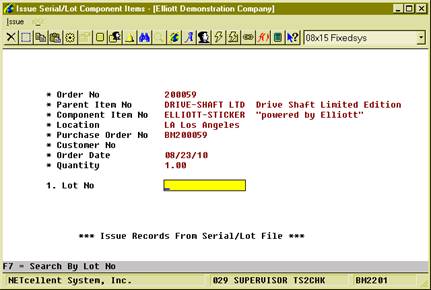
(Figure 12) Issued Serial/Lot Component Items
Each time a work order is
selected, the system will bring up one component issued for the work order and
the lot number for the component can be reported.
