|
Processing
The Order Entry application
allows the entry of customer orders. Orders, once entered, may be later
modified, deleted, or printed out on the Order Edit List. Order
acknowledgments may be printed to be mailed to the customer showing what was
entered in response to the customer's purchase order. Blanket orders are also
supported.
The user should be familiar with
all the options
and features available
from the Global
Setup chapters
as they can enhance order processing and meet specific data entry and
procedures required.
Order Types
There are five order types in
this package. The first of these is simply called regular orders. Regular (O)
type orders are the most common order type. Orders which are entered from a
customer's purchase order or phone order and which remain on file until the
date when the merchandise ordered on it is picked, shipped, and billed are
regular orders.
When there is no delay between
ordering and shipping, as in the case of over‑the‑counter sales,
you could use invoice (I) type orders. All of the items on invoice orders are
automatically selected to be billed, since it is assumed that the merchandise
has already been delivered. Companies that are confident their stocks will
always be adequate to meet all orders might consider using this order type also
to eliminate the necessity of selecting individual items on the order to be
billed. This is what is referred to as a one‑step billing procedure.
Items entered on the order can be billed on the next invoice-printing run
without any intermediate steps.
Credit memos can be entered as a
separate order (C) type. As with invoices, credit memos can be printed on the
next invoice-printing run without any preliminary steps. Credit memos allow
the customer to receive credit for returned merchandise or overcharges.
Blanket (B) type orders are orders that merely record the customer's
desire to receive a series of shipments at specified times in the future. The
customer might order 10,000 widgets with the agreement that the widgets will be
shipped at the rate of 1,000 a month for the next 10 months. In this case, you
would enter a blanket order for the 10,000 widgets as 10 line items with 1,000
quantities each and increment the request date as necessary to cover the next
10 months. Prior to each shipment you would utilize the application that
generates regular orders from blanket orders to create a regular order for each
1,000 widgets. Once the regular order has been created you can select the
widgets for billing just as you would have had they been entered on a regular
order.
Quotes can also be entered as a separate order (Q) type.
If the customer decides to order all or part of the items that have been
quoted, you can change the quote into an order. An order quote form can be
printed for the customer through the Print Order Quote made on the Order Entry
menu bar.
Adding Orders
Regular orders, blanket orders, and quotes are entered
through two screens. In the case of invoices and credit memos a third screen is
required. The first screen involves entering the order header information.
This is the general information pertaining to the order such as the customer
number, billing address, shipping address, shipping instructions, payment
terms, sales tax percent, shipping warehouse, etc. This information is entered
on a single screen at the time the order number is assigned. Once the order
header has been entered the program advances to the next screen.
On the second screen of Order Entry, the items that the
customer ordered are specified. The program allows the entry of the item
number, quantity ordered, quantity to ship, unit price, discount percent, unit
cost and request date. This order information for an item is referred to
throughout this section of the manual as a line item since it is one line on
the order and pertains to a particular item. All order types provide for the
entry of line items, although for credit memos you would be entering the
quantity credited rather than the quantity ordered and you would be specifying
the quantity to return to inventory rather than the quantity to ship.
With the entry of a quote, inventory will not be affected
until the quote has been changed to an order through change. Once the line
items have been entered for regular orders and blanket orders, the program
returns for entry of the header screen for the next order. For invoices and
credit memos, however, more information is required.
As mentioned above, invoices and credit memos utilize the
one‑step billing procedure whereby they are ready to be billed as soon as
they have been fully entered here. When entering documents of either of these
types, the program will advance to a third screen once all the line items have
been entered. This screen accepts entry of such data as miscellaneous charges,
freight charges, salesman commission amount and comments that print on the invoice.
For invoice type orders, this screen also allows the entry of a cash receipt
associated with the order, as in the case where the customer sends in a deposit
with the order or where the customer is on a cash‑with‑order basis
because of past credit history. This feature provides for a rudimentary point‑of‑sale
capability.
Printing The Edit List
Once a batch of orders has been entered the operator may
find it useful to print an edit list of what was entered. The Order Edit List
shows all of the information that was entered by the operator. If the customer
exceeds his credit limit with an order, the edit list will print a warning
message to alert the operator to this condition. It is further possible to
specify that the edit list be printed only for those customers who are over
their credit limit.
Printing Order Acknowledgments
An Order Acknowledgment is a report that summarizes for
the customer what the customer ordered. It shows all pertinent information
such as the billing and shipping addresses, shipping instructions, purchase
order number, payment terms and discounts, as well as the quantity ordered and
price of each item on the purchase order. The acknowledgment also prints the
address and phone number of the person or department, which should be contacted
in the event of any discrepancies.
Printing Order Quotes
Once the quotes have been entered for the customer, a
listing of all line items quoted can be printed in letter form for the
customer. This letter will include a correspondence address and can include
the name of the person to whom the correspondence should be sent. It shows all
pertinent information such as billing and shipping addresses, shipping
instructions, order number, customer number, etc.
Profit Centers/Department (If applicable)
If your company uses profit center accounting (as
specified in the Company File) the Customer Order Processing package allows
revenue generated by orders to be tracked by distribution center or by product
category. The method used is determined by your response to the Profit Center
Usage question in COP Setup. If your answer to this question was P (Product
Category Profit Centers) then your profit center orientation will be by product
category and there will be Sales and COGS accounts associated with each line
item on an order.
If your answer was O (Order Profit Center, department, if
applicable) then your profit center for all line items on an order will be
entered with the order header information. This subject is discussed in the
section describing COP Setup and Prod Cat/Acct Maintenance as well as in the
Run Instructions for Order Entry.
Multiple Salesmen For An Order
It is possible that more than one salesman may be
eligible for a commission on an order. The Order Entry application allows up
to three salesmen to share the commission.
The operator must enter the salesman number for each of
the sales‑people receiving a commission as well as each salesman's
percent of the total commission amount. When the order is posted, part of the
information that gets transferred to Accounts Receivable files is each
salesman's commission due.
If there is only one salesman associated with the order,
enter that salesman's number and specify the percent of commission as 100%.
This 100% simply means it is not split with other sales people. If there are
no sales people for the order, enter the default salesman's number and 100% of
the commission, later when the commission amount is entered, specify a
commission of zero.
Another way commissions can be set to zero is by setting
up a salesman with a number of XXX who always get a commission of zero. Then
to force a zero commission for an order, the operator would enter XXX as the
order's salesman.
If the order has multiple sales people the system will
automatically calculate the order commission percent using the following
formula:
|
(Slm#1 Comm % x Slm#1 % of Comm /
100) +
|
|
(Slm#2 Comm % x Slm#2 % of Comm / 100) +
|
|
(Slm#3 Comm % x Slm#3 % of Comm / 100) =
|
|
Order Commission Percent
|
Using the above formula, let's assume
the order sale amount is $1,000 and there are three sales people splitting the
commission. Salesman #1 has a commission percent of 5% and will get 50% of the
total commission, Salesman #2 has a commission percent of 2% and will get 30%
of the total commission and Salesman #3 has a commission percent of 1% and will
get 20% of the total commission.
The order commission percent will be
calculated as follows:
|
5 x 50
|
|
2 x 30
|
|
1 x 20
|
|
|
|
─────
|
+
|
─────
|
+
|
─────
|
=
|
3.30%
|
|
100
|
|
100
|
|
100
|
|
|
The total commission amount for this
order will be $33.00 ($1,000 x 3.30%). The commission amount earned by each
salesman will be as follows:
|
Salesman #1
|
$16.50
|
($33.00 x 50%)
|
|
Salesman #2
|
$ 9.90
|
($33.00 x 30%)
|
|
Salesman #3
|
$ 6.60
|
($33.00 x 20%)
|
|
Total
|
$33.00
|
|
Controlled And Non‑Controlled Items
The subject of controlled and non‑controlled items
is discussed in the Inventory Management documentation. You may refer there
for more detailed information on the subject. Basically, an item that is
controlled is an item with a unit value great enough to warrant monitoring its
availability. The chassis for a transistor radio would be controlled. A lock
washer used in the radio's assembly probably would not be, since the expense of
controlling the item exceeds the item's value. Order Entry will always meet
the quantity required, but for non‑controlled items the program simply
assumes that there are always adequate stocks.
Stocked And Non‑Stocked Items
As with controlled and non‑controlled items, the
subject of stocked and non‑stocked items is discussed in detail in the
Inventory Management documentation.
A stocked item is one, which is available in inventory in
the form in which it will be delivered. If radios were a stocked item, radios
would be stored in inventory and be available for shipment to customers. If
radios were a non‑stocked item, radio parts would be stored in inventory
and would have to be assembled before the finished goods could be shipped to
the customer.
All non‑stocked items should have a bill of
material or feature/option configuration on file in BOMP or a kit structure on
file in I/M.
If a non-stocked item has serial/lot components, a record
will be created in the COP Serial/Lot Transaction File for each component
item. These components must be issued from Inventory Lot/Serial File by
running the Issue Serial/Lot Components Items application from the Processing
menu bar.
The picking ticket for a non‑stocked item may
consist of that item's bill of material. You may refer to the BOMP
documentation for more information on the bill of material and feature/option
configurations. Refer to the I/M documentation for more information on non‑stocked
items and kit structures.
Adding Customers During Order Entry
During the entry of orders it may happen that an order
arrives from a customer who has not yet been assigned a customer number. You
may add this customer to the Customer File without the inconvenience of exiting
from Customer Order Processing. In order to do this you may assign an unused
customer number to the customer during entry of the order. The program will
inform you that the customer is not on file and ask if you wish to add it. If
you answer Y, you will be allowed to add a new customer record by using the F1
key.
Item Pricing
For stocked items, the program will automatically
calculate the price and display it as a default in the Unit Price field. This
price is based on the appropriate price code or, in the case of sale pricing,
the sale price specified in the Inventory Item record. Refer to the Item File
Maintenance section of the Inventory Management manual and the Price Code File
Maintenance section of this manual for more information on sale pricing and
price codes.
If the Bill Of Material Processor package is being used,
the Order Entry application supports the ordering of feature items. The price
of a feature item is calculated when the user selects options for the features
(components) that make up the item. These selections are made via windows that
pop-up when the cursor is placed on the Unit Price field. To change the unit
price for a feature item, the user must change the component price(s) using the
feature selection window.
Options for feature items may be individually selected
for special pricing by setting the S (special pricing) flag in BOMP's
Feature/Option Configuration File Maintenance application to Y. For more
information on feature items, refer to the Feature/Option Configuration File
Maintenance section of the BOMP manual.
COP also supports kit items from the Inventory
Maintenance package. Like feature items, prices for kit items are calculated
via a pop-up window. The main difference is that the exact structure of a kit
is predetermined in the I/M Kit File Maintenance application. Kit components may
not be added during Order Entry. Additional items may be ordered by adding
another line item to the order. The price of a kit item is determined by the
Rollup Price? flag set in the Item File Maintenance application. For more
information on kits and the Rollup Price? flag, refer to the Kit File
Maintenance section of the I/M manual.
Once the unit price has been entered (or the default
value accepted) the program will request entry of the line item discount
percent, which defaults to the discount percent entered on the first screen of
the order. If sale pricing is in effect this field may default to zero
depending on the nature of the sale (as specified in the Inventory Item
record). The user may choose to enter a discounted unit price instead of a percent.
In this case the discount percent is calculated automatically.
The extended price of the line item then is the unit
price multiplied by the quantity to ship, then adjusted by the discount
percent.
Modifying COP Orders Copied Into BOMP
Orders containing feature items may be copied into the
BOMP package for production. These orders may be changed or deleted exactly
like any other COP order as long as production has not started in BOMP. If the
production work order has been printed or if any production has been reported
in BOMP, the order may no longer be modified or deleted through COP.
For information on copying COP orders see the Copy COP
Orders Into BOMP section of the BOMP manual. For information on feature items
and changing or deleting orders during production, see the Package Overview
section of the BOMP manual.
Order Request Date
The customer's order will indicate the desired receipt
date for the merchandise. The receipt date may be specific; it may be within a
range of dates (after May 1 but before May 15); it may be up to a certain date
(before May 10), or it may be immediate. The date may be for the entire order
or there may be different requested receipt dates for each of the items on the
order. When you enter an order in Customer Order Processing you will enter a
shipping date. This date serves as the default for the request date. The date
that the system uses to monitor when shipments should be made is the request date.
The request date is entered for each item on the order.
When you print picking tickets you will enter a request date cut‑off as
well as a range of order numbers. The program will print a picking ticket for
each order within the order number range that has at least one line item for
which the request date falls on or before the request date cut‑off. All
line items on the order that meet that requirement will be printed. Since the
printing of a picking ticket initiates the shipping and billing procedure it is
evident that the request date that is entered for a line item must be such that
the merchandise will arrive by the customer's desired receipt date.
If you find that for a particular order or item it will
be necessary to postpone shipment beyond the request date and a new date is
negotiated, you may enter a promise date for each affected line item. Once
entered, this date will become the date that the picking tickets program
compares to the request date cut‑off when determining which line items to
include in this shipment. The request date will remain on file but will serve
as a reference date only.
Payment With The Order
Order Entry allows you to process a cash receipt during
the entry of an order for I (Invoice) type or during Select For Billing in the
Order Billing application for O (Order) type orders. This feature allows you
to process order deposits and cash‑with‑order sales as well as over‑the‑counter
sales. The only restriction is that the order type be I (Invoice), or O
(Order) in the Order Billing application.
You enter the order as you normally would. On the third
screen you will be asked to enter the payment amount. If the amount is not
zero you will also be asked to enter the discount amount, check number, and
cash account number. When the invoice is posted, this information will be
transferred to the appropriate
Accounts Receivable files, including the posting of an
A/R Open Item File Payment record that applies to the customer's newly posted
invoice record.
Serial Transactions
If the Serialized/Lot Items flag is S in I/M Setup and
the serialized item flag for this item is yes, then serialized item order entry
is allowed.
Serial numbers for items sold do not have to be in
stock. This flexibility allows serial numbers for items to be assigned during
order entry or during order billing. Serial numbers will only be requested for
Invoice type orders or Credit Memos during order entry. Serial numbers for
regular orders will be requested when selecting orders in the Order Billing
application.
Lot
Transactions
If the Serialized/Lot Items flag is L in I/M Setup and
the lot item flag for this item in the Inventory Item File is yes, then lot
number entry is allowed.
Lot numbers for items sold must be in stock. Lot numbers not on file for
the item cannot be assigned during order entry or during order billing. Lot
Numbers must be entered in inventory by using the Inventory Management or
Purchase Order and Receiving package.
Lot numbers will only be requested for Invoice type orders or Credit Memos
during order entry. Lot numbers for regular orders will be requested when
selecting orders in the Order Billing application.
Transfer Sales Order
A flag
has been added to customer file maintenance, Transfer Customer. If this flag
is set to “Y,” the system will allow input to the “Transfer To-Loc” and
“Transit Days” fields in the customer file. The idea is to set up your remote
warehouse location as a customer record. Instead of using “I/M Inventory
Transaction” or “I/M Inventory Transfer” to transfer the inventory, you can use
COP Sales Order to transfer inventory. Many organizations may wish to make the
transfer process just like the regular COP shipping process, due to their
shipping operations being tied to Picking Ticket, Shipping Verification,
Starship, Packing Slip and Bill of Lading.
When
you enter a sales order for the transfer customer, the sales amount will be
forced to zero (since this is an internal transfer). Even though the invoice
posting will not update sales and cost of goods sold, you may optionally enter
freight or a miscellaneous charge if cross division profit center billing is
applicable.
The
proper invoice, as well as other historical databases, will be updated so you
can track the details of what has been sent to a location. Since most of the
invoice history reports are used for sales analysis, they will exclude transfer
orders. Certain invoice history reports have options to include transfer
orders or print transfer orders only.
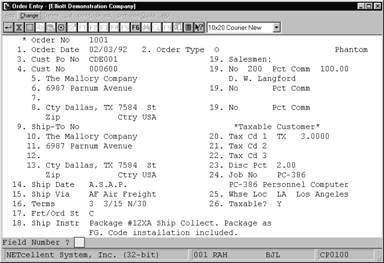
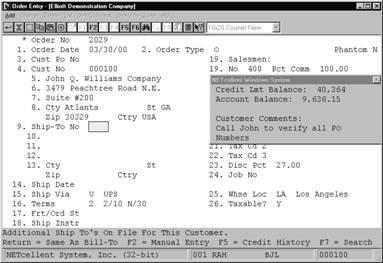
Select Order Entry from the pull down COP Processing
window. The following screen will then be displayed:
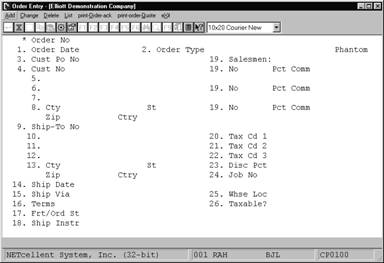
Order Entry Processing Entry Screen
The
following options are available:
* Select the desired mode from
the Order Entry menu bar.
* Enter the data requested on
the screen.
To return to the menu bar, press the ESC or F10 key. To
leave this application, press X for EXIT when positioned at the menu bar.
Entry Field Descriptions
Order Header Entry (See Order Header Screen in
Global Setup for additional options/features)
|
Name
|
Type
and Description
|
|
* Order No
|
6 numeric digits.
The manual entry of an order number will not affect the
automatic assignment of numbers. Only automatic order number assignment
through the F1 key will cause it to be incremented.
In add mode, press the F1 key for automatic assignment
of the next order number. The program will only allow order numbers which
are not already on file.
In change or delete mode,
the F1 key can be used to display the next order on file.
|
|
1. Order Date
|
A date in the standard date
format.
This is the date the order
was made. If any item on the order has a special sale price for a certain
time period (in the Inventory Item File), this is the date that will be used
to determine whether the order qualifies for the special price. Defaults to
today's date.
|
|
2. Order Type
|
1 alphanumeric character.
O = regular
order
I = invoice
C = credit
memo
B = blanket
order
Q = quote
A submenu will display to remind you of the options.
The entry defaults to O (regular order) on the first order entered and
thereafter defaults to the last type entered.
A regular order allows the
entry of header information and line items. The order and each of its line
items are kept on file until all of the items are billed, invoiced and posted.
|
|
Order Type (continued)
|
Partial billing (resulting
from incomplete shipments) is allowed and the original order number is
retained until all items have been billed, invoiced, and posted.
An invoice is similar to a regular order in that header
information and line items are entered. A third screen, upon which billing
information is entered, is also required. I type orders will be invoiced the
next time invoices are printed without any additional steps necessary.
This is known as the one‑step billing procedure,
as discussed in the Application Overview. Invoice type orders can be used to
accommodate point‑of‑sale transactions or to streamline the Order
Entry/ Billing process.
A credit memo, like an invoice, requires data to be
entered on all three screens. However, the entries made will credit, rather
than charge, the customer's account.
A blanket order records the customer's shipping
requirements for specific items over a period of time with none of the items
scheduled for immediate shipment. Each item that is ordered must have a
separate line item entered for each requested shipment. For instance, if the
customer orders 100 computers to be shipped at the rate of 10 per month for
10 months, 10 separate line items would need to be entered as each would have
a different request date.
Later, the blanket order will be activated from the
Activate Blanket Orders application and a regular order will be generated for
all blanket order line items whose request dates fall on or before the
activation date.
The requirements for blanket order activation will be
discussed in more detail later in the manual.
A quote order allows you to enter line items for a
customer as a quote only. This may be changed to an order through change, but
as a quote, inventory will not be affected.
This field defaults to the
last entry made.
|
|
RMA Status
|
When entering a Credit Memo,
an RMA Status field will be displayed with foure options:
W
= Waiting For Returns
P
= RMA Printed
R
= Received Returns
Space
= Not An RMA - just a regular credit memo
For detailed usage instructions, see Print RMA
Acknowledgements in the Reports Section of this manual.
|
|
Apply To
|
6 numeric digits (999999).
For credit memos, enter the
number of the invoice to which the credit applies. This field does not
display for other order types.
|
|
Apply To (continued)
|
If the customer is a balance forward type customer,
this field will not be transferred to the A/R Open Item File; it is just for
documentation within COP.
|
|
3. Cust Po No
|
10 alphanumeric characters.
Enter the customer's
purchase order number. This field serves a documentary purpose and is useful
to have when corresponding with customers.
|
|
4. Cust No
|
6 alphanumeric characters.
Enter the customer number. The number entered would
commonly be that of a customer on file in the Customer File. The program,
however, does allow new customers to be added during the entry of orders. If
an invalid number is entered the screen will display:
Customer Not On File ‑ Do You Wish To Add It?
If you answer Y, the customer search window will
appear. Press the F1 key to add a new customer.
If the number for a miscellaneous customer is entered,
the program will allow you to type in the customer's name and address.
Miscellaneous customer numbers are any which begin with an asterisk. Using a
miscellaneous customer enables you to enter a one‑time order for a
temporary customer without going to the trouble to set the customer up in the
Customer File.
Press the F7 key for customer search by number or
press the F8 key for customer search by name.
If the customer number is a
valid customer number, a window will be displayed. This window will contain
the customer's credit limit, account balance, and the customer's comments.
The customer comments will not be displayed if both comment lines were blank
on the customer's record in the Customer file.
|
|
5 - 7. Customer Name and Address
|
30 alphanumeric characters
for each of the four fields.
These fields usually display
the name and street address of the entered customer number from the customer
file. If a miscellaneous customer number was entered above, enter the
customer's name and address.
|
|
8. Cty, St, Zip, Ctry
|
(Cty) 15
alphabetic characters.
(St)
2 alphabetic characters.
(Zip) 10
numeric characters.
(Ctry) 10
alphabetic characters.
This line usually displays the city, state, zip code,
and country of the customer entered on line 4.
When using a miscellaneous
customer, enter the city, state, and zip code here. You may press the F2 key
to toggle between Free Form Address line or a specified City, State, and Zip
code format. Most overseas addresses will not fit into the regular format
and will require the use of the free form format.
|
|
9. Ship‑To No
|
4 alphanumeric characters.
Enter the Ship‑To code
that carries the shipping address requested by the customer. There are three
options available if you do not know the number of the correct Ship‑To
code or if Ship‑To codes have not been set up for the customer.
|
|
10 - 12. Ship-To Name and Address
|
30 alphanumeric characters
for each of the four fields.
These fields store the
customer's name and shipping address. They may be entered manually, although
they are more commonly displayed automatically when one of the options
described above is used. If entered, there are no requirements regarding
what may and may not be typed in. Any alphanumeric entry is acceptable.
|
|
13. Cty, St, Zip, Ctry
|
(Cty) 15
alphabetic characters.
(St)
2 alphabetic characters.
(Zip) 10
numeric characters.
(Ctry) 10
alphabetic characters.
You have the option to
change this address line to a Free Form format by pressing the F2 key.
|
|
14. Ship Date
|
A date in the standard date
format.
The entry is in MMDDYY
format. This is the date that the order is to be shipped. It defaults to
A.S.A.P. (as soon as possible). In fact, this field mainly serves a
documentary purpose because the application which prints picking
|
|
Ship Date (continued)
|
tickets looks at the request
dates entered for each individual line item to determine whether or not to
print the order and not at the ship date on the order itself.
The default for the request date on the individual line
items, however, is the ship date entered here, so if the order does not need
to be shipped until some specific time in the future, the date should be
entered here to speed entry of line items and to document this fact.
If a valid customer record
is found you have the option to default remaining fields by pressing the F1
key. However, if COP Setup is set to Profit Center Usage = 0, you will be
requested to enter field number 27 Pft Ctr.
|
|
15. Ship Via
|
2 alphanumeric characters.
Enter the Ship‑Via code for the means of
transportation that is to be employed when shipping the ordered merchandise.
The code entered must be a valid Ship‑Via code.
The entry defaults to the code specified in the Customer record. Once
the code is entered, the code's description displays beside the entry.
The shipping method is printed on the picking ticket
for the shipping department.
In add and change mode,
press the F7 key to search for ship via codes.
|
|
16. Terms
|
2 alphanumeric characters.
Enter the terms code for this order. The entry
defaults to the code on file for the customer. Once entered, a description
for the code displays beside the entry. The program requires the entry of a
valid Terms code. The information in the Terms Code record is used to
determine whether the customer is eligible for any payment discount at cash
entry time in Accounts Receivable.
In add and change mode,
press the F7 key to search for terms codes.
|
|
17. Frt/Ord St
|
1 alphanumeric character.
Enter the Freight Payment
code, Order Status code relevant to this order.
|
|
Frt/Ord St (continued)
|
C = Collect
P = Prepaid
H = Hold
A sub‑menu will display to remind you of the
valid options.
If the Freight Payment Code is collect, the system will
not expect entry of freight charges, although it is still allowed.
If Order Status code is H,
picking tickets and invoices will not be printed for this order. Also, you
will not be able to select the order if Order Type is (O)rder.
|
|
18. Ship Instr
|
2 fields of 40 alphanumeric
characters.
Enter here any shipping
instructions the customer requested on the purchase order or instructions
that are standard for the customer. These instructions will print on the
order acknowledgment and on the picking ticket.
|
|
19. Salesmen No
|
3 alphanumeric characters.
Three sales people may be specified to share the
commission on the sale. The salesmen numbers entered must be that of valid
salesmen. When a valid salesman is entered, the salesman's name displays on
the line below the entry.
A dummy salesman number, XXX, should be set up in the
Salesman File in case no commission is to be paid on a specific order. Then
, if no commission is to be paid, the operator could simply X out the first
Salesman field.
In add and change mode,
press the F7 key to search for salesman number.
|
|
Pct Comm
|
5 numeric digits with 2
decimal positions (999.99).
For each salesman who is to share the commission you
must specify what percent of the total commission each gets. This percent of
commission may not exceed 100.00. The sum of the three percents must equal
100.00. The entry defaults to the percent of commission that remains and
will therefore default to 100.00 for the first salesman.
The actual amount of the
commission is determined at billing time on the billing information screen.
|
|
20. Tax Cd 1
|
3 alphanumeric characters.
Enter the tax code that designates how this transaction
is to be taxed. If the tax code entered is not on file, an error message will
be displayed, and you will be prompted to enter another tax code.
You will not be prompted to enter a tax code here. If
no ship to number was entered, the program will use the default tax code 1
from the Customer's record in the Customer record. If you wish to change the
tax code, select this field at the Field Number ? prompt.
In add and change mode,
press the F7 key to search for tax codes.
|
|
Tax Pct
|
6 numeric digits with 4
decimal positions (99.9999).
You will not be prompted to enter a tax code percent
here. The program will use the tax percentage associated with tax code 1.You
must select tax code 1 from Field Number ? if you wish to change the tax
percentage. Press RETURN for the tax code and then enter the appropriate tax
percentage.
On the third screen (for
invoices and credit memos) where billing information is required you will be
asked to enter sales tax amount. The program calculates the default sales
tax amount (based upon the tax percent entered here and the value of taxable
items on the order). You may accept the default value at that time or
override it as you see fit.
|
|
21. Tax Cd 2
|
3 alphanumeric characters.
Enter the tax code that designates how this transaction
is to be taxed. If the tax code entered is not on file, an error message will
be displayed, and you will be prompted to enter another tax code.
You will not be prompted to enter a tax code here. If
no ship to number was entered, the program will use the default tax code 2
from the customer's record in the Customer File. You must select this item
when asked Field Number ? if you wish to change the tax code.
If no default is defined for tax code 2, then neither
the tax code or the tax percentage will be displayed.
In add and change mode,
press the F7 key to search for tax codes.
|
|
Tax Pct
|
6 numeric digits with 4
decimal positions (99.9999).
You will not be prompted to enter a tax code percent
here. The program will use the tax percentage associated with tax code 2. You
must select tax code 2 from Field Number ? if you wish to change the tax
percentage. Press RETURN for the tax code and then enter the appropriate tax
percentage.
On the third screen (for
invoices and credit memos) where billing information is required you will be
asked to enter the sales tax amount. The program calculates the default
sales tax amount (based upon the tax percent entered here and the value of
taxable items on the order). You may accept the default value at that time
or override it as you see fit.
|
|
22. Tax Cd 3
|
3 alphanumeric characters.
Enter the tax code that designates how this transaction
is to be taxed. If the tax code entered is not on file, an error message will
be displayed, and you will be prompted to enter another tax code.
You will not be prompted to enter a tax code here. If
no ship to number was entered, the program will use the default tax code 3
from the customers' record in the Customer File. You must select this item
when asked Field Number ? if you wish to change the tax code.
If no default is defined for tax code 3, then neither
the tax code or the tax percentage will be displayed.
In add and change mode,
press the F7 key to search for tax codes.
|
|
Tax Pct
|
6 numeric digits with 4
decimal positions (99.9999).
You will not be prompted to enter a tax code percent
here. The program will use the tax percentage associated with tax code 3.
You must select tax code 3 from Field Number ? if you wish to change the tax
percentage. Press RETURN for the tax code and then enter the appropriate tax
percentage.
On the third screen (for
invoices and credit memos) where billing information is required you will be
asked to enter the sales tax amount. The program calculates the default
sales tax amount (based upon the tax percent entered here and the value of
taxable items on the order). You may accept the default value at that time
or override it as you see fit.
|
|
23. Disc Pct
|
5 numeric digits with 2
decimal positions (999.99).
This is the line item
discount percent that can be taken in addition to any discounts inherent in
the line item's unit price. It can be thought of as a trade discount. The
entry will default to the discount specified in the Customer record. During
entry of line items this discount percent will display as the default discount
percent for the line item, to be accepted or overridden.
|
|
24. Job No
|
6 alphanumeric characters.
This field is used to update the Job History File when
posting invoices. It will be used to record billings against a job on the Job
Analysis Report in Accounts Receivable.
In add and change mode,
press the F7 key to search for job numbers.
|
|
25. Whse Loc
|
2 alphanumeric characters.
Enter the location code for the warehouse from which the merchandise
on the order is to be shipped. The entry must be for that of a valid
location. The location's description will display beside the entry. During
entry of line items, this is the location which the program will check to
determine if there are adequate stocks of the item or not.
This field defaults to the default location in the
Customer File.
In add and change mode,
press the F7 key to search for warehouse locations.
|
|
26. Taxable?
|
Y or N.
Enter whether the order is taxable or not.
If the customer is taxable, this field defaults to Y.
If the customer is non‑taxable,
this field defaults to N.
|
|
27. Pft Ctr
|
Standard Profit
Center/Department Account Number Format.
This field only displays if the Company File specifies
that there are profit centers/departments used throughout the system (profit
center/department is not zero) and if the COP Setup specifies that profit
centers/departments are order‑oriented rather than product category‑oriented.
If entered, all General Ledger sales and COGS transactions generated by this
order will have this profit center/department.
This field defaults to the
number entered on the previous order.
|
Line Item Entry (See Line Item Screen in Global Setup for
additional options/features)
|
Name
|
Type
and Description
|
|
1. Item No
|
15 alphanumeric characters.
Enter the item number of the item that was ordered. If
a specific number is entered, it must be that of a valid item on file in the
Inventory Item File.
In add mode you may press F1 to display the next item
on file in the Inventory Item File in item number order. This feature is
useful if the Item File is structured in such a way that product options for
an item follow the item record itself. The operator can press the return key
to quickly scan through the available options and select those that the
customer desires.
In change mode you may press F1 to bring up the next
line item on file for the order. You may use this feature to scan through
the line items, search for those that require change or simply review what
was entered.
You may press F2 to enter a comment in the body of the
invoice. After you press F2 you will be allowed to type comments into the
area in which the item's description would normally appear. There are two
lines of 30 characters each available for such comments on each line item.
All comments entered before a valid line item can be
printed on picking tickets. If the comments are entered after a valid line
item and the line item is not selected to print on picking tickets, the
comments will not print on picking
tickets. If a quantity is
backordered for a line item and comments are
|
|
Item No (continued)
|
associated with the
backordered line item, the comments will remain on file after posting orders
to Accounts Receivable.
A common use for this feature is to explain
substitutions and back orders on the previous or following line.
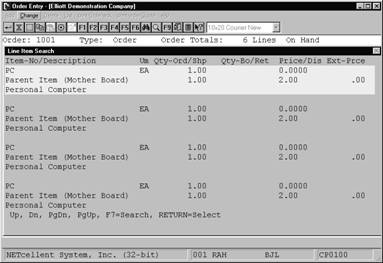
You may press the F6 key to display all line items that
have been entered thus far for this order. You may then highlight one of the
line items by using the up/down arrow keys.
While on the F6 Display Order screen, you have several
options. Press RETURN to display the highlighted line item. Press the F3
key to insert a line item or comment before the highlighted line
item. Press the F7 key to search sequentially for the line items on the
order. This can be especially useful on orders with large numbers of line
items.
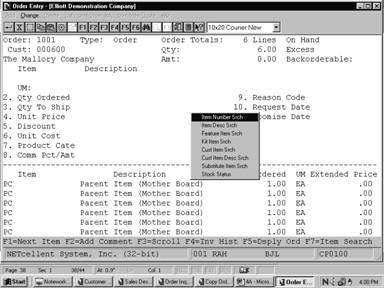
From the line Item Entry screen, press the F7 key to bring up the item
searches window. This window allows the user to search by item number or
item description. It also allows searches for feature or kit items.
This application will allow you to enter more than one
line item with the same item number. This is to cover the possibility that
the customer is getting some of the item at one price and others at another
price. In change mode, if a specific item number is entered which was not
entered previously, the application will ask if you wish to add the item. If
there are already items on file with the same item number, it will first
bring each one up, one at a time, and ask if they are the right line item.
If you answer Y to any of
these, you will be allowed to enter changes; if you answer N to all of them,
the system will ask if you wish to add the item.
|
|
Print Components On
Invoice Acknowledgements / Quote ?
|
Y or N.
This window will only
display if the line item entered is a kit or feature item. Enter Y to print
the components of the item on the invoice. Enter N to only print the parent
item. Defaults to N.
|
|
Item Description
|
Two fields of 30 characters
each.
Normally this field is
displayed once the item number has been entered. If a miscellaneous item
number (any number beginning with an asterisk) is entered, you may type in
the item's description.
|
|
Unit of Measure
|
2 alphanumeric characters.
If the stocking unit of measure is the same as the
selling unit of measure, this selection will not prompt an entry here. The
selling unit of measure will be displayed.
If the stocking unit of measure for this item is not
the same as the selling unit of measure for this item, then the program will
prompt you to select the correct unit of measure to use.
If the selling unit of measure is selected, the program
will use the sell to stock ratio to calculate the correct quantities to be
adjusted in the Inventory Item File for this item.
Press F1 to use the selling
unit of measure or press F2 to use the stocking unit of measure.
|
|
2. Qty Ordered
|
A standard quantity format.
For regular orders, blanket orders, and invoices, enter
the quantity ordered. For credit memos, enter the number of items for which
the customer is receiving credit. You may enter a negative quantity ordered
on a regular order or invoice to indicate credit for a specific line item.
In change mode, changing a line item's quantity ordered
to zero will give you the following options:
Delete
the line item
Cancel
the line item
Close
the line item
Delete usually means you made a
data entry error and the line item should be deleted. Cancel means
the customer changed their mind and they no longer want this line item. In
that case, Elliott keeps the line item for audit analysis and marks it as
“Canceled.” Close means you are not able to deliver this item.
Elliott keeps this line item for audit analysis and marks it as “Closed.” By
retaining the “Canceled” and “Closed” line items, future analysis can be done
for these items.
Users
can also “Short Ship” a line item, even if the line item is backorderable.
For example, if a customer ordered 10 each of Item A and we decide we can
only ship them 7, normally the Qty Backorder becomes 3. Upon shipping the 7
and posting the invoice, the 3 become the balance of the order. In some
situations, we may decide not to keep the 3 as backordered (i.e. to make 3
out of stock). If the item is set to “not backorderable,” then this will
happen automatically. Items that are backorderable, the user may optionally
press the F3 key at the unit price field to make the 3 as Out of Stock
instead of Backordered. Upon the posting of this line item, it will be
closed out automatically. The user may not want to enter the Quantity
Ordered as 7 because (1) The correct quantity ordered should be entered for
documentation purpose; (2) The stock situation may change and you may be able
to fill the full order quantity before the shipping date.
You
can also mass close out an item by changing the item status code from
“Active” to “Obsolete.” The system can prompt the user to close out all of
the outstanding COP line items.
For regular orders only, if the entered item is
serialized and the quantity ordered is greater than 1, the system will ask
the question Create Multiple Line Items For Serialized Item?. If you answer
yes to this question, the system will create multiple line items on the order
with a quantity ordered of 1 for each line item. This allows you to enter a
multiple quantity ordered for a serialized item and later during billing
assign each line item an individual serial number.
Press the F2 key if you want to change the item description
for this line item only.
If the item is stocked and
controlled, the quantity available at the order location will be displayed at
the top of the screen. This is the quantity on hand minus the quantity
already allocated.
Press the F7 key if you wish
to view the price level break information for this item according to the
Price Code File.
|
|
3. Qty To Ship
|
A standard quantity format.
For regular orders, blanket orders, and invoices, enter
the quantity to ship. The available quantity and backorderable status of the
item will display on the bottom line of the screen.
If the available quantity is less than the quantity
ordered you may ship what is available or specify the entire amount ordered
to be shipped even though current stocks are not adequate as long as you are
not using LIFO or FIFO costing. If the quantity to ship is less than
quantity ordered, the difference will be backordered if the item is
backorderable and be declared out of stock if the item is not backorderable.
If the quantity to ship is greater than the quantity available, a warning
will display, and a beep will be heard.
Other than giving the warning, this application does
nothing to prevent entering quantities to ship greater than quantities
available, as long as you are not using LIFO or FIFO costing.
For credit memos, enter the quantity to return to
inventory. This may be equal to or less than the quantity credited. A
customer may get credit for returned merchandise where only part of the merchandise
is suitable for return to stocks.
When a negative quantity ordered is entered for regular
orders and invoices, you will be expected to enter the quantity to return to
inventory. This is accomplished by entering a negative quantity to ship.
If the quantity to ship is greater than the quantity
available and this item has a valid substitute item number, the system will
ask the question Do You Wish To Use Substitute Item?. If you answer yes to
this question, the substitute item number will automatically be displayed and
you will be
asked to re‑enter quantity ordered.
For Order Quotes, this field
will be skipped.
|
|
4. Unit Price
|
10 numeric digits with 4
decimal positions and an optional minus sign (999,999.9999‑).
The program will automatically calculate the default
item price based upon the pertinent price code and any current sales, then
display it. You may accept the default value or manually override it.
If the item is a feature or
kit item, the unit price will be calculated differently. Refer to the tables
below for more details.
|
|
5. Discount Pct
|
5 numeric digits with 2
decimal positions (999.99).
The discount percent entered on the first screen will
display as the default. You may accept it or override it by manually
entering a new value. If entered, the discount percent may not exceed
100.00.
Press the F3 key to enter a
discounted unit price for the item. You may then enter the unit price at
which you wish to sell the item. The application automatically calculates
and displays the discount percent. To accept the calculated percent, press
RETURN.
|
|
6. Unit Cost
|
10 numeric digits with 4
decimal positions and an optional minus sign (999,999.9999‑).
For stocked items, the unit cost defaults to the
appropriate cost figure (average last, or standard) in the Inventory Item
record.
If you are using LIFO or FIFO costing method or if the
Cost To Use When Posting flag in the COP Setup is set to Actual Cost, the
item unit cost will be calculated when the invoice is posted.
If you wish to change the default value, you can only
do so by using Field Number?.
For kit items, this field may only be changed by
adjusting the quantity per assembly for the components.
Also, this field will not be
displayed if COP Setup field #12, (Display Item Cost At Line Entry Time) is
set to N.
|
|
7. Request Date
|
A date in the standard date
format.
Enter the date in MMDDYY format. The entry defaults to
the system date if the ship date on the order is A.S.A.P.; otherwise, it
defaults to the ship date on the order.
For regular orders and invoices
this date is used to trigger the printing of picking tickets. For blanket
orders, it is used to trigger the activation of line items. In both Print
Picking Tickets and Activate Blanket Orders you will be requested to enter a
cut‑off date for processing. The programs will compare this cut‑off
date to the request dates of individual line items when determining whether
to process the line item.
|
|
8. Promise Date
|
A date in the standard date
format.
In the event that the
original date promised (request date) must be renegotiated, the new date will
be entered here with the original request date remaining on file. After a
promise date has been entered it is this date that is used for comparison
during the printing of picking tickets and the activation of blanket orders.
|
If the line item is a feature item, the following fields
will appear. Feature items may be used only if the Bill Of Material Processor
package is installed. See the Feature/Option Configuration File Maintenance
section in the BOMP documentation for more information.
|
Name
|
Type
and Description
|
|
4. Unit Price
|
10 numeric digits with 4
decimal positions and an optional minus sign (999,999.9999‑).
If the line item is a
feature item, the unit price is calculated on a Feature Selection window.
Features may be selected from options defined in the BOMP Feature/ Option
Configuration File Maintenance application.
|
|
Ftr
|
3 numeric digits.
|
|
Ftr (continued)
|
Select the desired feature
code. This number must already exist in the Feature/Option Configuration
File Maintenance application. Press the F7 key to search for product
features. Press RETURN to select the default or next feature number.
The feature number, its
description and whether the feature number is required or optional is
displayed at the bottom of the window.
|
|
Opt
|
3 numeric digits.
Automatically displayed.
A window will display the available options that have
been defined for this particular feature code. The option item number,
description, quantity per, unit price, and the availability of this option at
this location will be displayed. Use the arrow keys, page up or page down to
highlight a desired option. Press RETURN to select an option.
If the feature is required for the feature item, an
option must be selected. If there is only one option under a required
feature, it will be automatically selected. If the feature is optional,
option number 000 (Non-Selection Of Optional Feature) may be selected.
Once the options have been
selected, the user may press the F7 key to redisplay the options window.
|
|
Option Item No
|
The inventory item number will automatically display.
|
|
Item Description
|
The item description will automatically display.
|
|
Qty/Per
|
10 numeric digits with 6
decimal places and an optional minus sign (9,999.999999-).
The quantity per for the selected option will
automatically display. This is the quantity of this option that will be used
to assemble one of the feature items as defined in BOMP's Feature/Option
Configuration File Maintenance application.
This field may only be changed if the Chg ? flag for
this option is set to Y in that application.
For example, if a personal computer system was usually
equipped with one
5 1/4" floppy disk
drive, this field would contain a one. If a customer ordered a system with two
5 1/4" drives, and the Chg ? field for this option is set to Y in
BOMP, the user could change the quantity per to two.
|
|
Unit Price
|
The unit price for each
option selected will automatically display. A unit price total is displayed
at the bottom of the window.
The unit cost will total to
the left of the unit price if field #12 Display Item cost At Line Entry Time
? in COP Setup is set to Y. If set to N, this total will not display.
|
If the line item is a kit item, the following fields will
appear. For more information on kit items, see the Kit File Maintenance
section of the I/M manual.
|
Name
|
Type
and Description
|
|
4. Unit Price
|
10 numeric digits with 4
decimal positions and an optional minus sign (999,999.9999‑).
If the line item is a kit item, its components will be
displayed on a window. These components were defined in the I/M Kit File
Maintenance application. The window displays the component item number,
description, quantity per kit, and unit price for each. The total kit price
is displayed at the bottom. The kit cost is displayed if the Display Item
Cost At Line Item Entry Time? flag in COP Setup is set to Y.
To make changes to the kit
configuration, the user may adjust the unit price for each component. New
components may not be added during Order Entry. To order additional items
another line item may be added to the order.
|
The following entries will be requested after the item
number is entered if the item has lot numbers and the order is an Invoice type
order or a Credit Memo:
|
Name
|
Type
and Description
|
|
Lot No
|
15 alphanumeric characters.
This is the lot number of the item being sold and/or
returned‑to‑stock. A valid lot already on file must be entered.
Press the F7 key to search
for lot numbers.
|
|
2. Qty
Ordered/Credited
|
Same as Line
Item Entry except quantity ordered can not be greater than lot quantity
available.
|
|
3. Qty To
Ship/Ret To Inv
|
Same as Line
Item Entry except quantity to ship can not be greater than quantity ordered.
|
|
4. Unit
Price
|
Same as Line
Item Entry.
|
|
5. Discount
Pct
|
Same as Line
Item Entry.
|
|
6. Unit
Cost
|
Same as Line
Item Entry.
|
|
7. Request
Date
|
Same as Line
Item Entry.
|
|
8. Promise
Date
|
Same as Line
Item Entry.
|
The following entries will be
requested if the item has serial numbers and the order is an Invoice type order
or a Credit Memo:
|
Name
|
Type and Description
|
|
2. Qty
Ordered/Credited
|
Same as Line
Item Entry except quantity ordered can not be greater than 1 or less than ‑1.
|
|
3. Qty To
Ship/Ret To Inv
|
Same as Line
Item Entry except quantity to ship can not be greater than 1 or less than ‑1.
|
|
4. Unit
Price
|
Same as Line
Item Entry.
|
|
5.
Discount Pct
|
Same as Line
Item Entry.
|
|
6. Unit
Cost
|
Same as Line
Item Entry.
|
|
7. Request
Date
|
Same as Line
Item Entry.
|
|
8. Promise
Date
|
Same as Line
Item Entry.
|
|
9. Serial
No
|
15 alphanumeric characters.
This is the
serial number of the item being sold and/or returned‑to‑stock.
Press the F7 key to search for serial numbers. The serial number does
not have to be a valid serial number on file. Serial numbers may be assigned
to the item as it is sold.
|
You can add an F6 Note to each serial
number. First, enter all of the serial numbers and then in Change mode you can
press F6 to add the Note as each serial number is highlighted.
Billing Data Entry Screen For "I"
Type Orders
(See Order Billing Screen in Global Setup for additional
options/features)
|
Name
|
Type
and Description
|
|
1. Misc Charges
|
7 numeric digits with 2
decimal positions and an optional minus sign (99,999.99‑).
Enter the amount of any
miscellaneous charges such as packing, handling and special order charges.
|
|
Misc Acct
|
An account in the standard
account format.
If the distribute miscellaneous charges flag is set to
N in the A/R Setup, no entry will be required and the default account will be
displayed automatically. If the distribute miscellaneous charges flag is set
to Y in the A/R Setup, you will be required to enter the miscellaneous
charges account to which the charges will be posted.
The entry or automatic display will default to the
default miscellaneous charges account specified in the Ship Via Code File
Maintenance in A/R.
If profit center usage is set to O in the COP Setup,
the profit center and department (if applicable) entered on the first screen
(field #27) will try to find a valid account using the information entered on
the first screen and the main account entered in the ship via code. If no
valid match is found in the account file, this entry will default to the
miscellaneous charges account specified in Ship Via Code File Maintenance in
A/R.
Pressing the F7 key will
allow you to search the account by number or pressing F8 key will allow you
to search for an account by description.
|
|
2. Freight
|
7 numeric digits with 2
decimal positions and an optional minus sign (99,999.99‑).
Enter the freight charges
amount if applicable. If you entered a Freight Payment code of C (collect)
for the order, you will not be prompted for an entry of this field, but you
may change the field, using Field Number ?.
|
|
Freight Acct
|
An account in the standard
account format.
If the distribute freight charges flag is set to N in
the A/R Setup, no entry will be required and the default account will be
displayed automatically. If the distribute freight charges flag is set to Y
in the A/R Setup, you will be required to enter the freight charges account
to which the charges will be posted.
The entry or automatic display will default to the
default freight charges account specified in the Ship Via Code File
Maintenance in A/R.
If profit center usage is set to O in the COP Setup,
the profit center and department (if applicable) entered on the first screen
(field #27) will try to find a valid account using the information entered on
the first screen and the main account entered in the ship via code. If no
valid match is found in the account file, this entry will default to the
freight charges account specified in Ship Via Code File Maintenance in A/R.
Pressing the F7 key will
allow you to search the account by number or pressing F8 key will allow you
to search for an account by description.
|
|
3. Sales Tax
|
8 numeric digits with 2
decimal positions and an optional minus sign (999,999.99‑).
The program will automatically calculate the sales tax
amount based upon the order's tax percent‑1 and the value of taxable
sales. It will display this value as the default. You may accept the
default or override it.
The program will
automatically display the tax code for tax code‑1.
|
|
4. Sales Tax
|
8 numeric digits with 2
decimal positions and an optional minus sign (999,999.99‑).
The program will automatically calculate the sales tax
amount based upon the order's tax percent‑2 and the value of taxable
sales. It will display this value as the default. You may accept the
default or override it.
If the order has a tax code‑2,
the program will automatically display the tax code for tax code‑2.
|
|
5. Sales Tax
|
8 numeric digits with 2
decimal positions and an optional minus sign (999,999.99‑).
The program will automatically calculate the sales tax
amount based upon the order's tax percent‑3 and the value of taxable
sales. It will display this value as the default. You may accept the
default or override it.
If the order has a tax code‑3,
the program will automatically display the tax code for tax code‑3.
|
|
6. Comm Pct
|
4 numeric digits with 2
decimal positions and an optional minus sign (99.99‑).
If the Calc Commission
Method field in COP Setup is not by item, the program will automatically
calculate the order commission percent based upon the normal commission
percents of each of the salespeople adjusted for the percent of the
commission that each is getting. You may accept this value or override it.
|
|
7. Comm Amount
|
8 numeric digits with 2
decimal positions and an optional minus sign (999,999.99‑).
If the Calc Commission Method field in COP Setup is not
by item, the program will automatically calculate the commission amount based
upon the commission percent entered above and the order's net sale amount or
the order's net margin amount. You may accept this default or override it.
If you change the commission amount the commission percent will change accordingly.
If the Calc Commission
Method field in COP Setup is by item, the program will automatically display
the commission amount calculated during order entry for all the items on the
order.
|
|
8. Comments
|
3 fields of 35 alphanumeric
characters each.
Enter the comments that you
wish to appear on the customer's invoice or leave these fields blank to have
them be assigned default comments at the time invoices are printed.
|
|
9. AR Reference
|
30 alphanumeric characters.
Enter a brief description of the transaction or some
comments about it. What you enter in this field is entirely up to you.
The default reference consists of a brief description
of the transaction type. For example, if the transaction is an invoice type
and you press the RETURN key for the reference, the program will insert a
default of:
PO#
9999999‑99 OUR ORD# 999999
|
|
10. Amount Paid
|
9 numeric digits with 2
decimal positions (9,999,999.99).
This and the following four fields will be entered only
for invoice type orders. If the customer sent in payment with the order you
may record the cash receipt here rather than in Accounts Receivable.
Enter the amount of the
payment or simply press RETURN to skip entry of the field. If there is no
payment amount entered you will not be prompted to enter the remaining
fields.
|
|
11. Disc Allowed
|
8 numeric digits with 2
decimal positions (999,999.99).
Enter the discount allowed
for the payment.
|
|
12. Check No
|
6 numeric digits (999999).
Enter the number of the
customer's check. A non‑zero check number is required, so if payment
was made by some other means than a check you will have to improvise a number
(the date, for instance).
|
|
13. Check Date
|
A date in the standard date
format.
Enter the check date for the invoice.
Defaults to the system date.
|
|
14. Csh Act
|
An account in the standard
account format.
If there are multiple cash
accounts specified in A/R Setup you must enter here the cash account to which
the payment will be posted. The entry will default to the default cash
account specified in A/R Setup.
|
|
Csh Act (continued)
|
Pressing the F7 key will allow you to search for the
account by number or pressing the F8 key will allow you to search for the
account by description.
|
List
|
Name
|
Type
and Description
|
|
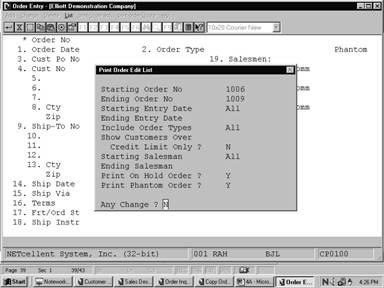
Starting Order No
|
6 numeric digits (999999).
Enter the lowest order
number that is to be included in the range of orders to be printed. The
entry defaults to All.
|
|
Ending Order No
|
6 numeric digits (999999).
Enter the highest order number that is to be included
in the range of orders to be printed.
The entry defaults to the
starting order number's value.
|
|
Starting Entry Date
|
A date in the standard date
format.
Enter the earliest order entry date that is to be
included in the range of orders to be printed.
The entry defaults to All.
|
|
Ending Entry Date
|
A date in the standard date
format.
Enter the latest order entry date that is to be
included in the range of orders to be printed.
The entry defaults to the
starting entry date's value.
|
|
Include Order Types
|
5 1‑character
alphanumeric fields.
The valid order types are O,
I, B, C and Q. If you press RETURN for the first field, the group defaults
to All. Otherwise, enter the specific order types that are to be considered
for this range of orders.
|
|
Show Customers
Over Credit Limit Only ?
|
Y or N.
If you answer Y, only those orders for customers who are over their
credit limit are shown.
The entry defaults to N.
|
|
Starting Salesman
|
3 alphanumeric characters.
Enter the starting salesman number for the range of
orders to print.
Pres the F7 key to search for salesman numbers.
Defaults to All salesmen.
|
|
Ending Salesman
|
3 alphanumeric characters.
Enter the ending salesman number for the range of
orders to print.
Press the F7 key to search for salesman numbers.
Defaults to the starting
salesman number.
|
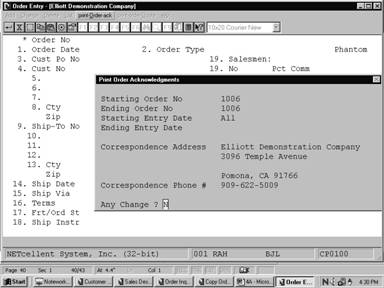
Print Order Acknowledgments
|
Name
|
Type
and Description
|
|
Starting Order No
|
6 numeric digits (999999).
Enter the lowest order number that is to be included in
the range of orders to be printed.
Defaults to All.
|
|
Ending Order No
|
6 numeric digits (999999).
Enter the highest order number that is to be included
in the range of orders to be printed.
The entry defaults to the starting
order number's value.
|
|
Starting Entry Date
|
A date in the standard date
format.
Enter the earliest order date that is to be included in
the range of orders to be printed.
The entry defaults to All.
|
|
Ending Entry Date
|
A date in the standard date format.
Enter the latest order entry date that is to be
included in the range of orders to be printed.
The entry defaults to the
starting entry date's value.
|
|
Correspondence Address
|
4 30‑character
alphanumeric fields.
Enter the address to which you wish customer
correspondence regarding the order to be sent. The address would include the
department name or number and perhaps the name of the person to whom the
correspondence should be sent. This address will print on the order
acknowledgment with instructions regarding its use.
The entry defaults to the
address stored in the company record.
|
|
Correspondence Phone #
|
20 alphanumeric characters.
Enter the phone number the customer should use to make
inquiries about the order as a result of reviewing the order acknowledgment.
There is sufficient space available to include both the area code and the
extension.
e.g., 614‑382‑5999
ext. 388
|
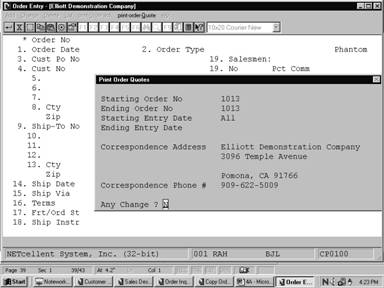
Print Order Quotes
|
Name
|
Type
and Description
|
|
Starting Order No
|
6 numeric digits (999999).
Enter the lowest order
number that is to be included in the range of orders to be printed.
|
|
Starting Order No (continued)
|
Defaults to All.
|
|
Ending Order No
|
6 numeric digits (999999).
Enter the highest order number that is to be included
in the range of orders to be printed.
The entry defaults to the
starting order number's value.
|
|
Starting Entry Date
|
A date in the standard date
format.
Enter the earliest order date that is to be included in
the range of orders to be printed.
The entry defaults to All.
|
|
Ending Entry Date
|
A date in the standard date
format.
Enter the latest order entry date that is to be
included in the range of orders to be printed.
The entry defaults to the
starting entry date's value.
|
|
Correspondence Address
|
4 30‑character
alphanumeric fields.
Enter the address to which you wish customer
correspondence regarding the order to be sent. The address would include the
department name or number and perhaps the name of the person to whom the
correspondence should be sent. This address will print on the order quote
with instructions regarding its use.
The entry defaults to the
address stored in the company record.
|
|
Correspondence Phone #
|
20 alphanumeric characters.
Enter the phone number the
customer should use to make inquiries about the order as a result of
reviewing the order quote. There is sufficient space available to include
both the area code and the extension.
|
 Screens Screens
Order Entry (Screen # 1)
F6 Display Order
F7 Item Search Options

Order Entry Line Items
Credit Limit Balance In Add
Mode
Print Order Quotes
Print Order Edit List
Print Order Acknowledgements
Run Date: Nov 1, 2001
- 2:49am Elliott Demonstration
Company Page 1
O R D E R E D I T L I S
T
Order-No:
300 Customer No: 000300 Ship-To No:
Shipping Instructions
Order Type: Regular
Order Brooks and Johnson, LTD. Brooks and Johnson, LTD.
Job
No: 9872 Round Circle Drive 9872 Round Circle
Drive
Loc: LA Los
Angeles Bldg. 19 Back Door Bldg. 19 Back Door
Knoxville TN 59006 Knoxville TN
59006
USA USA
Ord-Date Ent-Date
Cust-Po-No ---Ship Via---- Ship-Date Frt/Stat -----Terms-----
Slsman Pct-Comm Disc-Pct Tax-Pct2
Apply-To
Tax-Pct1 Tax-Pct3
10/31/01 10/31/01
2581 ABF TRUCKING A.S.A.P. Hld 2/10 Due
15th 400 100.00
*************** Warning - Customer Over Credit Limit
***************
Credit Limit
= 4,000 Customer Balance + Order Total =
11,884
Qty-Ord
Qty-B/O Item-No Description Um Unit
Dsc-Pct Extend Price Unit Cost
Qty-Ship Qty-Ret
Reason Code Prd Price Comm
Promise Date Request Date
244.00
1102-A China Cat - Gray EA 24.9500 .00
6,087.80 11.9653
244.00
.00 10/31/01 10/31/01
Sale Amt: 6,087.80
|
REPORTS
|
O R D E R A C K N O W L E D G M
E N T
Netcellent System, Inc.
3096 Temple Avenue
Pomona, CA 91745
Telephone: 909-622-5009
Dear Customer,
This document acknowledges receipt of your purchase
order number .
Please review the information presented here and
advise us of any errors you
notice or disagreements you have at your earliest
convenience. For fastest
service, write or call us at the address and phone
number printed above and
refer to order number 1000 in all correspondence.
Your PO #: Our Order #: 1000 Your
Customer #: 000100
Bill To: Ship
To: Ship Via:
John Q. Williams Company John Q. Williams
Company UPS
3479 Peachtree Road N.E. 3479 Peachtree Road
N.E.
Suite #200 Suite
#200 SHIP DATE:
Atlanta, GA 30329 Atlanta, GA
30329 A.S.A.P.
USA USA
Shipping
Instructions: Freight Terms: Payment Terms:
PC ‑ Package Available for Shipment via
Collect 2/10 N/30
UPS\Next. Box Cover #10XA
Item‑No/Description Quantity
Um Price Disc Net Price
PC 4.000 EA
.0000 27.00 .00
Parent Item (Mother Board)
Personal Computer
Total: .00
|
Order Acknowledgment
|
O R D E R Q U O T E
Netcellent System, Inc.
3096 Temple Avenue
Pomona, CA 91745
Telephone: 909-622-5009
Dear Customer,
This Document Serves As A Quote For The Items Listed
Below. Please Review
The Information Presented Here. If You Have Any
Questions Or You Wish To
Place An Order, Please Contact Us At The Address Or
Phone Number Printed
Above And Refer To Our Quote Number 1019 In Your
Correspondence.
Our Quote #: 1019 Your Customer #: 000100
Bill To: Ship
To: Ship Via:
John Q. Williams Company John Q. Williams
Company UPS
3479 Peachtree Road N.E. 3479 Peachtree Road
N.E.
Suite #200 Suite
#200 SHIP DATE:
Atlanta, GA 30329 Atlanta, GA
30329 A.S.A.P.
USA
Shipping
Instructions: Freight Terms: Payment Terms:
2/10 N/30
Item‑No/Description Quantity
Um Price Disc Net Price
16SX‑1 1.000 EA
1,728.0000 27.00 1,261.44
Personal Computer 386SX
Kit No1
*Kit Components Listed Below*
K‑SX2MB 1.000 EA
Personal Computer 386SX with
2 Meg of Memory
K‑SX1‑1.2 1.000
EA
386SX 1.2 Drive For Personal
Computer
K‑SX1‑1.44 1.000
EA
1.44 Drive For Personal
Computer
K‑SX1‑IDE 1.000
EA
386SX IDE Drive For Personal
Computer
K‑SX1‑V512 1.000
EA
VGA Card with 512 Ram
Chip Manual
|
Companies that are frequently unable to ship all that is
ordered may find themselves with many partially‑shipped orders left on
file awaiting the arrival of additional stock. The Consolidate/Close Customer
Orders application provides two options for dealing with this problem.
You may wish to consolidate some of the partially shipped
orders into a single order to facilitate shipping and billing. The Consolidate
feature in this application allows you to enter order header information for a
new order, then to specify which of the old orders are to be merged into the
new order. Up to 15 orders may be so consolidated. What this will accomplish
is the creation of a new order with line items taken from the old orders. The
old orders will be deleted once their line items have been consolidated into
the new order.
Some orders may be cancelled by the customer before all
items are shipped. The Close Order feature allows you to close O type orders
that have been partially posted in the Post Invoices To A/R application.
Controlled items that were still on order will be deallocated. The order will
be flagged as if it had been fully shipped and may be purged via the Purge
Posted Invoices application.
Select
Consolidate/Close Customer Orders from the pull down COP Processing window.
The following screen will then be displayed:
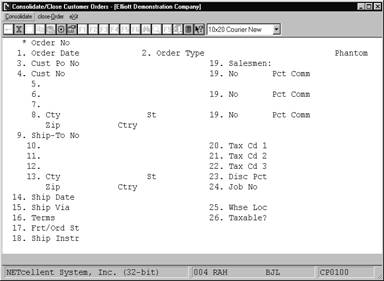
Consolidate/Close
Customer Orders Entry Screen
The following options are
available:
* Select the desired mode
from the Consolidate/Close Customer Orders menu bar
* Enter the data requested
on the screen
To
return to the menu bar, press the ESC or F10 key. To leave this application,
press X for EXIT when positioned at the menu bar.
Entry Field Descriptions
Define the new order header to consolidate existing
orders into.
Consolidate
|
Name
|
Type
and Description
|
|
* Order No
|
Press the F1 key for
automatic assignment of the next order number or enter the 6‑digit
number manually. The program will only allow order numbers, which are not
already on file.
The manual entry of an order
number will not affect the automatic assignment of numbers. Only automatic
order number assignment through the F1 key will cause it to be incremented.
|
|
1. Order Date
|
A date in the standard date
format.
This is the date the orders
were consolidated.
|
|
2. Order Type
|
1 alphanumeric character.
No entry is required.
Defaults to O.
|
|
3. Cust Po No
|
10 alphanumeric characters.
Enter the customer's
purchase order number. This field serves a documentary purpose and is useful
to have when corresponding with customers.
|
|
4. Cust No
|
6 alphanumeric characters.
Enter the customer number
you want to consolidate orders. The number entered would commonly be that of
a customer on file in the Customer file.
|
|
9. Ship‑To No
|
4 alphanumeric characters.
Enter the Ship‑To code
that carries the shipping address requested by the customer. There are three
other options available if you do not know the number of the correct Ship‑To
code or if Ship‑To codes have not been set up for the customer.
|
|
Ship‑To No (continued)
|
You may press RETURN to
default the shipping address to the same as the billing address.
You may press F1 to search through the Ship‑To
codes on file for the customer, then select the correct one.
You may press F2 to manually enter the shipping
address.
Pressing the F6 key will display a window showing the
customers credit history along with the current total of open customer
orders.
A sub‑menu will
display on the bottom of the screen to remind you of these options during
entry of the Ship‑To number.
|
|
10 - 12. Ship-To Name and Address
|
30 alphanumeric characters
for each of the four fields.
These fields store the
customer's name and shipping address. They may be entered manually, although
they are more commonly displayed automatically when one of the options
described above is used. If entered, there are no requirements regarding
what may and may not be typed in. Any alphanumeric entry is acceptable.
|
|
13. Cty, St, Zip, Ctry
|
(Cty) 15 alphabetic
characters.
(St) 2 alphabetic characters.
(Zip) 10 numeric characters.
(Ctry) 10 alphabetic characters.
You have the option to
change this address line as a free format by pressing the F2 key.
|
|
14. Ship Date
|
A date in the standard date
format.
The entry is in MMDDYY
format. Basically, this is the date that the order is to be shipped. It
defaults to A.S.A.P. (as soon as possible). In actual fact, this field
mainly serves a documentary purpose because the application which prints
picking tickets looks at the request dates entered for each individual line
item to determine whether or not to print the order and not at the ship date
on the order itself.
|
|
Ship Date (continued)
|
The default for the request
date on the individual line items, however, is the ship date entered here, so
if the order does not need to be shipped until some specific time in the
future, the date should be entered here to speed entry of line items and to
document this fact.
If a valid customer record is found you have the option
to default remaining fields by pressing the F1 key.
If COP Setup is set to use Profit Center usage = 0, you will be requested to enter field number 27 Pft Ctr.
|
|
15. Ship Via
|
2 alphanumeric characters.
Enter the Ship‑Via code for the means of
transportation that is to be employed when shipping the ordered merchandise.
The code entered must be a valid Ship‑Via code.
The entry defaults to the code specified in the
Customer record. Once the code is entered, the code's description displays
beside the entry.
The shipping method is printed on the picking ticket
for the shipping department.
In add and change mode,
press the F7 key to search for ship via code.
|
|
16. Terms
|
2 alphanumeric characters.
Enter the terms code for this order. The entry
defaults to the code on file for the customer. Once entered, a description
for the code displays beside the entry. The program requires the entry of a
valid Terms code, the information in the Terms Code record is used to
determine whether the customer is eligible for any payment discount at cash
entry time in Accounts Receivable.
In add and change mode,
press the F7 key to search for terms code.
|
|
17. Frt/Ord St
|
1 alphanumeric character.
Enter the Freight Payment
code, Order Status code relevant to this order.
|
|
Frt/Ord St (continued)
|
C = Collect
P = Prepaid
H = Hold
A sub‑menu will display to remind you of the
valid options.
If the Freight Payment Code is collect, the system will
not expect entry of freight charges, although it is still allowed.
If Order Status code is H,
picking tickets and invoices will not be printed for this order. Also, user
will not be able to select the order if Order Type is order.
|
|
18. Ship Instr
|
2 fields of 40 alphanumeric
characters.
Enter here whatever shipping
instructions the customer requested on the purchase order or whatever
instructions are customary for the customer. These instructions will print
on the order acknowledgment and on the picking ticket.
|
|
19. Salesmen No
|
3 alphanumeric characters.
Three sales people may be specified to share the
commission on the sale. The salesmen numbers entered must be that of valid
salesman. When a valid salesman is entered, the salesman's name displays on
the line below the entry.
A dummy salesman number, XXX, should be set up in the
Salesman file in case no commission is to be paid on a specific order. Then,
if no commission is to be paid, the operator could simply X out the first
Salesman field.
In add and change mode,
press the F7 key to search for salesman number.
|
|
Pct Comm
|
5 numeric digits with 2
decimal positions (999.99).
For each salesman who is to share the commission you
must specify what percent of the total commission each gets. This percent of
commission may not exceed 100.00. The sum of the three percents must equal
100.00. The entry defaults to the percent of commission that remains and
will therefore default to 100.00 for the first salesman.
The actual amount of the
commission is determined at billing time on the billing information screen.
|
|
20. Tax Cd 1
|
3 alphanumeric characters.
Enter the tax code that designates how this transaction
is to be taxed. If the tax code entered is not on file, an error message will
be displayed, and you will be prompted to enter another tax code.
You will not be prompted to enter a tax code here. If
no ship to number was entered, the program will use the default tax code 1
from the Customer's record in the Customer record. You must select this item
when asked Field Number? if you wish to change the tax code.
In add and change mode,
press the F7 key to search for tax code.
|
|
Tax Pct
|
6 numeric digits with 4
decimal positions (99.9999).
You will not be prompted to enter a tax code percent
here. The program will use the tax percentage associated with tax code 1.You
must select tax code 1 from Field Number? if you wish to change the tax
percentage. Press RETURN for the tax code and then enter the appropriate tax
percentage.
On the third screen (for invoices and credit memos)
where billing information is required you will be asked to enter sales tax
amount.
The program calculates the
default sales tax amount (based upon the tax percent entered here and the
value of taxable items on the order). You may accept the default value at
that time or override it as you see fit.
|
|
21. Tax Cd 2
|
3 alphanumeric characters.
Enter the tax code that designates how this transaction
is to be taxed. If the tax code entered is not on file, an error message will
be displayed, and you will be prompted to enter another tax code.
You will not be prompted to enter a tax code here. If
no ship to number was entered, the program will use the default tax code 2
from the customer's record in the Customer file. You must select this item
when asked Field Number ? if you wish to change the tax code.
If no default is defined for
tax code 2, then neither the tax code or the tax percentage will be
displayed.
|
|
Tax Cd 2 (continued)
|
In add and change mode, press the F7 key to search for
tax code.
|
|
Tax Pct
|
6 numeric digits with 4
decimal positions (99.9999).
You will not be prompted to enter a tax code percent
here. The program will use the tax percentage associated with tax code 2. You
must select tax code 2 from Field Number ? if you wish to change the tax
percentage. Press RETURN for the tax code and then enter the appropriate tax
percentage.
On the third screen (for
invoices and credit memos) where billing information is required you will be
asked to enter the sales tax amount. The program calculates the default
sales tax amount (based upon the tax percent entered here and the value of
taxable items on the order). You may accept the default value at that time
or override it as you see fit.
|
|
22. Tax Cd 3
|
3 alphanumeric characters.
Enter the tax code that designates how this transaction
is to be taxed. If the tax code entered is not on file, an error message will
be displayed, and you will be prompted to enter another tax code.
You will not be prompted to enter a tax code here. If
no ship to number was entered, the program will use the default tax code 2
from the customers' record in the Customer file. You must select this item
when asked Field Number? if you wish to change the tax code.
If no default is defined for tax code 3, then neither
the tax code nor the tax percentage will be displayed.
In add and change mode,
press the F7 key to search for tax code.
|
|
Tax Pct
|
6 numeric digits with 4
decimal positions (99.9999).
You will not be prompted to
enter a tax code percent here. The program will use the tax percentage
associated with tax code 3. You must select tax code 3 from Field Number ?
if you wish to change the tax percentage. Press RETURN for the tax code and
then enter the appropriate tax percentage.
|
|
Tax Pct (continued)
|
On the third screen (for invoices and credit memos)
where billing information is required you will be asked to enter the sales
tax amount. The program calculates the default sales tax amount (based upon
the tax percent entered here and the value of taxable items on the order).
You may accept the default value at that time or override it as you see fit.
|
|
23. Disc Pct
|
5 numeric digits with 2
decimal positions (999.99).
This is the line item
discount percent that can be taken in addition to any discounts inherent in
the line item's unit price. It can be thought of as a trade discount. The
entry will default to the discount specified in the Customer record. During
entry of line items this discount percent will display as the default discount
percent for the line item, to be accepted or overridden.
|
|
24. Job No
|
6 alphanumeric characters.
This field is used to update the Job History file when
posting invoices. It will be used to record billings against a job on the Job
Analysis Report in Accounts Receivable.
In add and change mode,
press the F7 key to search for job number.
|
|
25. Whse Loc
|
2 alphanumeric characters.
Enter the location code for the warehouse from which
the merchandise on the order is to be shipped. The entry must be for that of
a valid location. The location's description will display beside the entry.
During entry of line items, this is the location, which the program will
check, to determine if there are adequate stocks of the item or not.
This field defaults to the default location in the
Customer file.
In add and change mode,
press the F7 key to search for warehouse location.
|
|
26. Taxable?
|
Y or N.
Enter whether the order is taxable or not.
If the customer is taxable, this field defaults to Y.
If the customer is non‑taxable,
this field defaults to N.
|
|
27. Pft Ctr
|
Up to 5 alphanumeric
characters.
This field only displays if the Company file specifies
that there are profit centers and departments (if applicable) used throughout
the system (profit center and department, if applicable, is not zero) and if
the COP Setup specifies that profit centers and departments (if applicable)
are order‑oriented rather than product category‑oriented. If
entered, all General Ledger sales transactions generated by this order will
have this profit center and department (if applicable) as an account number
format.
This field defaults to the
number entered on the previous order.
|
After defining the new order header, determine which
orders to consolidate.
|
Name
|
Type
and Description
|
|
Orders To Be Consolidated
|
6 numeric digits (999999).
Enter up to 15 order numbers of orders to be
consolidated into the new order.
Press RETURN to consolidate
All of the customer's orders into the newly defined order header.
|
Close Order
The same fields are displayed as for Consolidate. The
only entry allowed is in the Order No field where you must enter the number of
a partially posted O type order. You may also press the F1 key to display
partially posted orders.
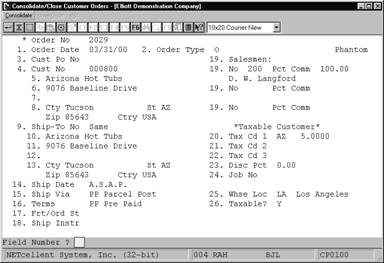
Consolidate
Customer Orders (Screen #1)
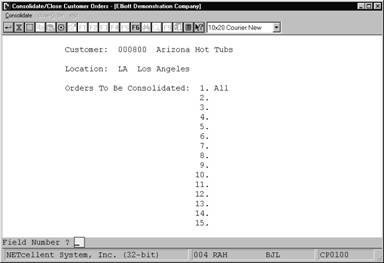
Consolidate
Customer Orders (Screen # 2)
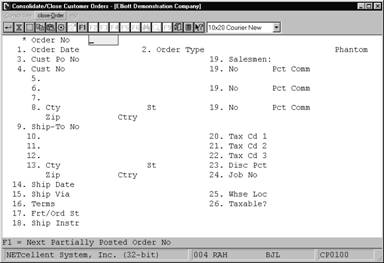
Close Customer Orders
Blanket orders are orders that merely record the
customer's desire to receive a series of shipments at specified times in the
future. The customer might order 10,000 widgets with the agreement that the
widgets will be shipped at the rate of 1,000 a month for the next 10 months.
In this case, you would enter a blanket order in the Order Entry application
for the 10,000 widgets and prior to each shipment you would utilize the
Activate Blanket Orders application that generates regular orders from blanket
orders, which would create a regular order for each 1,000 widgets. Once the
regular order has been created you can select the widgets for billing just as
you would have had they been entered on a regular order.
Blanket orders may not, themselves, be billed. A regular
order must be generated from a blanket order, then the regular order can be
shipped and billed. The process whereby regular orders are generated from
blanket orders is referred to as Activate Blanket Orders.
When line items for a blanket order are entered in the
Order Entry application, the operator enters the quantity ordered, unit price,
request date, etc., just as would occur for a regular order. However, during
entry of a regular order, the system takes note of what was ordered and adjusts
inventory records to reflect the commitment to ship this merchandise. This is
known as allocating the item, and the quantity allocated for an item is an
indication of how much has been ordered for shipment in the immediate or near
future. For blanket orders no such allocation occurs, since the order may be
of a very long‑term nature, and to make the allocation would
unnecessarily inflate inventory requirements over the life of the order.
Consequently, items are allocated only when the blanket order is activated.
One of the fields entered for the line item is the
request date. This is the date upon which shipment is requested. For blanket
orders this is the activation date. During blanket order activation a date
will be entered that will serve as the activation cut‑off date. All
items for the blanket order being activated that have request dates on or
before the activation cut‑off date will appear on the new order. Those
items that fall past the cut‑off date will be ignored. Once a line item
has been transferred to a regular order it is deleted from the blanket order
and once all line items for a blanket order have been transferred, the blanket
order itself is deleted.
Select Activate Blanket Orders from the pull down COP Processing menu. The following screen will
then be displayed:
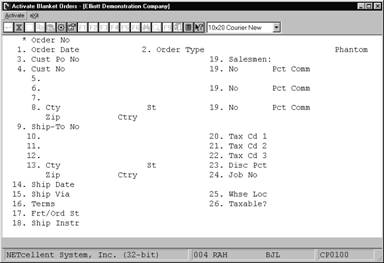
Activate Blanket Orders Entry Screen
The following options are available:
* Select the desired mode from
the Activate Blanket Orders menu bar
* When activate blanket orders
is selected, a prompt is displayed that enables you to enter the number of the
blanket order that is to be activated. During order activation, certain line
items on the blanket order will be transferred to a new order that has an order
type of O (regular order). You must assign an order number to this new order
before activation can begin. There is a field on the screen where this number
can be entered. Once this number has been assigned and any changes to the
first screen have been made, a second screen will display on which you enter
the activation cut‑off date. The program will then process the blanket
order. You may then specify another blanket order to activate.
To return to the menu bar, press the ESC or F10 key. To
leave this application, press X for EXIT when positioned at the menu bar.
Entry Field Descriptions
Activate Blanket Orders
|
Name
|
Type
and Description
|
|
* Order No
|
6 alphanumeric characters.
Press the F1 key for the
next blanket order on file or enter the blanket order you wish to activate.
|
|
New Order No
|
6 alphanumeric characters.
Press the F1 key for the next sequential order number.
Also refer to the Order
Entry application for individual field descriptions that may be changed after
the New Order Number is assigned.
|
|
Please Enter Cut‑Off Date
|
A date in the standard date
format.
Enter the cut‑off date in MMDDYY format. The
entry defaults to the system date.
This is the date that the
program will use to compare with the blanket order's request dates to see if
the line items qualify for inclusion on the new active orders.
|
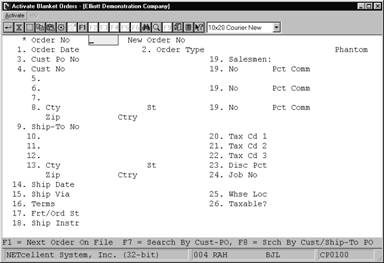
Activate Blanket Orders
|
