Picking Tickets are documents that list all the items in
the order that are eligible to be taken from stock (picked) and shipped from a
particular warehouse. These items are listed in order by their picking
sequence. A line prints beside each item where the stock clerk can enter the
amount that was actually picked for shipment. Picking tickets may be printed
for a range of orders. The program also allows the entry of a cut‑off
date so individual items on the order may be ignored if the request date falls
after the cut‑off date.
The picking ticket may be printed on 8‑1/2 by 11‑inch
paper to make it easier to work with, but standard‑sized computer paper
is also acceptable. The picking tickets can be printed on pre-printed forms if
you answered Y in COP Setup to the question Print Pick Tic On Forms?
During selection of the range information for the picking
tickets the operator must enter the starting and ending order numbers of the
orders that are to be considered, the warehouse location, the request date cut‑off,
whether previously picked orders should be considered and whether invoice‑type
orders should be considered. The program will then print the picking tickets
and then ask the operator for a new range. The operator will continue
selecting ranges until all pertinent picking tickets have been selected.
The program will print a picking ticket for each order
that falls within the selection range that has at least one line item for which
the request date is on or before the cut‑off date. Such orders must be
of the type O (regular order). Picking tickets may be printed for invoice‑type
orders if the operator specifically requests that this occur. Picking tickets
may be printed twice for the same order if the operator selects this option,
but duplicates are identified as such by a warning message that prints on the
document. If the program detects that the value of the order when added to the
customer's balance exceeds the customer's credit limit, a warning to that
effect will print on the picking ticket, so personnel should be instructed to
look for such warnings and to follow company policy when finding them.
If the Bill of Material Processor package is used,
picking tickets will distinguish between stocked and non‑stocked items
and will show the components of non‑stocked items in such a form that the
ticket can be used as a kit list for their assembly.
The program will print a line upon which miscellaneous
charges and freight charges can be written at the end of the picking ticket.
If all line items on the order appeared on the ticket a message to this effect
will also print. The picking ticket will also provide a work field for serial/lot
numbers if the component is serial or lot.
Staging Slips
Another
method is to batch pick all orders in one run and place the goods in a
staging area. From the staging area you can pick individual orders much
quicker than going through the entire warehouse. See the next chapter on
Staging Slips for run instructions.
Printing On Laser Forms
Picking tickets may be printed on either standard
(continuous) forms or laser forms. This option is set in the Print On Laser
Forms? field #21 of the COP Setup application. If that field is set to P or B,
picking tickets will automatically be set to print on laser forms. For more
information, refer to the description for field #21 in the COP Setup section of
this manual.
A Packing List is a document that lists all the items on
an order that have been taken from stock (picked) and shipped from a particular
warehouse. Packing Lists may be printed for a range of orders. The program
also allows you to select whether invoiced items should be included and items
that have only been billed should be included.
The Packing List may be printed on 8‑1/2 by 11‑inch
paper to make it easier to work with, but standard‑sized computer paper
is also acceptable.
During selection of the range information for the Packing
Lists the operator must enter the starting and ending order numbers of the
orders that are to be considered, the warehouse location, whether invoiced
items should be included, if billed items should be included, and if to print
zero quantity-to-ship line items. The program will then print the Packing
Lists and ask the operator for a new range. The operator may continue
selecting ranges until all pertinent Packing Lists have been selected.
The program will print a packing list for each order that
falls within the selection range that has at least one line item.
Note: Packing Slips may only be printed for Invoice type
orders or Regular type orders that have been partially or fully billed.
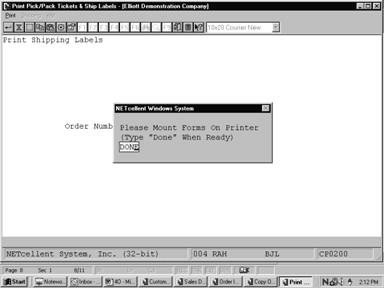
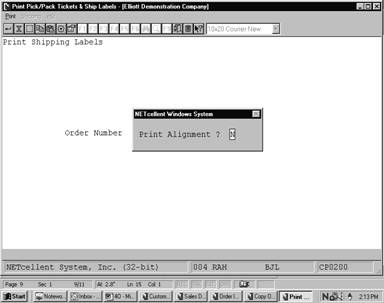
Shipping Labels, are documents that list the order shipping
address information. Each label will have the order number and the ship‑to
information including ship‑to name, ship‑to address, city, state
and zip. Define the label size in Label Code Setup in the Util_setup window
off the Elliott main menu bar. Then define the default label code in COP
Setup.
You may select multiple orders and request multiple
labels for each order.
Select Print Pick/Pack Tickets & Ship Labels from the
pull down COP Processing window. The following screen will then be displayed:
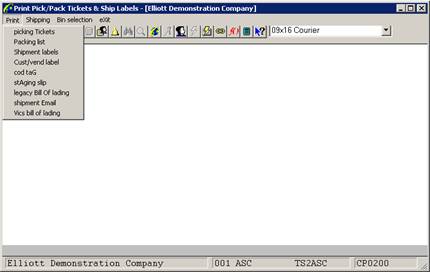
Print Pick/pack Tickets & Ship Labels Screen Window
The following options are
available:
* Select the desired mode from
the Print Pick/Pack Tickets & Ship Labels menu bar
* Enter the data requested on
the screen
To return to the menu bar, press the ESC or F10 key. To
leave this application, press X for EXIT when positioned at the menu bar.
Entry Field Descriptions
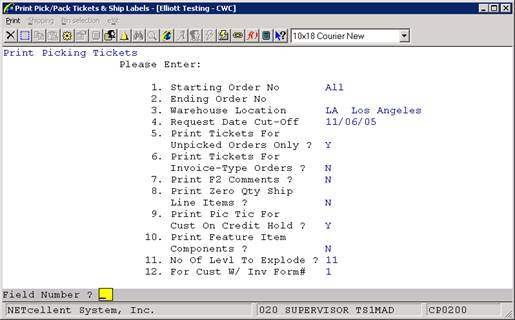
Picking Tickets
|
Name
|
Type
and Description
|
|
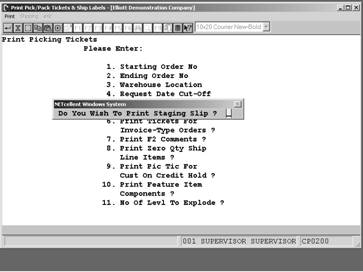
1. Starting Order No
|
6 numeric digits (999999).
Enter the starting number of
the range of orders for which you wish picking tickets to be printed.
Defaults to All.
|
|
2. Ending Order No
|
6 numeric digits (999999).
Enter the ending number of
the range of orders for which you wish picking tickets to be printed.
Defaults to the starting order number.
|
|
3. Warehouse Location
|
2 alphanumeric characters.
Enter the location code for
the warehouse for which picking tickets will be printed. Only orders for
this warehouse will be eligible for being picked. The location code you
enter must be on file in the Location file. The description associated with
this code will display beside the entry.
|
|
4. Request Date Cut‑Off
|
A date in the standard date
format.
Enter the date against which the request date for
individual items on orders will be compared to determine if they should print
on the order's picking ticket.
Note than an item's request
date may be revised after the order is entered, and this revised date is
identified as the promise date. The program will use the promise date for
comparison if it has been entered. This field defaults to the system date.
|
|
5. Print Tickets for Unpicked Orders Only
|
Y or N.
If you answer Y, orders that
have previously had picking tickets printed for them but have not yet been
billed will be excluded from consideration for printing again. If you answer
N, previously picked orders that have not yet been billed will be eligible to
have picking tickets printed again although a message will print on the
ticket to advise you that such a duplication occurred.
|
|
6. Print Tickets for Invoice-Type Orders?
|
Y or N.
If you answer Y, orders with an order type of I will be
eligible for printing. If you answer N such orders will not be eligible.
Ordinarily, invoice‑type
orders are used to record sales where shipment occurred at the time of the
sale such as with over‑the‑counter sales. Thus, picking tickets
are unnecessary. You may use invoices as ordinary orders however to
streamline the order processing sequence, in which case you would want
picking tickets to be printed.
|
|
7. Print F2 Comments ?
|
Y or N.
If you answer Y, the
comments that were entered during Order Entry will display on the picking
ticket and the picking tickets will not print in picking sequence order.
|
|
8. Print Zero Qty Ship Line Items?
|
Y or N.
If you answer Y, items with
zero quantity to ship will be printed on the picking ticket.
|
|
9. Print Pic Tic For Cust On Credit Hold?
|
Y or N.
If you answer Y, a picking
ticket will be printed for a customer that has been placed on credit hold.
|
|
10. Print Feature Item
Components?
|
Y or N.
Enter Y to print components of feature items on the
picking tickets.
Enter N to only print the parent feature item.
Defaults to N.
|
|
11. No Of Levl To Explode ?
|
2 numeric characters.
Enter the number of levels you wish to explode for
non-stocked parent items.
This question will only
appear when the Bill of Material Processor package is being used.
|
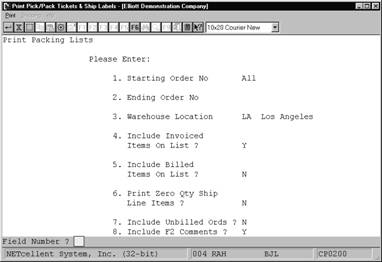
Packing Lists
|
Name
|
Type
and Description
|
|
1. Starting Order No
|
6 numeric digits (999999).
Enter the starting number of
the range of orders for which you wish Packing Lists to be printed. Defaults
to All.
|
|
2. Ending Order No
|
6 numeric digits (999999).
Enter the ending number of
the range of orders for which you wish Packing Lists to be printed. Defaults
to the starting order number.
|
|
3. Warehouse Location
|
2 alphanumeric characters.
Enter the location code for
the warehouse for which packing lists will be printed. Only orders for this
warehouse will be eligible. The location code you enter must be on file in
the Location file. The description associated with this code will display
beside the entry.
|
|
4. Include Invoiced Items on List?
|
Y or N.
If you answer Y, invoiced
items will be eligible for printing. If you answer N such items will not be
eligible.
|
|
5. Include Billed Items on
List
?
|
Y or N.
If you answer Y, billed items
will be eligible for printing. If you answer N such items will not be
eligible.
|
|
6. Print Zero Qty Line Items?
|
Y or N.
If you answer Y items with zero quantity to ship will
be printed on the Packing List.
Note : If all line items on
the order have zero quantity to ship, a Packing List will not be printed for
this order regardless of how you answer this question.
|
Shipping Labels
|
Name
|
Type
and Description
|
|
Order Number
|
6 numeric digits (999999).
Enter the number of the order for which you wish to
print labels.
If you press RETURN for the first entry of an order
number, the program will default to All orders, and the entry of No. of
Labels will be skipped. Only one label will then print for each order.
When you have entered all of
the order numbers and number of labels to print, press the F10 key to print
these labels.
|
|
No. Of Labels?
|
3 numeric digits (999).
Enter the number of labels you want to print for each
order specified.
If you selected All for the
order number, you will not be prompted for this entry.
|
 Screens
Print Picking Tickets
Print Packing Lists

Print Shipping Labels
Mount Labels on
Printer
Print Alignment
002094 11/02/01 000300 2546 1
ABF TRUCKING
A.S.A.P LA
2/10 Due
15th Los Angeles
User I.D. : SUPERVISOR
Brooks and Johnson,
LTD. Brooks and Johnson, LTD.
9872 Round Circle
Drive 9872 Round Circle Drive
Bldg. 19 Back
Door Bldg. 19 Back Door
Knoxville
TN 59006 Knoxville TN 59006
USA USA
***
CONTACT DEPT 11 _________ ***
10.00
11/02/01 1102-A EA 10.00 ..........
China Cat -
Gray
Ord #: 1000
John Q. Williams Company
3479 Peachtree Road N.E.
Suite #200
Atlanta, GA 30329
USA
Ord #: 1001
The Mallory Company
6987 Parnum Avenue
Dallas, TX 75843
USA
Ord #: 1002
Conte Crystalware PTY.
LTD.
GPO Box 4827 BB
8839 Bowman Street
Rushcutters Bay,2010
AUSTRALIA
Ord #: 1003
John Q. Williams Company
3479 Peachtree Road N.E.
Suite #200
Atlanta, GA 30329
USA
Ord #: 1005
Burkhart & Sons
909 White Water Ave
Suite 4004
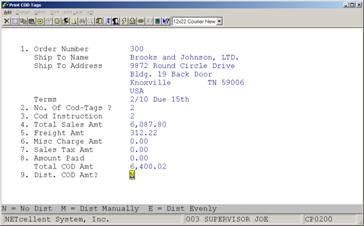
Print COD Tags
The user
has two options of applying the total COD amount. The first option is to
print only 1 tag, Field 2. This will print the total COD amount on one COD
tag and as a result, 1 COD tag per order.
Generate COD Tags
Key Field Entry Description
Field 3: Determines how COD is to be paid.
0 = No
instructions
1
= Certified Check/Money Order
2 = Company
Check
The second option is to print more that one COD tag per
order. If the user selects this option, then the system adds a Field 9 to
the above screen. This field prompts the user on how they want to distribute
the COD amount. The choices are:
1.
N = No Distribution. Total amount goes to 1 tag.
2.
M = Manually Manually distribute the COD amt. to the
number of tags, Field 2.
3.
E = Dist. Evenly System will distribute COD amt. evenly to
the number of tags.
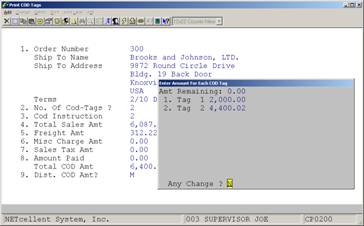
If M=Manually is selected, a window
will pop up and the user can enter an amount for each COD tag. After an amount
is entered, the projected total COD amount remaining will be displayed. See
figure next page.
Application Overview
This feature is used to print
a consolidated pick ticket (staging slip) for multiple orders. If you have a
large warehouse and the number of orders is huge, the traditional method of
using picking ticket to pick order one at a time is not efficient. A better
method is to pick all orders in a batch in one run and place the goods in a
staging area. From the staging area, you can pick your individual order much
quicker than go through the entire warehouse. Staging Slips are also referred
to as Wave Pick.
To use this feature, it must
first be setup as per the Global Setup instructions for Pick Ticket/Ship Labels
.
Run Instructions
From COP Main Menu, select Processing, then Pick/Pack
Tickets & Ship Labels and then Print
At the Print
option, you the choice of printing Picking Tickets or Staging Slips. This is a
process procedure because the system will not print a Staging Slip unless a
Picking ticket has already been printed.
When you finish printing
Picking Tickets and hit <Esc> or F10, the system will prompt you if you want to print a Staging Slip. At this point you may select “Yes” or “No”.
If you select “No”, then
at a later time you can return to the Print
Menu and select Staging Slips to print on an order-by-order basis.
Print Staging Slips
Step 1. Enter Orders
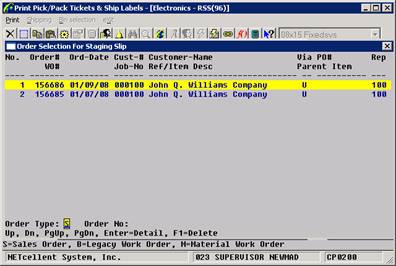
Step 2. >Esc> or F10 for prompt to print Staging Slips
Step 3. Select Bin Sequence
|
19-Jan-08
- 9:45Am Electronics - RSS(96) Page 1
S T A G I N G S L I P
Item-No
Item-Description Pick-Seq
Ord-No
Req-Date Line-Description Qty UM Name/Ref-Desc Via
046242000
Cocentric Testing Item
156686
01/09/08 Cocentric Testing Item 1.00 LH John Q. Williams U
----------
Item Total: 1.00
DATA-BUS
Data Bus/Buffer 25 Meg C-4444-A
156685
01/07/08 Data Bus/Buffer 25 Meg 1.00 EA John Q. Williams U
----------
Item Total: 1.00
19-Jan-08
- 9:45Am Electronics - RSS(96) Page 2
Order#
Ord-Date Cust-# Cust-Name Via PO# Rep
WO# Job-No Ref/Item Desc Parent Item
-------
-------- ------ ------------------------------ --- ---------- ---
156685
01/07/08 000100 John Q. Williams Company U 100
156686
01/09/08 000100 John Q. Williams Company U 100
|
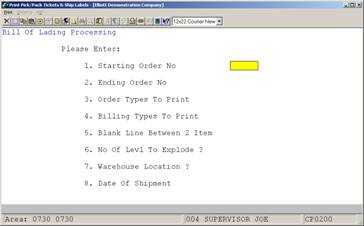
For field entry values and options, see Legacy Bill of
Lading in the Global Setup section of this manual.
This feature allows you to batch email customers that their
order has shipped. There are two requirements that must be met prior to using
this feature. They are:
- Customer must be subscribed to “Manifest” event (System
Manager Manual – Specific Events)
- Starship Manifest module must be installed or “Manifest”
note duplicated in Elliott Notes.
Run
Instructions
COP Menu Ò
Processing Ò Pick/Pack Tickets & Ship Labels Ò
Print Ò Shipment Email
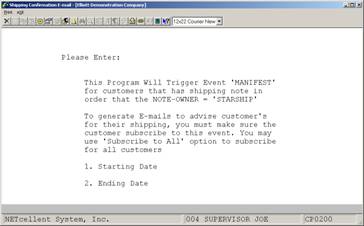
Enter the Starting and Ending Dates; the system will search
and use the dates manually entered in Elliott Manifest Note or dates created
automatically by the Starship Manifest module.
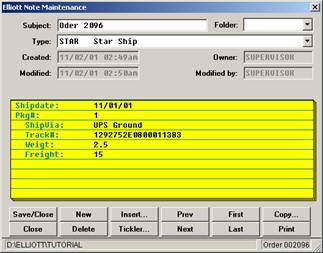
Starship/Elliott Note Order 2096
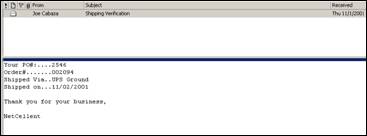
Manifest Event - Email Acknowledgement Order 2094
VICS Bill Of Lading
This module allows you to add, change, delete, split, print
and complete bills of lading according to the VICS standard. This can work in
conjunction with Shipping Verification to print UCC labels for each box and
create shipment records needed to produce an ASN (Advanced Ship Notice). There
are several requirements that must be set prior to using this feature. They
are:
- The VICS Bill Of Lading Global Setup.
- Create User Defined Codes in Inventory Management. These
need to be added to all of the items that you will ship using the VICS
Bill Of Lading.
- Review the Ship Via codes for proper values.
Run
Instructions
COP Menu Ò
Processing Ò Pick/Pack Tickets & Ship Labels Ò
Print Ò VICS Bill Of Lading
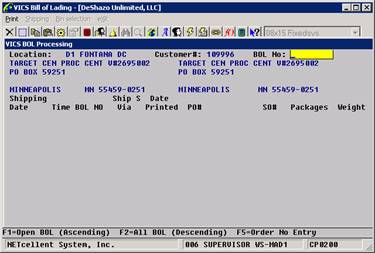
Location: Enter the location of the warehouse. The value
you enter here will be retained until you change it to make future processing
faster. You can also press F7 to get a search window of location codes.
Customer#: Enter the customer number. The F7 and F8 search
keys are available to search for a customer by number or by name. You can
press F1 to skip the customer number field and proceed to the BOL No field.
BOL No: Enter a BOL number or press F1 for open bills of
lading or F2 for all bills of lading. You can also press F5 to shift the
prompt to the order number.
BOL
Insert
Press the Insert key to
bring up the BOL Insert screen:
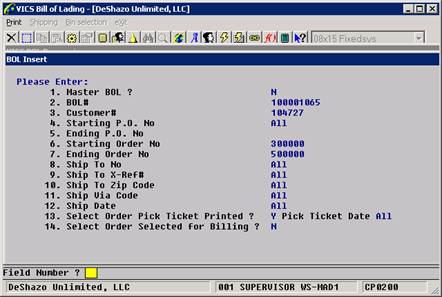
Orders can be grouped together on one bill of lading given
the correct parameters. Generally, these are orders that are being shipped
together to one location.
- Master BOL? – Most bills of lading will not be a master.
A master may be needed if the customer requires individual shipments be
sent in one load to a consolidation facility.
- BOL# - Leave this blank to allow the system to
automatically generate the next BOL number. A number may be specified if
you need to add orders to an existing BOL.
- Customer# - Enter the customer number of the orders.
- Starting PO No – Enter the beginning purchase order number
for a range found on the sales orders.
- Ending PO No – Enter the ending purchase order number for
a range found on the sales orders.
- Starting Order No – Enter the starting sales order number
for a range to include in the BOL.
- Ending Order No – Enter the ending sales order number for
a range to include in the BOL.
- Ship To No – Enter a ship-to number found on the sales
orders. Leave it blank for All.
- Ship To X-Ref# - Enter a ship-to cross reference number
found on the sales orders.
- Ship To Zip Code – Enter a zip code found on the sales
orders.
- Ship Via Code – Enter a ship via code found on the sales
orders.
- Ship Date – Enter a date and the ship date on the sales
orders must be on or prior to this date.
- Select Order Pick Ticket Printed? – You can select orders
that have a picking ticket and give a cut-off date.
- Select Order Selected for Billing? – You can select orders
that have already been selected for billing.
BOL
Header Maintenance
Press Enter when a BOL
entry is highlighted to maintain the header information:

Each bill of lading contains a header that specifies certain
characteristics about the shipment. The FOB, Ship Via, Freight Charge Terms
and Ship Date can be updated on all of the orders within the bill of lading
when it is completed. The Pro# is much like a tracking number. If it is
populated, a ship note will be created with this value as the tracking number
on all the orders. The Confirmation# may be required by some customers for the
advanced ship notice. Special Instructions entered will print on the bill of
lading in a predefined area.
F1
– PO View
Press the F1 key to view
the BOL by PO number:
Each purchase order will be displayed for the BOL, how many
orders are on the PO, the package quantity and type, the weight, and other
information. You can further drill down to the sales orders by pressing F1,
view the carrier information by pressing F2, print labels for the BOL by
pressing F3, or split the BOL by pressing F4. You can also add to or delete
from the BOL in this screen.
F4
– Print BOL
Press the F4 key to print the BOL. The BOL is designed
to print on a laser printer and a laser overlay is provided for your
convenience. If a supplemental page is required, a separate print job will be
generated. Some criteria may be required before the BOL will print, like entry
of a pro number. If a BOL needs to be changed or is printed by mistake, you
can press F7 to void the print.
F5
– Complete BOL
Press the F5 key to complete the BOL. This should be
performed once the shipment has left your facility. This marks the BOL as
completed so it does not appear with the other open bills. Also, billing
selection can be performed automatically for all orders on the BOL. The BOL
must be printed before it can be completed. If a BOL needs to be corrected or
is completed by mistake, you can press F7 to void the completion.
