The Sales History Trx Processing is a standard
transaction entry module allowing add, change and delete/inquire functions, as
well as an edit list print‑out to verify that the transactions entered
are correct. You may also print two lists that analyze sales by customer and
invoice date or by location and item number. Once the transactions have been
entered and verified as correct, you may post them to the Sales History file by
means of the Post/Purge Sales History Trx application in the Processing pull
down window.
Normally, sales transactions are posted into the Sales
History Transaction file directly by the Post Invoices to A/R application and
from there they are posted into the Sales History file. There are two
situations in which this does not happen, however, which necessitates the
availability of this application. The first of these situations is where the
user first brings up COP and wishes to load the Sales History file with data
from his former order processing system. The second situation is where the
user has created sales transactions through Accounts Receivable and now needs
to transfer this data into Sales History.
Select Sales History Trx Processing from the pull down
COP Processing window. The following screen will then be displayed:
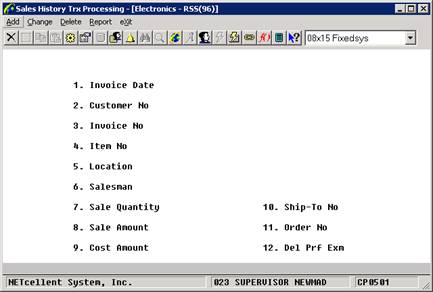
Sales History Trx Processing
Entry Screen
The following options are available:
* Select the desired mode from
the Sales History Trx Processing menu bar
* Enter the data requested on
the screen
To return to the menu bar, press the ESC or F10 key. To
leave this application, press X for EXIT when positioned at the menu bar.
Entry Field Descriptions
|
Name
|
Type
and Description
|
|
1. Invoice Date
|
A date in the standard date
format.
Enter the date of the
invoice.
|
|
2. Customer No
|
6 alphanumeric characters.
Press the F7 key for customer
search by number or press the F8 key for a customer search by name.
|
|
3. Invoice No
|
6 numeric digits (999999).
Enter the invoice number.
In change mode, this entry
defaults to the invoice number, by pressing the RETURN key, of the first
transaction on file with the above‑entered invoice date and customer
number. When this invoice number displays, the question Right Invoice? will
appear. Answering Y to this question will advance you for entry of the next
field. Answering N will display the invoice number of the next transaction
on file for the invoice date and customer number. This sequential search and
display of these invoice numbers will continue until you answer Y to the
Right Invoice? question, press the Esc key or enter a specific invoice
number.
|
|
4. Item No
|
15 alphanumeric characters.
Enter the item number. Press the F7 key to search for
the item by number or press the F8 key to search for the item by name.
As in the entry of the
invoice number, this entry defaults by pressing the RETURN key, in change
mode, to the item number of the first transaction on file with the above
invoice date, customer number and invoice number. The sequential search and
display of the item number will continue until you answer Y to the Right
Item? question, press the ESC key, or enter a specific item number.
|
|
5. Location
|
2 alphanumeric characters.
Enter the location code for the warehouse from which
the merchandise was shipped. The entry must be a valid location. Default is
the item's default or manufacturing location.
In add and change modes,
press the F7 key to search for Location.
|
|
6. Salesman
|
3 alphanumeric characters.
Enter the salesman for this sale. The salesman number
entered must be a valid salesman. Default is the salesman number from this
customer's record in the Customer file.
In the add or change modes,
press the F7 key to search for Salesman.
|
|
7. Sale Quantity
|
A standard quantity format.
Enter the sale quantity.
|
|
8. Sale Amount
|
10 numeric digits with 2
decimal places and an optional minus sign (99,999,999.99‑).
Enter the sale amount.
|
|
9. Cost Amount
|
10 numeric digits with 2
decimal places and an optional minus sign (99,999,999.99‑).
Enter the cost amount.
|
|
10. Ship-To No
|
4 alphanumeric characters.
Enter the Ship-To code that
carries the shipping address requested by the customer.
|
|
11. Order No
|
6 numeric digits (999999).
Enter the order number.
|
Edit List
|
Name
|
Type
and Description
|
|
Starting Invoice Date
|
A date in the standard date
format.
Enter the starting date of
the range. Defaults to All.
|
|
Ending Invoice Date
|
A date in the standard date
format.
Enter the ending date of the
range. Defaults to the starting date.
|
|
Starting Customer No
|
6 alphanumeric characters.
Enter the starting customer
number of the range. Defaults to All.
|
|
Ending Customer No
|
6 alphanumeric characters.
Enter the ending customer
number of the range. Defaults to the starting customer number.
|
Cust/Invoice List
|
Name
|
Type
and Description
|
|
Starting Customer No
|
6 alphanumeric characters.
Enter the starting customer
number of the range. Defaults to All.
|
|
Ending Customer No
|
6 alphanumeric characters.
Enter the ending customer
number of the range. Defaults to the starting customer number.
|
|
Starting Invoice Date
|
A date in the standard date
format.
Enter the starting date of
the range. Defaults to All.
|
|
Ending Invoice Date
|
A date in the standard date
format.
Enter the ending date of the
range. Defaults to the starting date.
|
Loc/Item List
|
Name
|
Type
and Description
|
|
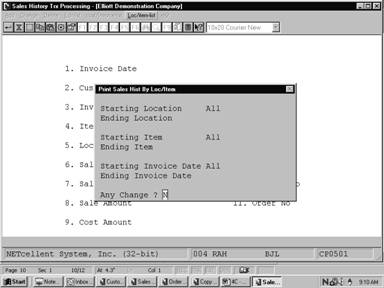
Starting Location
|
2 alphanumeric characters.
Enter the starting location
of the range. Defaults to All.
|
|
Ending Location
|
2 alphanumeric characters.
Enter the ending location of
the range. Defaults to the starting location.
|
|
Starting Item
|
15 alphanumeric characters.
Enter the starting item of
the range. Defaults to All.
|
|
Ending Item
|
15 alphanumeric characters.
Enter the ending item of the
range. Defaults to the starting item.
|
|
Starting Invoice Date
|
A date in the standard date
format.
Enter the starting date of
the range. Defaults to All.
|
|
Ending Invoice Date
|
A date in the standard date
format.
Enter the ending date of the
range. Defaults to the starting date.
|
Sales History & Stock Analysis Report
|
Name
|
Type
and Description
|
|
Sales as of Date
|
A date in the standard date
format.
Enter the sales effective
date. Defaults to the current date.
|
|
Year Start Date
|
A date in the standard date
format.
Enter the report year start
date. Defaults to January 1st.
|
|
Period Start Date
|
A date in the standard date
format.
Enter the report period
start date. Defaults to the first date of the period.
|
|
Location
|
2 alphanumeric characters.
Enter the location you want
to use for the report. Defaults to All.
|
|
Product Category
|
3 alphanumeric characters.
Enter the product category
you want to use for the report. Defaults to All.
|
|
User Defined Code
|
2 alphanumeric characters.
Enter the user defined code
you want to use for the report. Defaults to All.
|
|
Customer Type
|
5 alphanumeric characters.
Enter the customer type you
want to use for the report. Defaults to All.
|
|
Create CSV File ?
|
Y or N.
Answer whether you want to
create a CSV file from the report generated or not. Defaults to Y.
|
|
If Item Has No Sales Only Print That Has Qty OH/Ord ?
|
Y or N.
Answer whether you want the
item to print if there are no sales numbers, but has either a quantity on
hand or on order, or not. Defaults to blank.
|
|
CSV File Path
|
50 alphanumeric characters.
Enter the file name and path
you want to use for the CSV file. Defaults to blank.
|

Sales History Trx Processing
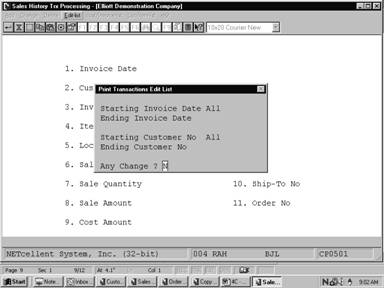
Print Transactions Edit List

Print Sales History Trx By
Customer/Invoice
Print Sales History Trx By
Location/Item
Sales History & Stock
Analysis Report
