The Recurring Journal Transaction
Processing application allows standard recurring journal transactions
to be entered. They may also be changed before being posted to the General Ledger through the Post Recurring Journal
Transactions application. Transactions entered here are not accessible
through the General
Journal Transaction Processing application.
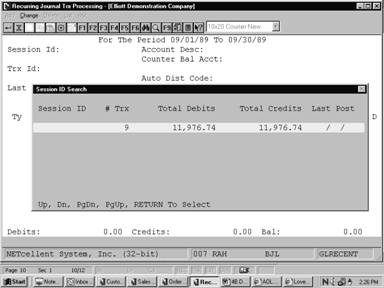
Session Balances
The bottom of
the Recurring
Journal Trx Processing screen displays a running total of debits and
credits for the current session, along with the session balance. The Session
ID allows users to identify the transactions that they were responsible for
keying in. When entering change mode, a window is displayed with each Session
ID, the number of transactions it contains, total debits and credits, and the
last date on which it was posted. The user may choose one of these sessions or
create a new one in add mode.
Transaction ID
Each
recurring transaction is assigned a unique Transaction ID number. As new
transactions are entered, the Starting Transaction ID No field in G/L Setup is
incremented. The Transaction ID may be used to access transaction directly for
changes. In change mode, you may search for transactions by Transaction Id by
pressing the F2 (Trx ID
Search) key.
Current Period
The current
period starting and ending dates are displayed continuously at the top of the
screen. All transactions entered will be posted to the period ending date.
Journal History Numbers
Journal
History data may be maintained for transactions in Recurring Journal Transaction
Processing if the Maintain Journal History ? flag (field #3) in G/L Setup is set to Y. Posting totals will be
written to the Journal History File and may then be printed using the Journal History Report application.
Accrual Reversals
Transactions
entered with the source code Accrue can be automatically reversed in the next period if the
user then enters a Y in the R (Reverse Next Period?) column.
The automatically generated reversal will have the first day of the subsequent
period as the transaction date. This reversal will print on the Edit List and
Posting Register, but will not appear on the transaction screen or be assigned
a Transaction ID. It will, however be reflected in the balance totals at the
bottom of the screen. Be sure to enter both a debit and credit for accrual
entries.
Automatic Counter‑Balancing
For General Ledger accounts
with a counter‑balance account on file, the operator is allowed to
counter‑balance the entry. If the operator enters a Y in the C (Counter-Balance Account)
column, the package will generate a reversing debit or credit for the counter‑balance
account.
Automatic Distribution
For General Ledger accounts
with an automatic distribution code on file, the operator is given the option
to auto‑distribute the entry. If the operator enters a Y in the D (Auto‑Distribution Code)
column, the package will automatically calculate and post the transactions to
the accounts specified by the auto‑distribution code. On the Edit List
and Posting Register, these distributions will be rounded to the nearest
penny. Any remaining amount will be added to (or subtracted from) the last
distribution to ensure proper balance.
Balance By Periods
The List and
Register verify the transaction balances by period to ensure they are both
zero. (All transactions will fall in one of two periods ‑ current period
or next period for accrual reversals.) If either of the two possible periods
have a non‑zero balance, a warning prints showing the balances for the
non‑zero periods and posting is not allowed.
Select Recurring Journal Trx Processing from the
pull down G/L Processing window. The
following screen will then be displayed:
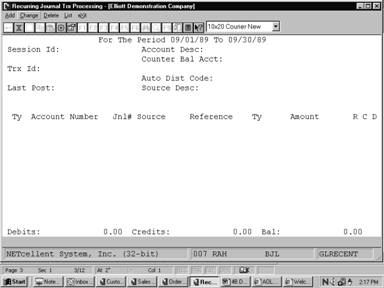
Recurring Journal Trx Processing Entry
Screen
The
following options are available:
* Select
the desired mode from the Recurring Journal Trx Processing menu bar
* Enter
the data requested on the screen
* To
exit press the ESC or F10 key when the
cursor is positioned for entry of the first field on the screen
To return to
the menu bar, press the ESC or F10 key. To leave this application, press X for EXIT when
positioned at the menu bar.
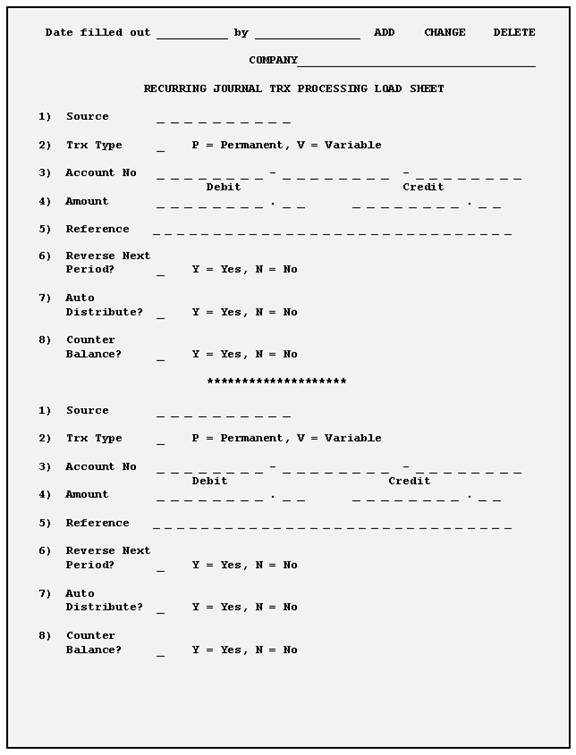
Entry Field Descriptions
|
Name
|
Type
and Description
|
|
Session Id:
|
10
alphanumeric characters.
In add mode, enter a Session ID
number to identify this batch of recurring transactions. The ID can be the
user's name, the date, a number, or anything else that will later distinguish
the transactions when changes need to be made. When a Session ID number is
used, you can later retrieve reports that list all the transactions that
cross reference to this given Session ID number. The Session ID may also be
left blank. All transactions entered under a blank ID will be grouped
together.
In add
mode, press the F7 key to search for Session ID's. In
change and delete modes, select the desired Session ID from the window and
press RETURN. Any transactions
entered under a blank Session ID are displayed on the first line of the
window.
|
|
Trx Id
|
7 numeric
characters. This number uniquely identifies each transaction entered in the
table below.
In add
mode, the next sequential Transaction ID number is automatically displayed.
In change mode, the number of the transaction the cursor is currently on is
displayed. Also in change mode, you may search by Transaction ID when the
cursor first appears on the Account Number field. For more information on
how to search by Transaction ID, refer to the Account Number field
description.
|
|
Last Post:
|
A date in
the standard format.
This
field displays the last date on which the currently selected recurring
transaction was posted. Manual changes to this field are not allowed.
|
|
Ty
|
1
alphanumeric character. Enter the recurring transaction type.
Only the following entries are
allowed:
P or 1 - Permanent
V or 2 - Variable
Permanent
Entries ‑ Transaction Type P
|
|
Ty (continued)
|
A
permanent journal entry is any entry that is made for the same amount each
period. These entries are retained on file and posted each period for the
amount specified. Permanent transactions are modifiable through change and
delete modes.
Variable Entries ‑ Transaction Type V
A variable journal entry is any
entry that is made to the same account for different amounts each period.
Each period, before posting, the operator can enter the amount to be posted
that period. The procedure is:
1) Select change mode.
2) Enter Trx Type of V.
3) Press the F1 key when the cursor is positioned for entry of the
Account No.
4) The system locates and displays the first screen of
variable transactions on file. Use the up/down arrow keys to select the
desired transaction, then use the RETURN key to move to the Amount field and enter the correct
amount.
5) Individual transactions may be accessed directly by
entering the transaction type V and the
account number or by pressing the F2 key and entering a Transaction ID number.
Press the
F1 key to delete the transaction that
the cursor is currently on.
|
|
Account Number
|
An
account number in the standard account number format.
In add and change mode, press the F7 key to search by account number or press the F8 key to search by account description.
In change mode, when the cursor first appears on this field, press the F1 key to list transactions for this Session ID in account
number order. After transactions are
displayed, press the F1 key to delete the transaction that
the cursor is currently on. In change mode, press the F2 key to search for transactions by Transaction ID. In
change mode, the account number cannot be changed.
The
current account's description, counter-balancing account (if applicable), and
auto-distribution Code (if applicable) are all displayed at the top of the
screen.
|
|
Jnl#
|
4 numeric
characters.
Enter the Journal History number to
be associated with this transaction. This field is only accessible if the
Maintain Journal History flag (field #3) in G/L Setup is set to Y.
In add mode, if no other
transactions have been recorded since entering the application, the Starting
Journal History Number (field #4) from G/L Setup will be displayed. If transactions have already been
recorded, the journal number from the last transaction entered is displayed.
Press the RETURN key to accept the default journal number or press the F1 key to increment the journal number by one.
In change
mode, use the Page Up and Page Down keys to move between pages of
transactions.
|
|
Source
|
10
alphanumeric characters.
If the source field entered is Accrue the program will accept an automatic accrual reversal.
If the operator enters a Y in the (R)
Reverse Next Period? column, a reversing entry will also
be posted for the start date of the next period when this transaction is
posted. If the source entered was not Accrue then the Reverse Next Period? question is forced to be N.
Press the RETURN key to default to the last source entered. Press the F7 key to search for source codes or press the F6 key to display source totals. The F6 key will display the corresponding account number,
transaction date, debit, and credit amount, and their totals.
If you select a pre-defined source,
its description will be displayed in the Source Desc: field at the top of the screen. In add mode, if Journal
History is being used, the source defaults to RJ plus the journal number for the transaction. For
example, if the journal number is 0001, then the source will default to RJ0001.
If the
source entered is not defined in the Source Code File Maintenance application, you may add it from this field by answering
Y to the question Source
Not Found, Do You Wish To Create One ? If you
answer Y, you will be prompted to enter a
source description at the top of the screen.
|
|
Source (continued)
|
If Journal History is not in use and
you are in change mode, use the Page Up and Page Down keys to move between
pages of transactions.
|
|
Reference
|
30 alphanumeric characters. Enter a
reference number or press RETURN to
default to the previously entered reference, if any. Press the F1 key to use the first line of the source description as
the reference.
|
|
Ty
|
1
alphanumeric character. Enter the type of transaction being entered. Only
the following entries are allowed.
D or 1 = Debit
C or 2 = Credit
The
transaction type defaults to the previously entered type, if any.
|
|
Amount
|
11
numeric digits with 2 decimal places (negative or zero not allowed)
(999,999,999.99).
Enter the
amount of the transaction. This amount will be debited or credited to the
appropriate account depending on what was entered in the transaction type
field.
|
|
R (Reverse Next Period)
|
Y or N.
The only way to change this field is
to enter Accrue in the Source
field. See the description of the Source field above.
NOTE: Only one of the
options R, C, or D can be selected for any one transaction. If any one of
these is answered Y, the other options cannot be
selected.
RETURN defaults to N.
|
|
C (Counter-Balance)
|
Y or N.
If the
account number entered for this transaction has a counter‑balance
account on file, the account and its description will display and the
operator will be allowed to select counter‑balancing. If the account
number has a counter‑balance account but the counter‑balance
account is not on file, the account will display but the description will be ***Account
Not On File*** and selection of counter‑balancing
will not be allowed.
|
|
C (Counter-Balance) (continued)
|
If the account does not have
a counter‑balance account associated with it, (Not Allowed) will display next to the Counter Balance Acct: field above and the operator will not be allowed to
select automatic counter‑balancing.
NOTE: Only one of the options R, C,
or D can be selected for any one transaction. If any one of these is
answered Y, the other options cannot be
selected.
RETURN defaults to N.
|
|
D (Auto-Distribute)
|
Y or N.
If the account number entered for
this transaction has an Auto Distribution code which exists in the Distribution
Code file, this code will be displayed
and the operator will be allowed to enter a Y in this field. If the account number for this
transaction does not have an Auto Distribution code or if the Auto
Distribution code is not on file then (Not Allowed) will display and the (D) option will not be allowed. To view the
Auto-Distribution accounts, press the F1 key in the Trx Date field.
NOTE: Only one of the
options R, C, or D can be selected for any one transaction. If any one of
these is answered Y, the other options cannot be
selected.
RETURN defaults to N.
|
Recurring
Journal Trx Processing Session ID Search

Recurring
Journal Trx Processing

Recurring
Journal Trx Processing Session ID Search

Recurring
Journal Trx Processing Session ID Search
 REPORTS
The Post Recurring Journal
Transaction application transfers standard recurring journal entries
into the General
Ledger Transaction File. It serves to automatically update the information
on file.
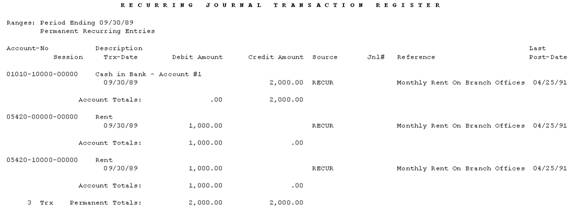
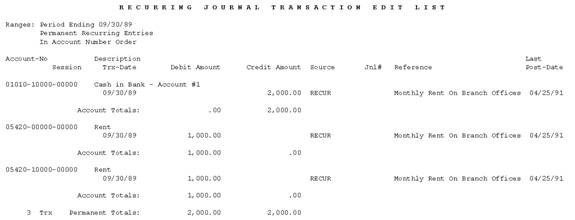
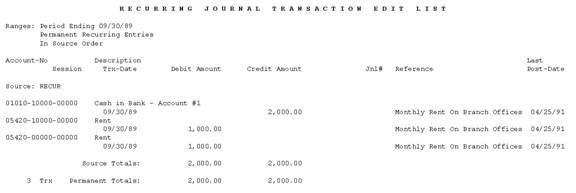
Recurring Journal Transaction Register
All entries
are detailed on this register. The register is automatically printed in
account number order when the transactions are posted.
For counter‑balanced
entries, the balancing transaction is printed showing its account number and
description.
For accrual
reversals, the reversing entry is printed showing its date.
For automatic
distributions, a breakdown by account is printed.
When posting,
only the recurring transactions that are applicable for the current period will
be posted. Likewise, posting out of balance is not allowed.
In both cases
a message will display on the screen explaining why access to the posting
routine is not allowed.
During the
printing of the register, if any accounts to which posting is attempted are
discovered to be invalid, the posting will terminate and a message on the
screen will advise you of the problem. You must print out the spooled register
in order to identify the problem accounts. Such accounts will show up on the
register with a description bearing the message
***Account Not On File***.
IMPORTANT: Recurring
journal entries must be posted before changing the current period in the
Accounting Period File Maintenance application. Failure to post recurring
entries before posting entries for the next period will require you to make
manual entries for the previous period.
Select Post Recurring Journal Trx from the
pull down G/L Processing window. The
following screen will then be displayed:
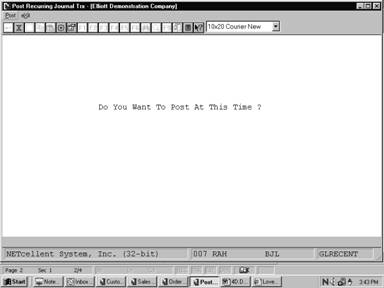
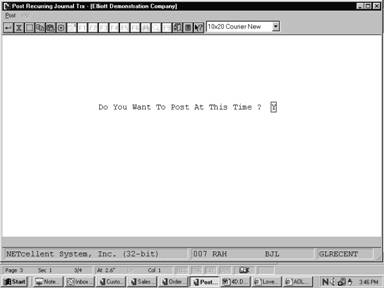
Post Recurring Journal Trx Processing
Entry Screen
The
following options are available:
* Select
the desired mode from the Post Recurring Journal Trx menu bar
* If
the total credit amounts on file do not equal the total debit amounts for all
accounting periods, a message will be displayed to that effect and posting will
not be allowed.
To return to
the menu bar, press the ESC or F10 key. To leave this application, press X for EXIT when
positioned at the menu bar.
Entry Field Descriptions
|
Name
|
Type
and Description
|
|
Do You Want To Post At This Time ?
|
Y or N. Answer Y to Post
all Recurring Transaction entries to the General Ledger Transaction
File, or N to decline.
|
Post
Recurring Journal Trx Processing
REP