 |
|
ProcessingInventory Transaction ProcessingApplication Overview
The Inventory Transaction Processing application records several types of transactions that effect inventory. The I/M package offers the flexibility of two ways of recording those transactions and updating the appropriate inventory files.
The user may choose to record transactions on-line. This means that inventory quantity levels will be immediately adjusted when a transaction is entered; providing the most up to the minute picture of the actual status of inventory. To select this option, set the Online Update Inventory Trx flag (#24) in I/M Setup to Y.
The second option is to place entered transactions in a transaction file; to be posted later via the Post Inventory Transactions application. This offers the flexibility of verifying the accuracy of transactions before they effect inventory levels. For issue, adjustment, and receiving transactions, it also allows the user to distribute the value of the inventory to one or more G/L accounts. To select this option, set the Online Update Inventory Trx flag (#24) in I/M Setup to N.
Note: Switching back and forth between on-line and batch processing can corrupt inventory data files. It is recommended to choose one of the above methods and stay with it.
If it is necessary to change from on-line to batch processing, first re-initialize the Inventory Transaction Process File, Inventory Transaction Distribution File, and Inventory Transaction Serial File using the File Utilities application under the Util_setup window of the Elliott main menu.
Warning: Initializing these files will erase any transactions recorded in them. Changing from batch processing to on-line is not recommended.
For more information on the two types of inventory transaction processing, see the On-line Processing and Batch Processing chapters that follow. On-Line Processing
If on-line processing is selected, the application will record receivings, transfers, issues of inventory. As entry of a transaction is completed, the application immediately updates the appropriate item's quantity fields in the Item File. It also creates a record in the Inventory Transaction Audit File.
If a transaction is changed or deleted, the program actually creates a change transaction, which makes the necessary adjustments to the original transaction. This change transaction is also recorded in the Audit File. When searching for transactions in change or delete mode, the transaction which appears on the screen is actually the latest change to the transaction.
If a transaction has been deleted, it will not be displayed in change or delete mode. It will however, along with all changes, be printed on the Inventory Transaction Audit Trail Report.
Adjusting Average Cost
Very commonly, the situation will arise that receivings are entered from the packing slip before the actual invoice arrives. Since the packing slip does not usually provide the unit cost, some method must be used to make sure the unit cost does ultimately get entered correctly, since this will affect the average cost for the item.
If the new unit cost is unknown at the time of receiving, simply press RETURN for that field, which will cause the item's last cost to be accepted. If an on-line receipt was used when the invoice arrives with the unit cost, you may bring up that transaction in change mode and re‑enter the correct unit cost.
If your company uses the Elliott Purchase Order and Receiving package, it is strongly recommended that you use that package wherever possible to enter receivings transactions. This is because certain quantities pertaining to an item, which have importance to the Purchase Order and Receiving package, are not processed using the Inventory Management package. Receivings processed by the Inventory Management package will not tell the whole story for the Purchase Order and Receiving package. NOTE: Depending on your I/M Setup, Average Cost will display as FOB Cost or Landed cost. LIFO And FIFO Cost Method
A layer is a single record in the LIFO/FIFO File that records for each item each receipt or purchase and associated cost and quantity. Receivings from both the Inventory Management or Purchase Order and Receiving packages will create LIFO/FIFO layers. Posted credit memos from the Customer Order Processing package will also create a layer. Layers are removed in the appropriate order as inventory is relieved. Issues from the Inventory Management or posted invoices from the Customer Order Processing package will either remove layers or reduce layer quantities based on needed quantities.
Each receipt relates directly to a record or layer in the LIFO/FIFO File. Deleting an on-line receipt transaction will remove the associated layer record. Also, changing an on-line receipt transaction's quantity will adjust the quantity remaining in the layer record. Since the layer may be partially issued, the layer quantity may not match the receipt transaction quantity.
The system will not allow an on-line receipt with a partially issued layer to be deleted. In addition, the quantity received of a receipt with a partially issued layer may not be reduced to a point that would create a negative layer quantity.
The LIFO/FIFO cost method does not allow stocked items to have a negative quantity on hand or allow layers with negative quantities.
Transactions cannot be purged from the Transaction Audit Trail File until their associated layers have been deleted from the LIFO/FIFO layer file. Only transactions, whose layers have been completely issued and deleted, will be purged.
Detailed layer information by item may be obtained through a report option on the Stock Status Report application.
Serial Transactions
If the Serialized/Lot Items flag is S in I/M Setup, then serialized items and transactions are allowed. All items are not automatically assumed to be serialized. The second screen of Item File Maintenance has both a serialized item question and length of warranty question. These fields are used to selectively create serialized inventory.
Each on-line receipt or issue of a serial item creates a record in the Serial/Lot File. These records may be inquired or printed through the Serial/Lot Stock Status Inquiry, Serial/Lot Stock Status Report, and Issue History Report.
Serial stock records are created by receivings from the Inventory Management, Purchase Order And Receiving, and Manufacturing packages. Production reporting may be performed in Bill Of Material Processor to produce serialized stock. Posted credit memos from the Customer Order Processing package may be used to return serialized items to stock. Serial stock records are relieved and serial issue records are subsequently created by issue transactions from the Inventory Management package and posted invoices from the Customer Order Processing package. Unposted invoice type orders and selected orders from Customer Order Processing will allocate serialized inventory.
Each inventory receipt, issue and adjusting transaction relates directly to a record in the Serial/Lot File. Transaction quantities may be larger than one but the system will prompt for an equal number of unique serial numbers. A separate transaction will be created for each serial number. Deleting an on-line receipt will remove the associated serial stock record. If an on-line issue is deleted, the system will return the serialized item to stock. An on-line receipt that has had its associated serial number issued may not be deleted.
On-line transactions for serialized items may not be changed. Changes to issued warranty dates may be accomplished through the Serial/Lot Processing application.
Entry of serial numbers on receipts is not mandated. Also, serial numbers issued or sold do not have to be in stock. This flexibility allows serial items and warranty dates to be tracked after the sale only. Serial numbers may be entered on the picking ticket generated by the Customer Order Processing package.
Lot Transactions
If the Serialized/Lot Items flag is L in I/M Setup, then lot items and transactions are allowed. All items are not automatically assumed to be tracked by lot. The second screen of Item File Maintenance has a lot number question to allow selective creation of inventory items requiring lot tracking.
Each on-line receipt or issue of a lot item creates a record in the Serial/Lot File. These history records may be inquired or printed through the Serial/Lot Issue History Report and Serial/Lot Processing application.
Lot records are created by receivings from both the Inventory Management or Purchase Order And Receiving packages. The Production Transaction Processing application may also be used in Bill Of Material Processor to produce lots. Posted credit memos from the Customer Order Processing package may be used to return stock to its original lot. Lot quantities are reduced and lot issue records are subsequently created by issue transactions from the Inventory Management package and posted invoices from the Customer Order Processing package. Unposted invoice type orders and selected orders from Customer Order Processing will allocate lot quantities.
Each receipt relates directly to a stocked lot record in the Serial/Lot File. Deleting a receipt transaction will delete the associated lot and remove the transaction from the I/M Transaction File. Deleting an issue transaction will remove the transaction from the I/M Transaction File and update the inventory and lot quantity fields.
The system will not allow an on-line receipt with a partially issued lot to be deleted. In addition, the quantity received of an on-line receipt with partially issued lot may not be reduced to a point that would create a negative lot quantity. Items with lot tracking are not allowed to have a negative quantity on hand or allow lots with negative quantities.
The total quantity on hand from the Serial/Lot File must match the item quantity on hand. However, allocated quantities may not match since Customer Order Processing only allocates lots after line items are selected. This allows orders to be placed for out of stock items with no lots available.
After a lot is completely issued or sold, it remains in stock with a quantity of zero. The lot must remain in stock if returns are anticipated so that original expiration dates may be tracked. These zero lots may be purged from the Purge Zero Quantity Lots in the Serial/Lot Processing application through a selected cut off date. Run Instructions - On-Line Processing
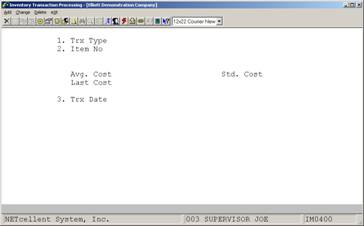
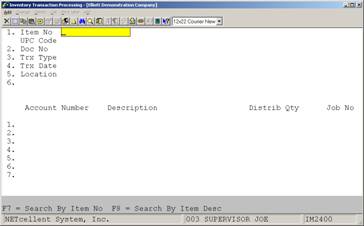
Select Inventory Transaction Processing from the pull down I/M Processing window. The following screen will then be displayed:
Inventory Transaction Processing Entry Screen
The following options are available:
* Select the desired mode from the Inventory Transaction Processing menu bar * Enter the data requested on the screen
To return to the menu bar, press the ESC or F10 key. To leave this application, press X for EXIT when positioned at the menu bar. Entry Field Descriptions
Top Screen Entries
The first three fields entered determine what further data will appear on the screen.
Receiving Screen
If you have entered R for Transaction Type, the following fields will now appear on the screen.
The following entry will be requested if the item has serial numbers:
The following entries will be requested if the item has lot numbers:
Additional data appears on the right side of the receivings screen, as described below:
Transfer Screen
If you have entered T for Transaction Type, the following fields will appear below the top screen.
The following entry will be requested if the item has serial numbers:
The following entries will be requested if the item has lot numbers:
Additional data appears on the right side of the screen, as described below:
Issue Screen
If you have entered I for Transaction Type, the following fields will appear below the top screen:
The following entries will be requested if the item has serial numbers:
The following entries will be requested if the item has lot numbers:
|
||||||||||||||||||||||||||||||||||||||||||||||||||||||||||||||||||||||||||||||||||||||||||||||||||||||||||||||||||||||||||||||||||||||||||||||||||||||||||||||||||||||||||||||||||||||||||||||||||||||||||||||||||||||||||||||||||||||||||||||||||||||||||||||||||||||||||||||||||||||||||||||||||||||||||||||
|
Name |
Type and Description |
|
1. Item No |
15 alphanumeric characters.
Enter the item number of the item to be effected by the transaction. Items must be stocked to have inventory transactions performed on them.
In add or change mode, press the F7 key to search by item number or the F8 key to search by description. |
|
2. Doc No |
6 numeric digits.
Enter the document number to be associated with this particular transaction. This number will differentiate between transactions involving the same item.
In add mode press the F1 key to display the next sequential document number from the I/M Setup application. In change and delete modes, press RETURN to display the next transaction on file for this item. |
|
3. Trx Type |
1 alphabetic character.
Only the letters L, T, I, C, A, or R are allowed.
L represents Layer Adjustment.
Enter L if you are making an adjustment to the layer file for LIFO/FIFO valuation or for a serial/lot item.
T represents Transfer.
Enter T if you are transferring items from one location (such as a warehouse) to another. |
|
Trx Type (continued) |
I represents Issue.
Enter I if you are issuing items out of inventory.
A represents Adj. Item.
Enter A if you are making an adjustment to the quantity on hand level of the item.
C represents Cost Adjustment.
Enter C if you are adjusting the cost of the item in the Item File.
R represents Receivings.
Enter R if you are recording the receiving of items into inventory. If the Purchase Order and Receiving package is being used, it is recommended that you record receivings in that package instead of here. |
|
4. Trx Date |
A standard date format.
If you are adding transactions, this field will default to today's date. You may enter a different date, if you wish.
In change mode, this field may not be changed. |
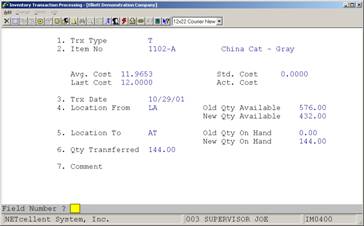
Transfer Screen
If you have entered T for Transfer, the following fields will now appear on the screen.
|
Name |
Type and Description |
|
5. Loc From |
2 alphanumeric characters.
This is the location, as listed in the Location File, from which the item(s) will be transferred.
Press the F7 key to search for location codes. |
|
6. |
An account number in the standard format.
This field displays the asset account number that the inventory will be transferred to. It is read from the Material Cost Type/Location File or the Default Asst Account field in I/M Setup. If the Multiple I/M Accounts flag in I/M Setup is set to Y, the user may change this account number during transaction entry.
Press the F7 key to search by main account number or the F8 key to search by account description. |
|
7. Loc To |
2 alphanumeric characters.
Enter the location to which the inventory is being transferred. The item must be stocked at this location.
Press the F7 key to search for location codes. |
|
8. Qty Trn |
A quantity in the standard format.
Enter the quantity to be transferred. This quantity may not be zero. |
|
9. Comment |
30 alphanumeric characters.
This is a comment field for this transaction. |
|
10. |
An account number in the standard format.
Enter the account number that the inventory will be transferred from. This field will display the default asset account number entered in I/M Setup or one from the appropriate code in the Material Cost Type/Location File if one exists for the item. The user may change the account number if a different one is to be used.
Press the F7 key to search by main account number or the F8 key to search by account description. |
Transferring Serialized Items
If the item has serial numbers, the user will have the option to enter the serial numbers of the items being transferred. If the user answers Y to the Enter Serial Numbers ? question, the following field will appear:
|
Name |
Type and Description |
|
Serial No |
15 alphanumeric characters.
This is serial number of the item being transferred.
Entered serial numbers must already be on file for the item at the location being transferred from. Press the F3 key to enter a range of numeric serial numbers. Press the F7 key to search for serial numbers on file at the "from" location. |
Transferring Lot Items
The following entries will be requested if the item has lot numbers:
|
Name |
Type and Description |
|
8. Lot From |
15 alphanumeric characters.
This is the lot from which the item is being transferred. Press the F7 key to search for lot numbers. |
|
9. Qty Trnsf |
8 numeric digits with two decimal places (999999.99).
Enter the quantity to be transferred. This quantity may not be zero and may not be greater than the quantity available in the lot.
Defaults to the quantity remaining in the lot. |
|
10. Lot To |
15 alphanumeric characters.
This is the lot to which the item is being transferred. It may be an existing lot or a new lot may be created. Press the F7 key to search for lot numbers. |
|
11. Comment |
30 alphanumeric characters.
This is a comment field for this transaction. |
|
12. |
An account number in the standard format.
Enter the account number that the inventory will be transferred to. This field will display the default asset account number entered in I/M Setup or one from the appropriate code in the Material Cost Type/Location File if one exists for the item. The user may change the account number if a different one is to be used.
Press the F7 key to search by main account number or the F8 key to search by account description. |
Additional data appears on the right side of the screen, as described below:
|
Name |
Type and Description |
|
Qty O/H |
A quantity in the standard format.
The quantity on hand for this item at the transferred from location is automatically displayed. |
|
Qty O/O |
A quantity in the standard format.
The quantity on order for this item at the transferred from location is automatically displayed. |
|
Qty Alloc |
A quantity in the standard format.
The quantity allocated for this item at the transferred from location is automatically displayed. |
|
Qty Avail |
A quantity in the standard format.
The quantity available is calculated by subtracting the quantity allocated from the quantity on hand and automatically displayed. |
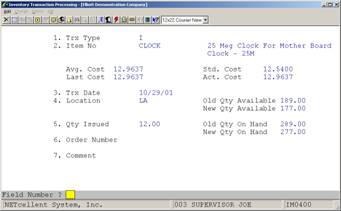
Issue Screen
If you have entered I for Issue Type, the following fields will appear.
|
Name |
Type and Description |
|
5. Location |
2 alphanumeric characters.
This is the location, as listed in the Location File, from which items are being issued.
Press the F7 key to search for location. |
|
6. |
An account number in the standard format.
This field displays the asset account number that the inventory will be issued from. It is read from the Material Cost Type/Location File or the Default Asst Account field in I/M Setup. If the Multiple I/M Accounts flag in I/M Setup is set to Y, the user may change this account number during transaction entry.
Press the F7 key to search by account number or the F8 key to search by account description. |
|
7. Qty Iss |
A quantity in the standard format.
Enter the quantity to be issued. This quantity may not be zero but may be a negative amount. Note: Serial/Lot items may not have negative quantities issued. |
|
8. Order No |
8 alphanumeric characters.
Enter the document number of the shop or purchase order from which this transaction derives. |
|
9. Comment |
30 alphanumeric characters.
This is a comment field for this transaction. |
Issuing Serial Items
The following entries will be requested if the item has serial numbers:
|
Name |
Type and Description |
|
Effect Dte |
A standard date format.
This is beginning warranty date for the serial number being issued.
If transactions are being added, this field defaults to the system date. |
|
Expire Dte |
A standard date format.
This is the ending warranty date for the serial number being issued.
If transactions are being added, this field defaults to the system date plus the number of warranty days this item is under warranty. |
|
Cust No |
6 alphanumeric characters.
This is the customer number the serial number is being issued to.
The customer number entered here is not validated against the A/R Customer File. |
|
Serial No |
15 alphanumeric characters.
This is serial number of the item being issued.
Press the F3 key to enter a range of numeric serial numbers. Press the F7 key to search for serial numbers on file at this location. |
Issuing Lot Items
The following entries will be requested if the item has lot numbers:
|
Name |
Type and Description |
|
7. Lot No |
15 alphanumeric characters.
Enter the lot number of the item being issued. Press the F7 key to search for lot numbers. |
|
8. Qty Iss |
A quantity in the standard format.
Enter the quantity to be issued. This quantity may not be zero and may not be greater than the quantity available displayed at the right side of the screen. |
|
9. Order No |
8 alphanumeric characters.
Enter the document number of the shop or purchase order from which this transaction derives. |
|
10. Cust # |
6 alphanumeric characters.
This is the customer number the lot number is being issued to.
The customer number entered here is not validated against the A/R Customer File. |
|
11. Comment |
30 alphanumeric characters.
This is a comment field for this transaction. |
Additional data appears on the right side of the screen, as described below:
|
Name |
Type and Description |
|
Cost |
This is the current cost of this item, prior to the transaction. The type of cost displayed will depend on the cost method specified in I/M Setup.
This is display only. |
|
Tot Cost |
This is the total cost of this transaction based on the per unit cost multiplied by the quantity issued. |
Adjust Item Screen
If you have entered A for Adjust Item, the following fields will appear.
|
Name |
Type and Description |
|
5. Location |
2 alphanumeric characters.
Enter the location where the adjustment needs to be made. The item must be stocked at this location.
Defaults to the default location for the item. |
|
6. |
An account number in the standard format.
This field displays the asset account number that is used for this item. It is read from the Material Cost Type/Location File or the Default Asst Account field in I/M Setup. If the Multiple I/M Accounts flag in I/M Setup is set to Y, the user may change this account number during transaction entry.
Press the F7 key to search by main account number or the F8 key to search by account description. |
|
7. Qty +-Adj |
A quantity in the standard format.
Enter the amount of the adjustment to be made to the quantity on hand for this item. Enter a minus sign before the quantity if the adjustment is a reduction of quantity on hand. |
|
8. Comment |
30 alphanumeric characters.
This is a comment field for this transaction. |
Cost Adjustment Screen
If you have entered C for Cost Adjustment, the following fields will appear.
|
Name |
Type and Description |
|
Location |
Automatically displayed.
This is the primary stocking location for this item in the Item File. |
|
5. |
An account number in the standard format.
This is the asset account for this item. It is read from the Material Cost Type/Location File or the Default Asst Account field in I/M Setup. If the Multiple I/M Accounts flag in I/M Setup is set to Y, the user may change this number during transaction entry.
Press the F7 key to search by account number or the F8 key to search by account description. |
|
6. New Cost |
10 numeric digits with 4 decimal places and an optional minus sign (-999,999.9999).
Enter the new cost to be recorded in the Item File for this item. The average, last, and standard costs currently on file for this item are displayed in a window in the upper right corner of the screen. The costing method currently selected in I/M Setup is displayed just below this field. |
|
7. Comment |
30 alphanumeric characters.
This is a comment field for this transaction. |
Layer Adjustment Screen For LIFO/FIFO Items
If you have entered L for Adjust Layer File, the following fields will appear.
|
Name |
Type and Description |
|
6. Qty +-Adj |
A quantity in the standard format.
Enter the amount of the adjustment to be made to the layer file for this item. |
|
7. Order No |
15 alphanumeric characters.
Enter the document number of the shop or purchase order from which this transaction derives. |
|
8. Comment |
30 alphanumeric characters.
This is a comment field for this transaction. |
If the item has serial numbers, the following additional field will appear:
|
Name |
Type and Description |
|
Serial No |
15 alphanumeric characters.
If the adjustment quantity is positive, enter the serial number(s) of the item(s) to be added.
If the adjustment quantity is negative, enter the serial numbers already on file to be deleted or press the F7 key to search for serial numbers on file.
In either case, press the F3 key to enter a serial number range. Although serial numbers can be alphanumeric, this range may contain only numeric values so that the serial numbers will be properly incremented.
If you end the transaction before the amount of serial numbers entered equals the quantity of items being adjusted. the quantity entered in field #7 will be automatically changed to match the number of serial numbers entered. |
Layer Adjustments For Lot Items
If the item has lot numbers, the following fields will appear:
|
Name |
Type and Description |
|
6. Lot No |
15 alphanumeric characters.
Enter the lot number of the item being adjusted.
Press the F7 key to search for lot numbers on file at this location. |
|
7. Qty +-Adj |
A quantity in the standard format.
Enter the amount of the adjustment to be made to the quantity on hand for this item. |
|
8. Order No |
15 alphanumeric characters.
Enter the document number from which this transaction derives. |
|
Comment |
30 alphanumeric characters.
This is a comment field for this transaction. |
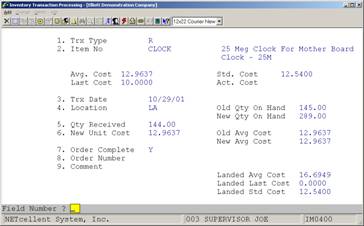
Receiving Screen
If you have entered R for Receiving, the following fields will appear.
|
Name |
Type and Description |
|
5. Location |
2 alphanumeric characters.
This is the location, from the Location File, where the items are being received. The item must be stocked at this location to be received there.
Press the F7 key to search for locations.
Defaults to the primary stocking location that is defined for this item in the Item File. |
|
6. |
An account number in the standard format.
This is the asset account for this item. It is read from the Material Cost Type/Location File or the Default Asst Account field in I/M Setup. If the Multiple I/M Accounts flag in I/M Setup is set to Y, the user may change this number during transaction entry.
Press the F7 key to search by account number or the F8 key to search by account description. |
|
7. Qty Recvd |
8 numeric digits with 3 decimal places and an optional minus sign (-99,999.999).
Enter the quantity being received. The received unit of measure for this item is displayed at the bottom of the screen. For serial/lot items this quantity must be greater than zero. |
|
8. Unit Cost |
10 numeric digits with 4 decimal places and an optional minus sign (-999,999.9999).
Enter the item's unit cost for this receiving. The average, last, and standard costs currently on file for this item are displayed in a window in the upper right corner of the screen.
Defaults to the last cost for this item. |
|
9. Order No |
8 alphanumeric characters.
Enter the purchase order number for the items being received. |
|
10. Comment |
30 alphanumeric characters.
This is a comment field for this transaction. |
Receiving Serial Items
If the item has serial numbers you will be asked if you wish to enter serial numbers. If you answer Y, the following field will appear.
|
Name |
Type and Description |
|
Serial No |
15 alphanumeric characters. Enter the serial number(s) of the item(s) being received. If you end the transaction before the amount of serial numbers entered equals the quantity of items being received, the quantity entered in field #7 will be automatically changed to match the number of serial numbers entered.
Press the F3 key to enter a serial number range. Although serial numbers can be alphanumeric, this range may contain only numeric values so that the serial numbers will be properly incremented. |
Receiving Lot Items
If the item has lot numbers, the following fields will appear.
|
Name |
Type and Description |
|
11. Lot No |
15 alphanumeric characters.
Enter the lot number of the items being received. |
|
12. Exp Mn |
2 numeric digits.
Enter the expiration month for the received items. This value must be between 1 and 12 inclusive. |
|
Exp Yr |
2 numeric digits.
Enter the expiration year for the received items. |
Distribution Window
For issue, receiving, quantity adjustment, and cost adjustment type transactions, the user will be required to distribute the value of the inventory being affected to one or more G/L accounts.
|
Name |
Type and Description |
|
Account Number |
An account number in the standard format.
Enter the account number that part or all of the value of the transaction will be distributed to. Each account number may have an amount distributed to it only once per transaction.
Press the F7 key to search by main account number or press the F8 key to search by account description. |
|
Description |
30 alphanumeric characters.
The description of the account number entered will automatically be displayed. |
|
The next field will display Distribution Amount or Distribution Qty depending on how I/M Setup field #27 (Distribute By Amt Or Qty) is set. |
|
|
Distribution Amount |
11 numeric digits with two decimal places and an optional minus sign (‑999,999,999.99).
If distributions are being made by a dollar amount enter the amount to be distributed to this account. You may enter negative amounts or amounts greater than the transaction amount. The only requirement is that the amount remaining to distribute displayed at the bottom of the screen must be zero before you may exit the screen. To remove a distribution to an account, enter zero in this field. If you alter the transaction quantity in change mode, you will be required to adjust the distribution amounts. |
|
Distribution Qty |
A quantity in the standard format.
If distributions are being made by item quantity, enter the quantity to be distributed to this account. You may enter a negative quantity or quantities greater than the total transaction quantity. The only requirement is that the quantity remaining to distribute displayed at the bottom of the screen must be zero before you may exit the screen. |
|
Job No |
6 alphanumeric characters.
Enter the job number for this transaction. Press the F7 key to search for job numbers. |
|
Amount Remaining To Distribute or Qty Remaining To Distribute |
11 numeric digits with 2 decimal places and an optional minus sign (‑999,999,999.99), or a quantity in the standard format.
The net amount/quantity left to be distributed is automatically displayed. This field must equal zero before the user can leave the screen. |
Inventory Trx Processing Edit List
|
Name |
Type and Description |
|
Starting Item |
15 alphanumeric characters.
Enter the starting item number for the range to be printed. Press the F7 key to search by item number or the F8 key to search by description. Defaults to All items. |
|
Ending Item |
15 alphanumeric characters.
Enter the ending item number for the range to be printed. Press the F7 key to search by item number or the F8 key to search by description. Defaults to the starting item number. |
Operation Notes
1. When changing previously entered transactions, changes to location are disallowed by the program. To affect a change to the Location field, it is necessary to delete the transaction and then re‑enter it with the correct location.
2. When changing previously entered transactions, changes to serial/lot number are disallowed by the program. To affect a change to the serial/lot number field, it is necessary to delete the transaction and then re‑enter it with the correct serial/lot number.

Inventory Transaction Screen – Receipts
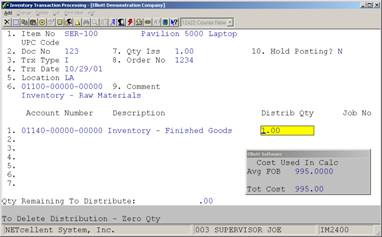
Inventory Transaction Screen - Issue
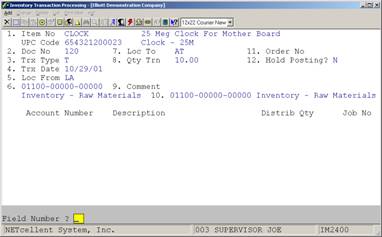
Inventory Transaction Screen - Transfer
I N V E N T O R Y T R A N S A C T I O N P R O C E S S I N G E D I T L I S T
Range: All Items
Item‑Number Item‑Description Doc# Doc Loc Po# Cust# Quantity New Cost Total‑Amount
Doc‑Date Typ To Serial/Lot Eff‑Dte Expr‑Dte Old Cost
Comment/Serial Cust#
K‑5INPLIERS 5" Pliers 105 R LA 5.000 2.5500 12.75
(Tool Kit) 04/28/92
Asset Acct: 01190‑10000‑00000 Kit Component 12.75
Distributions: 01190‑10000‑00000 Kit Component 12.75CR Job No:
K‑6INLNG‑NOSE 6" Long Nose Pliers 104 R LA 7.000 2.3300 16.31
(Tool Kit) 04/28/92
Asset Acct: 01190‑10000‑00000 Kit Component 16.31
Distributions: 01190‑10000‑00000 Kit Component 16.31CR Job No:
K‑6INWRNCH 6" Wrench 106 R LA 8.000 2.7200 21.76
(Tool Kit) 04/28/92
Asset Acct: 01190‑10000‑00000 Kit Component 21.76
Distributions: 01190‑10000‑00000 Kit Component 21.76CR Job No:
K‑8INREAMER 8" Reamer 109 R LA 7.000 2.1200 14.84
04/28/92
Asset Acct: 01190‑10000‑00000 Kit Component 14.84
Distributions: 01190‑10000‑00000 Kit Component 14.84CR Job No:
K‑COAX‑STP Coax Striper For Ethernet 102 R LA 10.000 7.2000 72.00
Kit 04/28/92
Post Inventory Transactions
Application Overview
The Post Inventory Transactions application updates asset and distribution accounts, Item File quantity fields, and creates lot records with information entered in the Inventory Transaction Processing application if using batch transaction entry.
For T (transfer) type transactions, it will credit the "from" asset account and debit the "to" or transfer account. For I (issue) type transactions, it will credit the asset account and debit any distribution accounts specified in the transaction. For A (adjustment) type transactions, it will debit the asset account and credit any distribution accounts (for a positive adjustment). For R (receiving) type transactions, it will debit the asset account and credit user defined purchase account distributions. For L (adjust layer) type transactions, it will adjust the appropriate records in the layer file, but no G/L distributions will be made. For C (cost adjust) type transactions it will debit the asset accounts, credit the distribution accounts (for a positive adjustment), and adjust the appropriate cost field in the Item File.
When this application is run, it will automatically generate an Inventory Transaction Processing Journal which details all updates to accounts and files.
Note: This application will only be used if I/M is set up for batch type inventory transaction processing. If the Online Update Inventory Trx ? flag in I/M Setup is set to Y, the system will not allow access to this application.
Run Instructions
Select Post Inventory Transactions from the pull down I/M Processing window. The following screen will then be displayed:
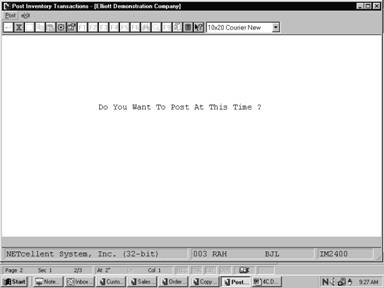
Post Inventory Transactions Entry Screen
The following options are available:
* Select post from the Post Inventory Transactions menu bar.
* Enter the data requested on the screen.
To return to the menu bar, press the ESC or F10 key. To leave this application, press X for EXIT when positioned at the menu bar.
Entry Field Descriptions
|
Name |
Type and Description |
|
Do You Want To Post At This Time ? |
Y or N.
Enter Y to post or N to decline. Defaults to N. |
Post Inventory Transactions