|
|
A/R Global Setup
A/R Global Control
Elliott Main Menu à Util setup à Global setup à Acct à a/R global control
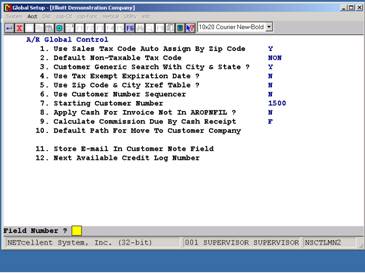
Figure 2C.1 shows the setup screen for A/R global Setup.
Sales Tax Code Auto Assign By Zip CodeThis feature allows you to automatically assign sales tax codes during Customer File Maintenance, and Ship-to file maintenance. We have added a new file, Zip Tax Code File, for county, city, and local tax jurisdiction. We have also added two fields in the existing state table file: STATE-TAXABLE-TAX-CODE AND STATE-NON-TAXABLE-TAX-CODE.
During COP Ship-to file maintenance and customer file maintenance, if the taxable flag is “N”, then the default tax code for this record will come from the State-Non-Taxable-Tax-Code in the state table. There will only be one tax code for this record. However, if the taxable flag is “Y”, then the first tax code for this record will come from the State-Taxable-Tax-Code in the state table. The system will then attempt to go to the zip tax code file to look up by zip code to find out if there should be another two tax codes. If there are two other tax codes found in the zip tax code table, it will put in the second and third tax code fields. In change mode, even if there is no change to the record, the system will still try to check if the tax code matches with the state and zip code entered. If not, the system will prompt with a message to update with the new tax code.
Field 1. Answer “Y” to enable this feature. Default Non-Taxable Tax Code
Field 2: Answer “Y” if you wish to enable this function.
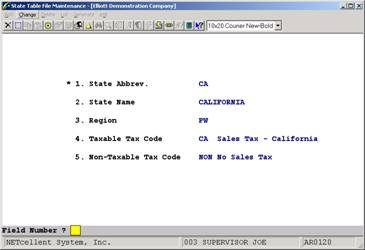
Figure 2C.2 shows the State Table File with the two new fields: Taxable Tax Code, and Non-Taxable Tax Code.
Customer Generic Search With City & State
Field 3. Answer “Y” to enable this feature.
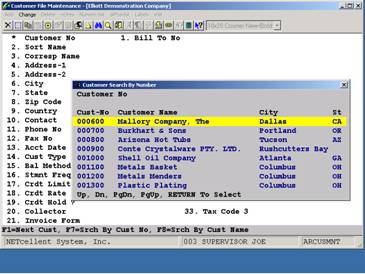
This feature offers users the ability to do a generic customer search with the city and state being displayed. In the original generic customer search, only the customer numbers and customer names were displayed. With this feature, Customer’s City and State will also be displayed. Users who have customers belonging to a chain or with the same name will find this useful.
This feature gives users the flexibility of having many customers with the same name without having to worry about remembering the customers’ numbers. This makes it simple when a customer calls in to check if an invoice has been paid. The user does not need to know the customer’s number. All that is needed is the customer’s name. The user can then ask where the customer is located in order to identify the correct customer.
Figure 2C.5. You can differentiate among customer names by city and state. Use Tax Exempt Expiration DateThis function allows you to create a tax-exempt record and define and expiration date for the tax exemption.
Field 4. Answer “Y” under enhancement setup if you wish to use this function.
. City, State and Zip Code LookupThis feature serves as a quick lookup for a city, state and zip code in the Customer File Maintenance, and Ship-to File Maintenance. The initial motive behind this feature is to let the system automatically fill the City and State information after the Zip Code uniquely identifies a location. Later, we expanded the capability of performing different types of lookups based on the information availability.
Field 5. Answer “Y” to use this function.
Basic Information Needed For Lookup
No matter what type of lookup the user plans to perform, he/she always has to provide some information for the system as a lookup base. The following table lists this piece of information for each type of lookup.
Lookup Type Basic Parameter(s) City Zip Code State State Name Zip Code City
Automatic Fill-In Of City And StateFrom time to time, the user may encounter a situation where he/she has a hard time understanding the city name that the customer addresses on the phone. When this kind of embarrassment occurs, the user may simply obtain the customer’s zip code to let the computer automatically fill in the City and State information. Although a zip code cannot always uniquely identify a city, a pop-up window with the closest answers will be available and visible to the user.
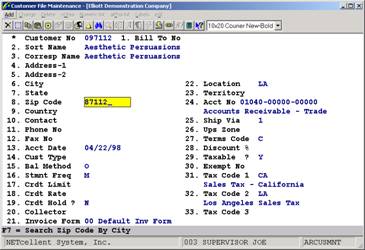
In Figure 2C.8, we use the Customer File as an example to perform this nice and convenient feature. We can bypass the entry of City and State to enter Zip Code, then press ENTER, and the corresponding information will automatically be filled in.
If the zip code entered cannot uniquely identify a location, pressing F7 in the ZIP code field will popup the City Search By Zip Code Window listing the ZIP Codes closest to your search. The user may verify with the customer to ensure the right entries.
Another situation the user may run into is that after the City and State fields are automatically filled in, he/she finds out the zip code is incorrect. Before the user can correct the zip code, he/she has to clear the City and State fields first so that when the new zip code is entered, the system will update those two fields with the right information accordingly.
Figure 2C.8 You have to enter a value to the Zip Code field to have the system fill in the City and State information.
Use Customer Number SequencerThis function allows you to use a counter to determine the next available customer number. This is useful when you are entering a new customer record, and you do not remember the last customer number used.
Field 6. Answer “Y” to this question if you wish to use this feature. Starting Customer NumberYou will need to define the starting customer number. This is the counter which will track the next available customer number.
Field 7. Enter starting customer number.
Apply Cash For Invoice Not In A/R Open File
This is a useful function when you want to enter and post a cash receipt and apply the cash to an invoice that has not been posted or created yet.
Field 8. Answer “Y” to enable this function.
Calculate Commission Due By Cash Receipt
If you pay commissions on a cash receipt basis, this feature gives you the option of paying commissions based on fully paid invoices or as partial payments are received.
Field 9. Select “F” for fully paid or “P” for partially paid.
If you set this flag to “P” then the default will be to include partial payments from A/R Open Item file when you calculate the commission.
If you set this flag to “F” then the default will be to include only fully paid invoices when you calculate commissions.
Whether your default is “P” or “F”, you have another chance when you run the Sales Commissions Due Report to decide during the calculation process. This flag simply serves as a default value for calculation.
A/R Bill-To CustomerApplication Overview
This feature is designed accommodate multi-location customers where their headquarters takes care of all the Accounts Payable for it’s chain stores or branches. Purchase orders can be executed from the headquarters or from any of the stores, but the billing goes to the headquarters’ office.
In this feature, the headquarters and all stores/branches are each treated as an individual customer account. One purpose of implementing this feature is to track sales and sales commission by store, (customer). Also, all collections and cash receipts processing are done by the headquarters’ account.
In Customer Order Processing, it is much easier to find an order by store (customer) rather than by headquarters when providing customer service.
To set up Standard Elliott to handle this type of customer, you will need to create customer accounts for the headquarters and all its store branches. For each of the store branches, the headquarters’ account number will be assigned in the Bill-To field. Run Instructions
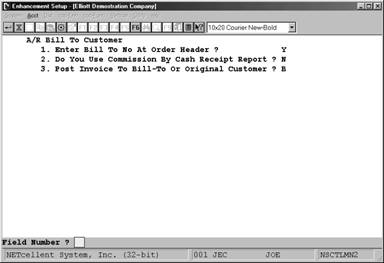
Goto: Elliott Main Menu à Util Setup à Global Setup à Acct à A/R Bill To Customer
Enabling A/R Bill-To CustomerStandard Elliott main menu à Util_setup à Global setup à Acct à a/r Bill to customer
Figure 1B.1 shows the setup screen for this feature.
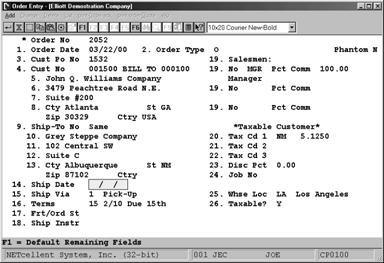
Figure 1B.2. Users have the option of having the bill-to address display on the order.
Figure 1B.3 This Order Entry screen is a sample Purchase Order of Grey Steppe Consulting, which is a branch of John Q. Williams (headquarters). In field #4, the order is billed to the headquarters, while in field #9, the order is shipped to the branch store’s address.
Field 2. Do You Use Commission By Cash Receipt Report?
If you are using Commission by Cash Receipt Report, answer “Y.” The importance of this flag is to determine which customer number will be posted to the commissions due file: the Bill-To Customer number or the Original Customer number.
By default, the system uses the original customer number. If you use Commission Due By Cash Receipt with the Bill-To option, the receivable record is stored under the Bill-To Customer and the commission due must be stored under the Bill-To Customer as well. If the commission due is stored under the original customer number, then the commission due calculation will not be able to math the payment received in the A/R Open Item file.
A/R Sales Tax Audit Trail
Application Overview
The purpose of this feature is to give a detailed tracking for sales tax so that complete auditing information can be available (especially for state auditing). This feature enables users to create Sales Tax Liability Reports for each tax code based on invoices or cash receipts. It also gives users the choice for printing a report for fully paid invoices only. If the user is tired of paying sales tax for which the invoice has not been paid off or paid in full, or if the user would like to be able to track down the exact sales tax amount based on fully-paid invoices, this feature will serve as a remarkable vehicle for business.
Run Instructions
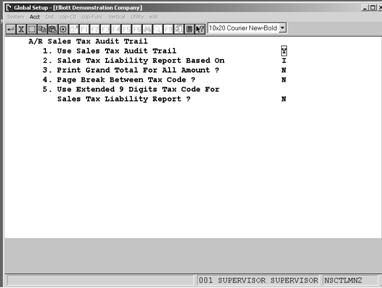
Goto: Elliott Main Menu à Util Setup à Global Setup à Acct à a/r Sales tax audit trail Enabling Sales Tax Audit Trail
1. Use Sales Tax Audit Trail?
This is a yes-or-no question for updating the Sales Tax Liability file (refer to Figure 2D.1). If the user answers “Y” to this question, the system will create the sales tax information record in the Sales Tax File during Posting Invoices to A/R.
2. Sales Tax Liability Report Based On
The Sales Tax Liability may be initially set up to run based on “I” - Invoice or “C” - Cash Receipt. If you answer “I”, the sales tax will be based on all invoices regardless of any payments made by the customer against the invoice(s). If you answer “C”, the sales tax will be based on the actual receipt of payment from customer against the invoice(s). Note: Once your choice of method has been selected, it cannot be changed. Doing so may cause unpredictable results!
3. Print Grand Total For All Amounts?
If you want the Sales Tax Liability Report to print a grand total of all taxed amounts, answer “Y” to this question. If you don’t, answer “N” to this question.
4. Page Break Between Tax Code?
If you answer “Y” to this question, the system will perform page breaks when printing the Sales Tax Liability Report.
5. Use Extended 9 Digits Tax Code For Sales Tax Liability Report?
This is an optional field. Some companies need the ability to use a 9 digit tax code. If you answer “Y” to this question, you will be able to see a 9 digit tax code on the report. How Does This Feature Work?Eventually, there is a work file associated with the Sales Tax Audit Trail feature. This work file will get updated during four processes, which are 1) Post Sales & Cr/Dr Memo Transaction, 2) Post Invoice to A/R if COP module is used, 3) Re-apply Cr/Dr Memo, and 4) Post Cash Receipts. We will discuss what happens to this work file during these four processes in the following paragraphs.
1 and 2. Post Sales & Cr/Dr Memo Transaction and Post COP Invoice to A/R
Upon the posting of invoices, STANDARD ELLIOTT will create Sales Tax Liability records. Each record consists of 18 fields, which can be found in the attached sample report. All the fields except Cash Receipt Date (Csh-Date), Receipt-Amt, Adjust-Amt, and Adj-Tax-Amt will be written with the data from the invoice. At this stage, multiple records may be created for one invoice due to the possible multi-tax codes.
If a credit memo was entered in COP Order Entry, STANDARD ELLIOTT will write the information to the Sales Tax Liability file in the field of Adjust-Amount and Adj-Tax-Amt upon posting.
If the Apply-to field is blank or Apply-to is not found, the Sales Tax Liability records will not be updated.
3 and 4. Re-apply Cr/Dr Memo and Post Cash Receipts
Upon the posting of Cash Receipts Processing, STANDARD ELLIOTT will update the fields of Csh-Date and Receipt-Amt based on the cash receipts information. If the Re-apply function was executed, STANDARD ELLIOTT will write the total of New Amount-1 and New Amount-2 to the Adjust-Amount field.
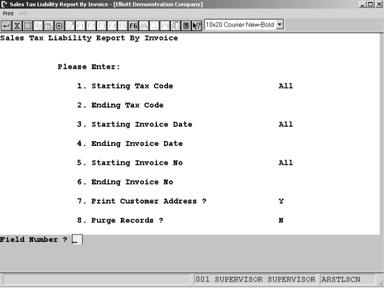
If the Apply-to field is blank or Apply-to is not found, the Sales Tax Liability records will not be updated. Sales Tax Liability ReportsIn order to get a glance of how much sales tax the user needs to pay to each state, county, and city, two reports are available to the user. One is Sales Tax Liability By Invoice, and the other is Sales Tax Liability By Cash Receipts. They both can be accessed by going through A/R à Reports à Ar Enh Report à Sales Tax Liability Report. Figure 2D.2 and Figure 2D.3 display the print screens of each kind.
The report by invoice is asking the user to enter starting and ending Invoice Dates versus Cash Receipts Dates in the report by cash receipts. The report by cash receipt has an additional field - 8. “Print Full-Receipt Invoice Only?”. Figure 2D.3 displays the Sales Tax Liability Report by Cash Receipts. The “Receipt-Amt” and “Adj-Tax-Amt” columns will only display if the report is by Cash Receipts. As you can see, the report by Invoice does not contain these two columns (Figure 2D.4).
Figure 2D.2. Sales Tax Liability Report by Invoice.
Figure 2D.3 Sales Tax Liability Report by Cash Receipts.
Figure 2D.4 shows a sample of a Sales Tax Liability Report.
A/P Global UtilitiesA/P Global Control
Elliott Main Menu à Util-Setup à Global Setup à Acct à A/P Global Control
Figure 2A.1 shows the setup screen for A/P Enhancements.
Field Entry Descriptions1. Print Voucher Reference On A/P Check
Answer “Y” to enable this feature. Default value is “N”.
By default, the system does not print any descriptive information referencing the Invoice on the Check Stub. This feature enables printing the voucher reference on check stubs below the invoice number being paid. If enabled, this will make it easier for the person signing checks to have a better idea of what the invoice was for. Additionally, it can be used for the original vendor invoice when it exceeds the 8-digit invoice field of the software. If voucher references are printed, then each check stub will only print up to eight invoices per section. Additional invoices with voucher references will carry over to the next check stub and the corresponding check number will be marked as void.
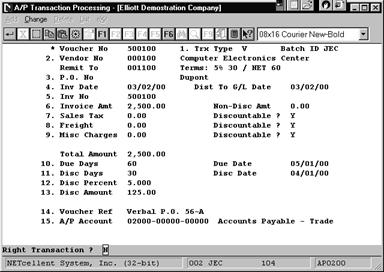
You can input the voucher reference while in the A/P Transaction Processing during add new vouchers or change vouchers. Once the transaction is posted, the voucher reference can no longer be changed. However, the user always has the option of not printing the voucher reference by resetting the flag to “N” in the Enhancements Setup, (Figure 2A.1).
Note: This same Voucher Reference can be optionally interfaced to GL.
Field 14 is the voucher reference to be printed on check stup. 2. Use Rec Accrual Account Reconciliation
Answer “Y” to enable this feature. Default value is “N”.
The purpose of this feature is to provide a means of reconciliation for the P/O receiving accrual account. If you are using batch receiving in Purchase Order, by default, there are no detailed report that can be used to reconcile the ending balance in the G/L receiving accrual account. This feature provides the necessary reports to reconcile the ending balance in the receiving accrual account.
As a bonus of enabling this feature, you can also speed up your A/P vouchering process if you integrate with PO module.
See documentation next chapter for a complete description and how to use this feature.
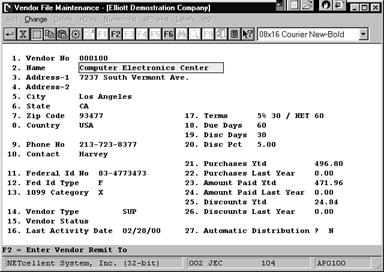
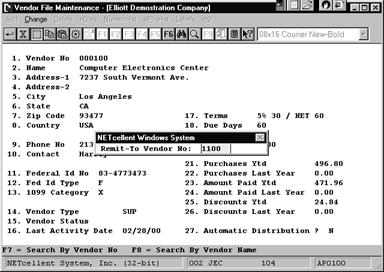
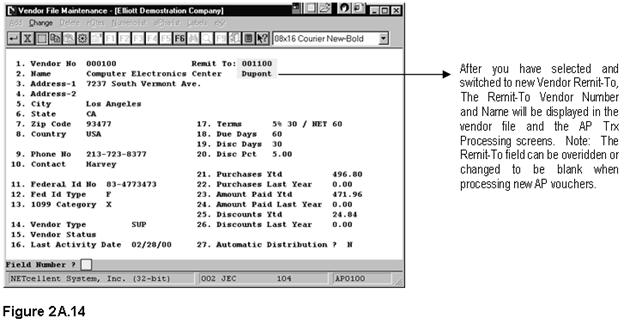
3. Vendor Remit To FlagAnswer “O” or “R” to enable this feature. Default value is blank.
By default, system does not provide for making payments directly to a Remit-To Vendor. This feature establishes a link between a vendor and its remit-to vendor. A factor company is an example of a remit-to vendor. The user may place an order to their vendor and make payment to the remit-to vendor, which in this case could be the factor company.
This feature provides the following options: 1. Space = Don’t Use Remit To, 2. O = Trx Under Orig. Vend, 3. R = Trx Under Remit To Vend.
1. If you wish to track all vendor accounts based on the original vendor, type “O” in the “Vendor Remit To Flag” field. Using this type, all payments are made to the remit-to vendor and the transactions are tracked through the original vendor. This option is less flexible that “R”, but easier to track the vendor transactions.
2. If you wish to track all vendor accounts based on the remit-to vendor, type “R” in the “Vendor Remit To Flag” field. Using this type, both the payments and the transactions are tracked through the remit-to vendor. This method is more flexible than “O” since you can change the Remit-To at voucher entry and change. However, since the voucher is posted to the Remit-To vendor, it makes tracking more difficult.
3. If you do not wish to use this feature, leave the “Vendor Remit To Flag” field blank.
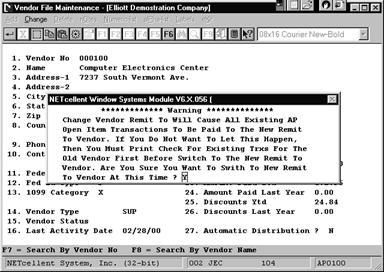
You may enable this feature anytime you want. However, do not change flag from “R” to “O” or vice versa without reading the detail instructions for this feature.
See documentation next chapter for a complete description and how to use this feature.
4. Print Vendor Name On A/P Check
Answer “Y” to enable this feature. Default value is “N”.
This feature prints the Vendor Name rather than Vendor Number on the top line of the Check Stub. This is an identification convenience feature ensuring that multi-check stubs with one check are kept together. 5. Allow Dist To PO line Item Acct for Non-Inv Item PPV
Answer “Y” to enable this feature.
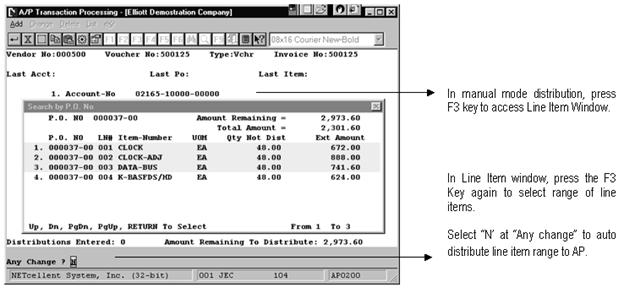
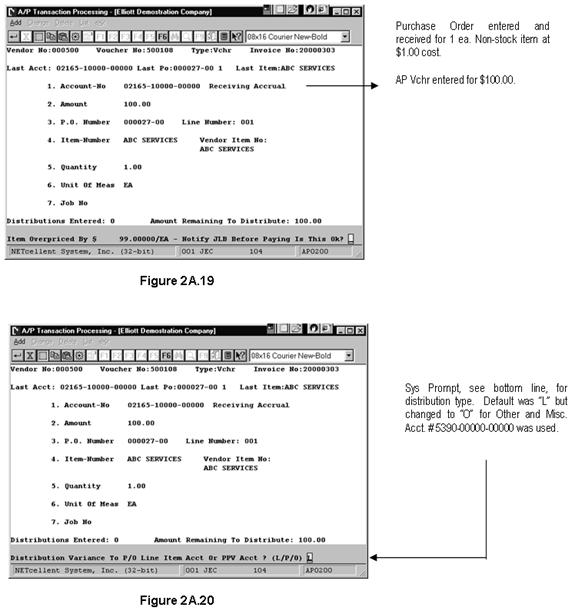
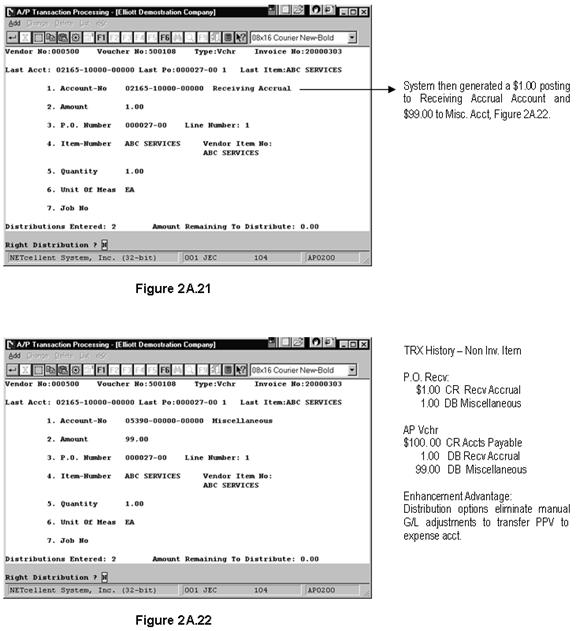
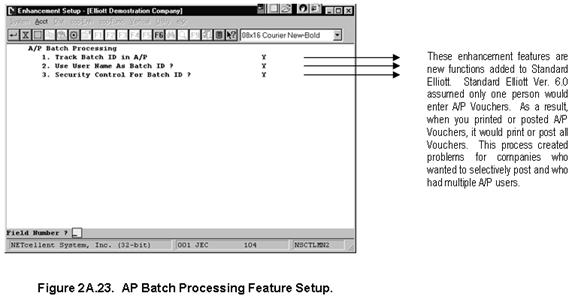
By default, system creates a Purchase Price Variance (PPV) Distribution in New A/P Trx Processing whenever A/P distribution mismatches PO. For PO non-inventory items (i.e. office supplies), in many cases the purchasing agent does not really know the cost. Therefore, they will just put a $1 or $0 in the PO line item unit cost field. However, this creates unintended significant value in the PPV Account. Currently, you can manually enter G/L entries to transfer it to the expense account (P/O Line Item G/L Account). If you answer “Y” to this field, “Allow Dist to P/P Line Item Acct for Non-Inv Item PPV?” and if during A/P voucher distribution the system detects a non-inventory item that has a variance amount, it will prompt the following message: “Item Overpriced By $9.999. Is this OK?” If you answer “Y,” the system will display a second question: “Distribution Variance to P/O Line Item Acct, PPV Acct, or Other?”
If you answer “Y” to this feature, the system will allow you access to next field and you will be able to define the default distribution account.
See documentation next chapter for a complete description and how to use this feature. 6. Dist To PO Line Item Acct For Non-Inv Itm By Default
This question is directly related to the previous field. If you answer “Y” to previous field, then this becomes a required field and the system will let you define a default value. You are given three options for your default account when there’s a variance as indicated in previous field: L = Line Item Account, P = PPV Account, and O = Other. Be aware that this is just the default and you still can override it at time of A/P distribution.
See Global Setup documentation for a complete description and how to use this feature.
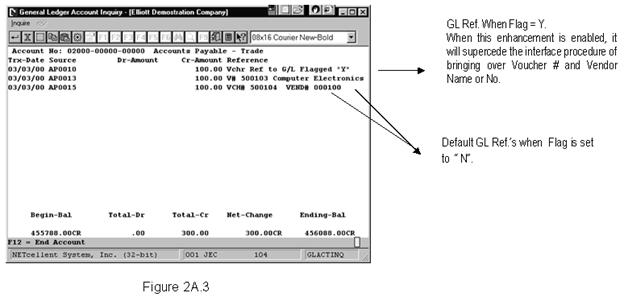
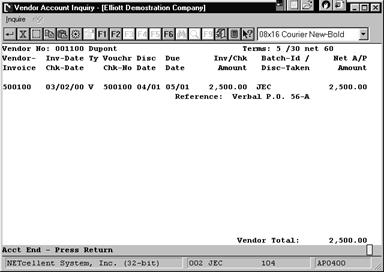
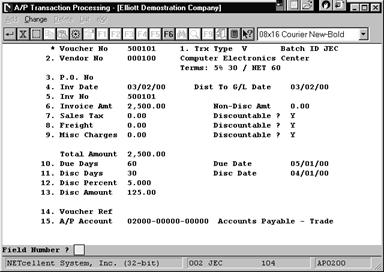
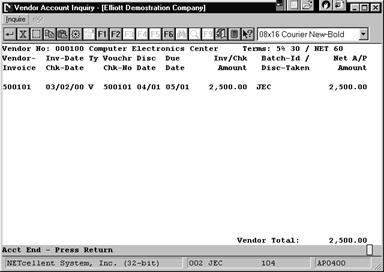
7. Voucher Reference For Interface to G/L
Answer “Y” to enable this feature. Default value is “N”.
Elliott Business Software gives you the option of using the Vendor name or Vendor Number when you interface AP into GL. This will appear in the Reference field along with the Voucher Number when you do a GL Account Inquiry or print the Trial Balance. Selecting “Y” in the AP Feature set-up will replace the Voucher Number, or Vendor Name/Number with the Voucher Reference, (Figure 2A.3), when you interface. The Voucher Reference will then appear when doing an Account Inquiry or printing the Trial Balance. See screen next page.
Using Global UtilitiesReceiving Accrual Account ReconciliationDifference between On-Line Receiving and Batch Receiving
Before we talk about the purpose of this feature, we have to understand the difference between On-Line and Batch receiving. The following table outlines the difference between these two receiving methods:
Application Overview
If you are using batch receiving, posting a PO receiving updates the General Ledger (via the GL Inventory Interface) by debiting inventory and crediting the receiving accrual account as a temporary liability account. Without enabling this feature, there are no sub-ledger detail reports that could be used reconcile the ending balance in the G/L receiving accrual account.
The purpose of this feature is to provide a means of reconciliation for the P/O receiving accrual account. For data accuracy and integrity, the Reconciliation Process should be done prior to your End of Month Reporting. As a bonus, this feature will also speed up A/P voucher processing.
If you are using on-line receiving method, there’s no need to enable this feature because there’s no such a concept as “Receiving Accrual Account” in on-line receiving process. However, we do recommend most users to use batch receiving instead of on-line for the additional features and benefits of batch receiving process.
Additional Files Used by This Feature:
Accounts Payable
1. APRCNFIL - Receiving Account Reconciliation File. This file will be updated when posting AP Transactions. Two reports will be generated from this file: The Outstanding Report (similar to A/P Open Items), and The Date by Date Report. We will discuss the purpose of these reports later in this document.
2. APRCNHIS - Receiving Reconciliation History File. This file will be updated when you purge the APRCNFIL file. The purpose of this file is to provide history information. You can generate an Outstanding Report from this file.
Purchase Order
1. PORCNFIL - Receiving Account Reconciliation File. This file will be updated after posting Receiving Transactions in P/O. Two reports will be generated from this file: The Outstanding Report, and The Date by Date Report.
2. PORCNHIS - Receiving Reconciliation History File. This file will be updated when you purge the PORCNFIL file. The purpose of this file is to provide history information. You can generate an Outstanding Report from this file.
Run Instructions
Elliot Main Menu à Distribution à Purchase Order & Receiving à Processing à Reconciliation Processing.
Setting Receiving Accrual Account in P/O Setup
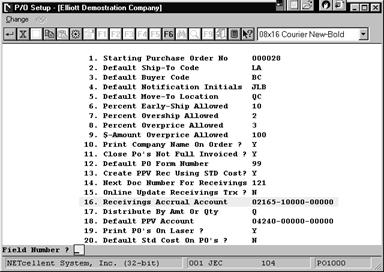
Before we can begin using this feature, you will need to setup the Receivings Accrual Account. Figure 2A.4 shows how to do this. Field 16 under P/O setup is where you define the account. In our example, we set this account to 02165-10000-00000.
Figure 2A.4 P/O Setup Updating and Maintaining P/O & A/P Account Reconciliation Files
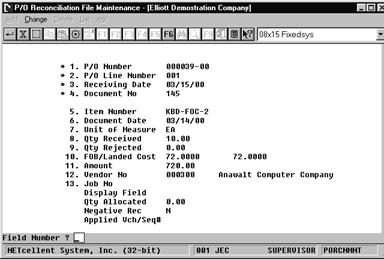
P/O Receiving: We will start by entering and receiving a purchase order as shown in Figure 2A.5. After posting P/O Receiving, the system will update the Receiving Account Reconciliation File where it can be maintained as shown in Figure 2A.6.
Figure 2A.5 shows a purchase order being received.
Figure 2A.6. After posting P/O Receiving, the system automatically updates The P/O Account Reconciliation file.
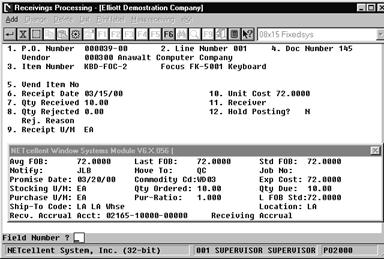
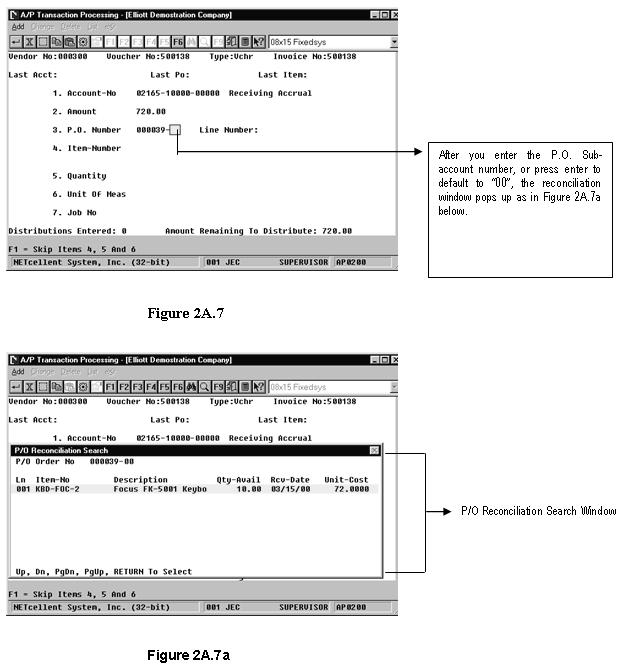
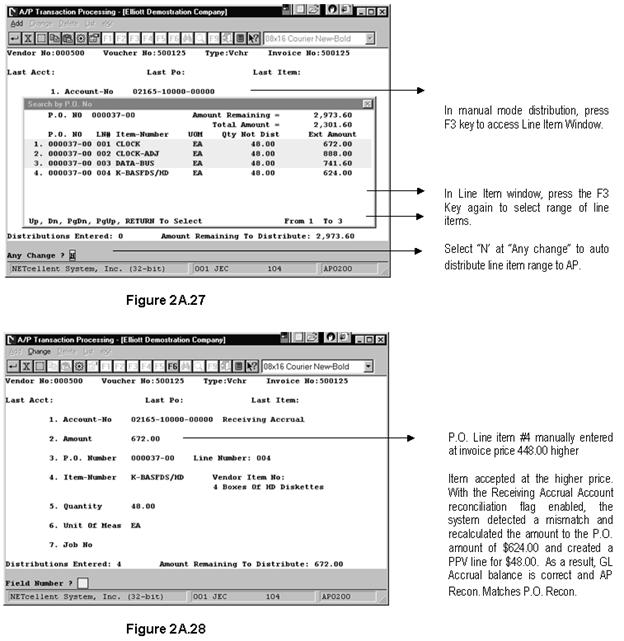
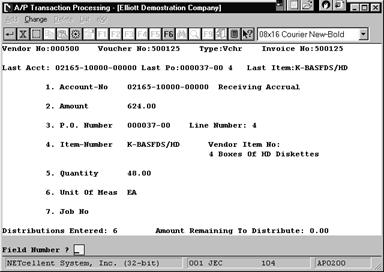
Processing A/P Transactions
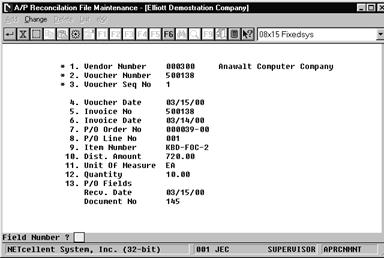
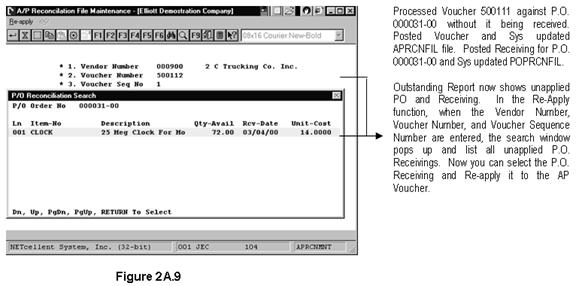
During A/P transaction, the system will display a P/O Reconciliation Search window, (Figure 2A.7 next page). You can easily select the line item by highlighting it and pressing <Enter>. The voucher no. is 50138, and applied to P/O 000039-00. Note: If you prepaid a P/O without receiving it, you will still need to enter the “Receiving Accrual Account”, “P/O No.”, “Line No.”, “Qty”, and “Unit of Measure”. After posting the A/P Transactions, the system updates the A/P Receiving Account Reconciliation File, Figure 2A.8 next page. This is a maintained file that can be edited.
Figure 2A.8 A/P Reconciliation File Maintenance Screen
Posting Considerations P.O. 000039-00
Posting P.O. Receiving: DR Inventory $720.00 CR Rec Accrual 720.00
Posting A/P Voucher DR Rec Accrual $720.00 CR Accts Payable 720.00
If Invoice had come in at $750.00
Posting A/P Voucher DR Rec Accrual $720.00 DR PPV 30.00 CR Accts Payable 750.00
Reporting
What makes this feature powerful is that it provides detailed reporting to reconcile the ending balance in the G/L receiving accrual account. This function gives you the option to print three reports: 1. Outstanding Report, 2. Date by Date Report, and 3. History Report.
1. Outstanding Report: This report should be run at the end of the accounting period. The report will list all Receivings that have not been invoiced and Invoices that have not been received, and compare the net balance to the GL Receiving Accrual Account. This report is generated from the A/P and P/O Account Reconciliation Files.
2. Date by Date Report: This report should be run when the Outstanding Report net balance does not match the GL Receiving Accrual Account balance. This report compares the subledger net changes with the G/L Accrual Account and isolates any discrepancies on a day by day basis.
If the net changes for a day match, that day will be skipped. If net changes do not match, the report will print the subledger detail and the G/L Accrual Account detail for that day. By isolating discrepancies to a day, it then becomes relatively easy to identify where the problems come from, e.g., someone updates the G/L Accrual Acct, but not from A/P or P/O. This report is generated from the A/P and P/O Reconciliation Files, and the GL Transaction File. 3.History Report: This is exactly like the Outstanding Report. The difference is that it is generated from the history files: APRCNHS and PORCNHS. These two history files are updated when you purge the A/P and the P/O Account Reconciliation files.
The Reporting Function is accessed from:Elliot Main Menu à Distribution à Purchase Order & Receiving à Processing à Reconciliation Processing à Report
Oustanding Report
This report items from the AP Reconciliation File and the P/O Reconciliation File. At the time of printing, you have the option to report fully reconciled items. When you purge these files, only the reconciled items get purged by a cut-off date.
The report is in four sections:
1. Unapplied A/P 2. Outstanding P/O 3. Fully Applied P/O 4. Grand Total (Net Balance)
Section 1: Unapplied A/P
These are A/P invoices posted against prepaid Purchase Orders or those P/O’s or line items that have net been received yet. When the P/O lines are received, they will be reported as Outstanding P/O line items in Section 2. To reconcile the P/O line items just received against the Unapplied A/P’s, you must go to Reconciliation Processing Menu, Processing Sub Menu Re-apply. After this has been done, the posted voucher and posted line items will appear in Section 3, Fully Applied Purchase Order line items.
Section 2: Outstanding P/O Line Items
This reports items from the P/O Reconciliation file and these line items are P/O line items that have been received but not vouchered in A/P.
Section 3: Fully Applied P/O Line Items
This report lists the P/O line items matched up, (reconciled) to the corresponding A/P voucher. If one P/O line item had two receivings, it would appear twice and each with it’s corresponding A/P voucher. This is also the information, (reconciled items), that gets purged when you run the Purge function.
Section 4: Grand Total (Net Balance)
This is the last page of the Outstanding Report and reports the difference between Unapplied A/P transactions and outstanding P/O line items.
Grand Total: A Debit balance indicates there are more unapplied A/P transactions than P/O line item receivings. A Credit Balance indicates more posted receivings than posted vouchers for line items in A/P.
In addition to Prepaid Purchase Orders and line items posted before P/O Receiving, a Debit balance can also occur when you post an A/P voucher without processing it against the P.O. Receiving. This also another good reason why you should reconcile at Month End.
A zero balance will indicate that all the P/O receivings have been matched up to an A/P voucher and that there are no Unapplied A/P transactions.
Remember:
P/O Receivings: DR Inventory CR Accrual Account
A/P Vouchers DR Accrual Account CR Accounts Payable DR Purchase Price Variance (PPV)
Day By Day Report
This report groups and isolates all transactions on a Date By Date reporting basis, thus making it easier to find transactions that do not match up.
Purging Function
Once the sub ledger is reconciled to the G/L Accrual Account, you should systematically purge the sub ledger to prevent these files from becoming too large. There is a purging function for the A/P and P/O Reconciliation Files and also for the A/P and P/O Reconciliation History Files.
When purging reconciliation files, the system will prompt you for a cutoff date. Any data before this date will be purged from the A/P and P/O Reconciliation files and written to, (updating), the A/P and P/O Reconciliation History Files.
When purging reconciliation history files, the system will display a window prompting you for the cutoff date. Any data before this date will be deleted from the A/P and P/O Reconciliation History Files.
Re-apply Function
After you print the Outstanding Report, there may be certain A/P transactions that should be applied to a P/O receiving transaction. This may happen when A/P Vouchers are posted prior to the P/O receiving. Although the net balance will match after the P/O receiving has been posted, you must Re-apply these outstanding transactions to match-up A/P and P/O so that they can be purged to prevent your sub ledger from becoming too large and making reconciliation a difficult task. This is a necessary house-cleaning job at Period End Closing.
Re-apply function: Elliot Main Menu à Distribution à Purchase Order & Receiving à Processing à Reconciliation Processing à Processing à Reapply P/O
Reset Allocation of Reconciliation Files for A/P and P/O
When entering an A/P trx, the system will allocate P/O quantity reconciliation records to prevent other A/P transactions from using them again. In case of data corruption, i.e., when an A/P trx has been deleted and the P/O trx not de-allocated thereby preventing the user from using the allocated P/O trx’s, we have provided a utility to rebuild and reset allocations based on the data in A/P trx and P/O receiving trx.
Reset Allocation: Elliot Main Menu à Distribution à Purchase Order & Receiving à Processing à Reconciliation Processing à Processing à Utility à Reset Allocation
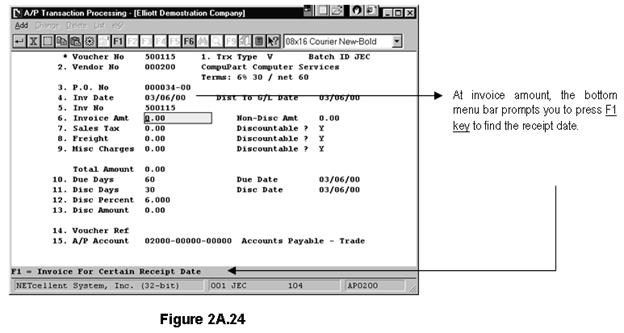
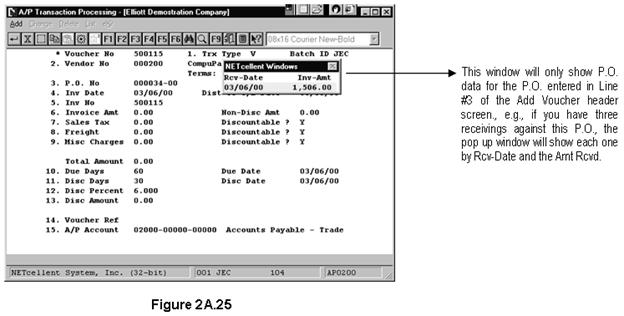
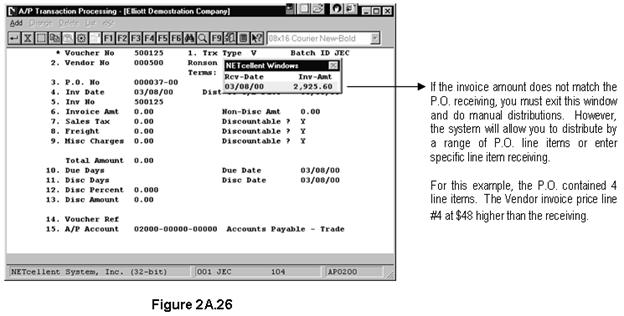
Speedy Voucher Processing
When processing an AP Voucher to Purchase Order Receiving, you to distribute every applicable P.O. line item during the Voucher entry. If you have enabled the A/P Global Control Receiving Account Reconciliation feature, the Speedy AP Voucher Processing feature allows you to enter a voucher and reference it to a P.O. receiving. Once referenced, the system will automatically distribute each line item for you and, as an added bonus, greatly speed up voucher processing.
|