|
|
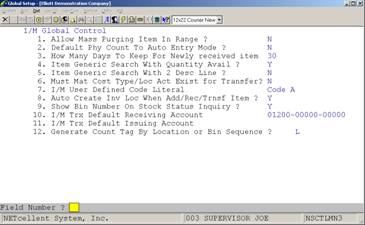
Global SetupI/M Global ControlFrom Elliott Main Menu go to à Util-setup à Global setup à Dist à I/m global control
Global Control Setup Screen
This screen controls which features and options you want to use to enhance the functionality of your Inventory Management module. Rather than default install these items, we let you “Pick and Choose.” Allow Mass Purging of Items In Range
Field 1: This enhancement will allow you to purge a range of item records rather than having to delete them one at a time. This mass item purge utility will delete item master record(s), inventory location records(s), and multi-bin record(s) based on the cutoff date. The item record will be deleted if the following conditions exist: item has no qty on hand, no qty on order, no qty allocated, no back orders, there are no sales or any other activities for this item for the past and current year, and the item’s last access or last sold date was before the cut-off date.
1. Allow Mass Purging Item In Range? Answer “Y” if you wish to use this function.
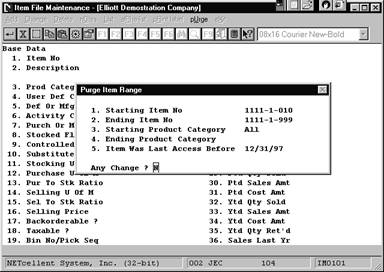
Figure 3C.2 shows how to Purge in Inventory File Maint.
In the above example the pop up window displays the conditions for purging items. Any items that were accessed on 12/31/97 or earlier will be deleted. If the item’s last access date was 01/01/98, then this item will not be deleted. Default Physical Count To Auto Entry ModeField 2.
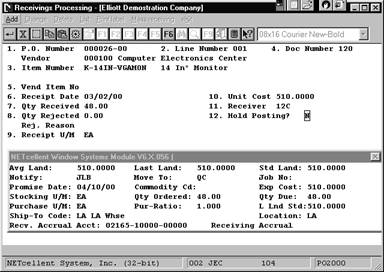
How Many Days To Keep Newly Received Items
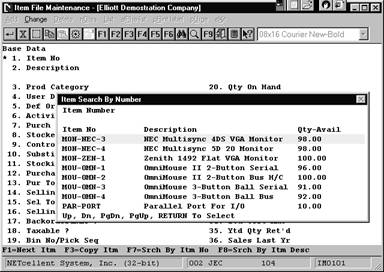
Field 3. Determines how long an item’s receiving is reflected in the Available To Promise (ATP) Inquiry and Report. Item Generic Search With Quantity AvailableField 4. With this enhancement the user has the capability of when searching for an item the quantity-available is displayed. This quantity available is taken from the item file. It does not take into consideration the quantity on order from a vendor or customer, and quantity in production. This enhancement can be accessed wherever generic item search can be accessed.
Please note: Qty-Avail = Item-Qty-OH - Item-Qty-Alloc.
The Item file is the only place from which quantity-available is obtained; as a result, if you are using multiple warehouses, the quantity in other locations will not show up. If you find this misleading, you may want to turn off this feature. For single warehouse users, you should not have any problems and find this enhancement very useful.
Item Generic Search With 2 Description LineField 5. This function allows you to see 2 description lines in the Item Search Window.
Answer “Y” if you wish to use this function.
Must Mat Cost Type/Loc Acct Exist For Transfer
Field 6: This is a control feature that ensures proper Inventory Asset Account Balances when transferring inventory from location to location. If this flag is set “N” the posting will be to the default Asset Account setup in I/M Setup.
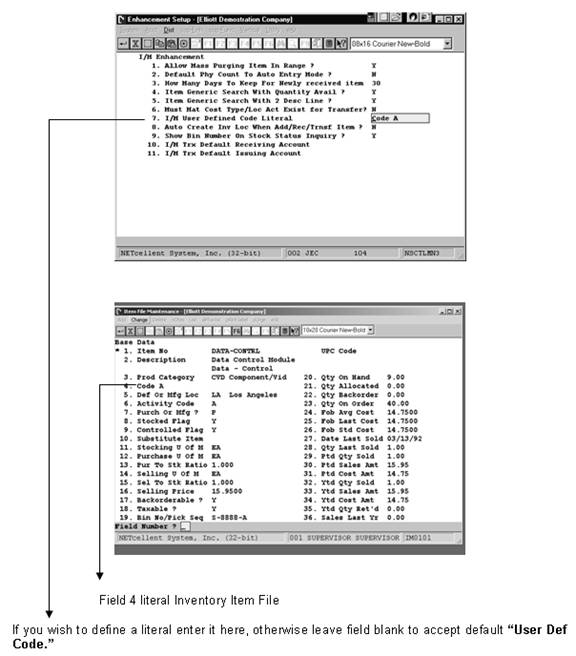
I/M User Defined Code LiteralThe I/M User defined Code is used in conjunction with the Bill of Lading program. Please refer to the Bill of Lading documentation in the COP manual. The literal you enter here replaces the default description of “User Def Code” in field 4 of the Inventory Master Item file, (Base Data screen 1).
Auto Create Inventory Location Control RecordField 8. For every item you want to stock at another location, it must be defined in the Location control file. Depending on the processing step, this function allows you to it automatically by:
1. When adding a new item, it gives you the option via a screen prompt to automatically create Inventory Location Records, (Location Control File), for all locations, (Location File).
2. When adding, receiving, or transferring item(s) not defined in the Location Control file, the will system will prompt you with “Item Not stocked At This Location. Do You Wish To Add?” This is gives the user the ability to create a new location control record on the fly.
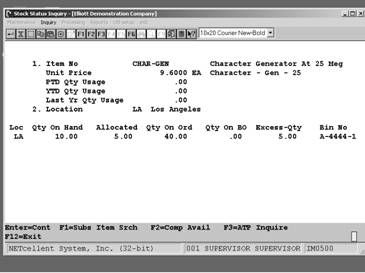
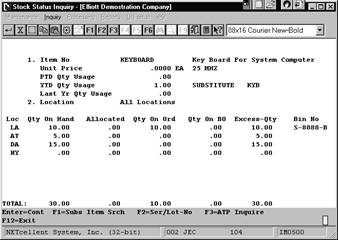
Answer “Y” if you wish to use this function. Show Bin Number On Stock Status InquiryField 9. This function allows you to view bin number in Stock Status Inquiry.
Answer “Y” if you wish to use this function.
Stock Status Inquiry w/Bin No. Displayed I/M Trx Default Receiving Account
The distribution account in Inventory Receiving defaults to the account number you enter here. This prevents the user from having to do a look up or from entering an incorrect posting account number. At time of data entry or if in “I/M Processing Change Mode,” users can override the default value. I/M Trx Default Issuing Account
The distribution account in Inventory Issuing defaults to the account number you enter here. This prevents the user from having to do a look up or from entering an incorrect posting account number. At time of data entry or if in “I/M Processing Change Mode,” users can override the default value.
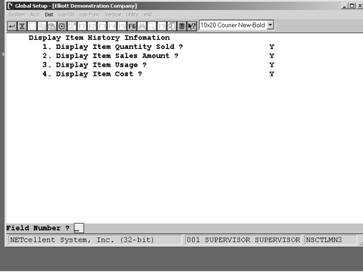
Display Item History Information
This function will allow you to view additional history information from the Item Master File and during Item File Inquiry. The inquiry windows are similar to Standard Elliott Item History Report.
Run Instructions
From Elliott Main Menu go to à Util-setup à Global setup à Dist à Display item history info
Answer “Y” if you wish to display the item quantity sold when inquiring item history information.
Field 2: Display Item Sales Amount? Answer “Y” if you wish to display the item sales amount when inquiring item history information.
Field 3: Display Item Usage? Answer “Y” if you wish to display the item usage when inquiring item history information.
Field 4. Display Item Cost? Answer “Y” if you wish to display item cost when inquiring item history information.
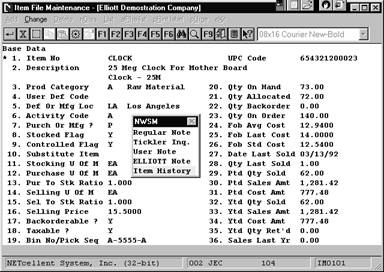
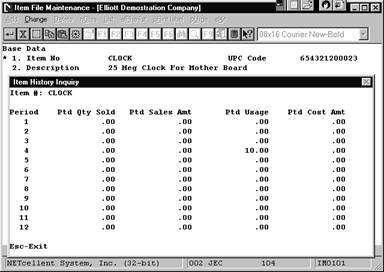
When you press the F6 function key, a popup window will display the following options: 1. Regular note, 2. Tickler Note, 3. User Note, 4. Elliott Note, and 5. Item History. After selecting Item History, the system will display the window below showing historical information for: Ptd. Qty. sold, Ptd. Sales Amt., Ptd. Usage, and Ptd. Cost Amt. as shown below.
Substitute Item Class FileApplication Overview
You can now define multiple substitute items in a class instead of one substitute item only. During order entry, if there is insufficient quantity for an item, the system will prompt if you would like to use substitute item. If you answer “Yes”, a window showing multiple substitute items will display. You can choose which substitute item to use. A similar function also exists in The Stock Status Inquiry Plus screen.
Before you can begin using this function you will need to setup the Five Additional Item Search Keys Enhancement and generate an Item index key, see Systems Manager Manual Global Setup for System and Utility. Run Instructions
From Elliott Main Menu go to à Util-setup à Global setup à Dist à Substitute item control
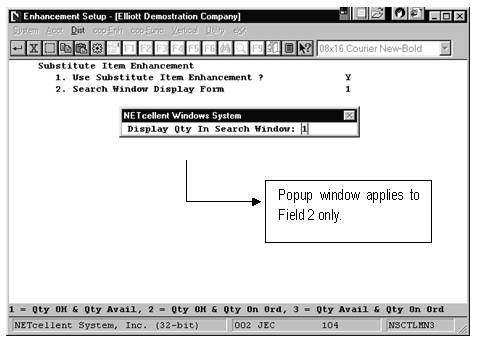
Field 1. Use Substitute Item Enhancement? Answer “Y” to enable this enhancement. Otherwise, answer “N” to disable function.
Field 2. Search Window Display Form There are two options for this field: 1 = One Line Info. or 2 = Two Line Info.
If you answer “1” in this field, the system will display a one line item description for the substitute items. After you type 1 and press <Enter>, a popup window will display prompting the message “Display Qty In Search Window:”. This message is asking you what information (bottom menu) you would like to display in the Substitute Item Search Window. You have three options: 1= Qty. On Hand & Qty. Available, 2= Qty. On Hand & Qty. On Order, and 3= Qty. Avail & Qty. On Order.
If you answer “2”, the system will display a two-line description. Additionally, it will also display the Qty. On Hand, Qty. On Order, Qty. Avail and Qty Allocated. Using Substitute Item Enhancement
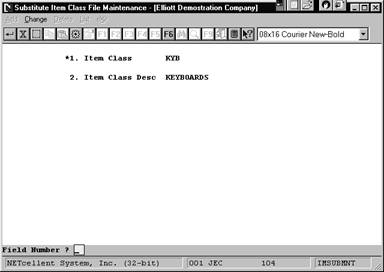
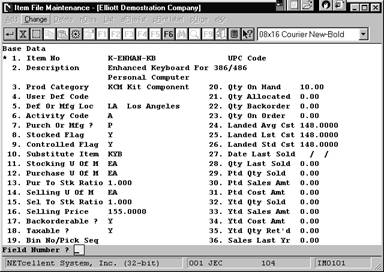
After setting up the Search and Index keys, the next step, (Inventory Maintenance – Substitute Item Class File Maintenance), is to define the item class under the Substitute Item Class File Maintenance as shown in Figures 3F.5. This Item Class can be assigned to as many Item Master record(s) as needed for a substitute reference, (Figure 3F.6, Field 10).
Figure 3F.5
Figure 3F.6
COP Order Entry
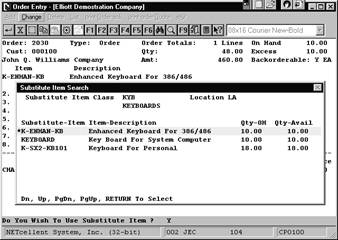
Figure 3F.7 shows an example of the display screen for the Multiple Substitute Item Enhancement.
Figure 3F.7 shows how this enhancement works during COP Order Entry.
Stock Status Inquiry
When you inquire on Stock Status, you can press the [F1] Subs Item Srch key to display all the substitute item defined for this particular item (Figure 3F.8).
Figure 3F.8
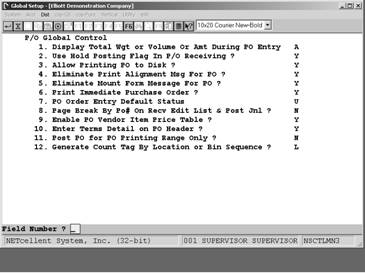
Global SetupP/O Global ControlSetup
1. Select Util-Setup from the Elliott Main Menu.
4. Select P/O Global Control
Fig. 3D.1 P/O enhancement setup screen
Display Total Weight/Volume/Amount During Po EntryDuring Purchase Order Entry, the system will show either the weight or volume information. It will also show the accumulated weight or volume information for each line item. This is helpful when you need to determine if a container has reached its maximum weight or volume capacity.
Usage Instructions
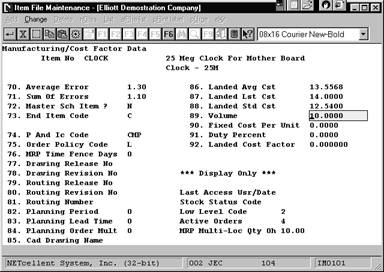
As mentioned earlier, with this enhancement the system will allow you to enter volume information in the Item File Maintenance. If you answered “V” in the enhancements setup as shown in Figure 3D.1, make sure that you have the volume information defined in the Item Master File field (89) as shown in Figure 3D.2.
Figure 3D.2.
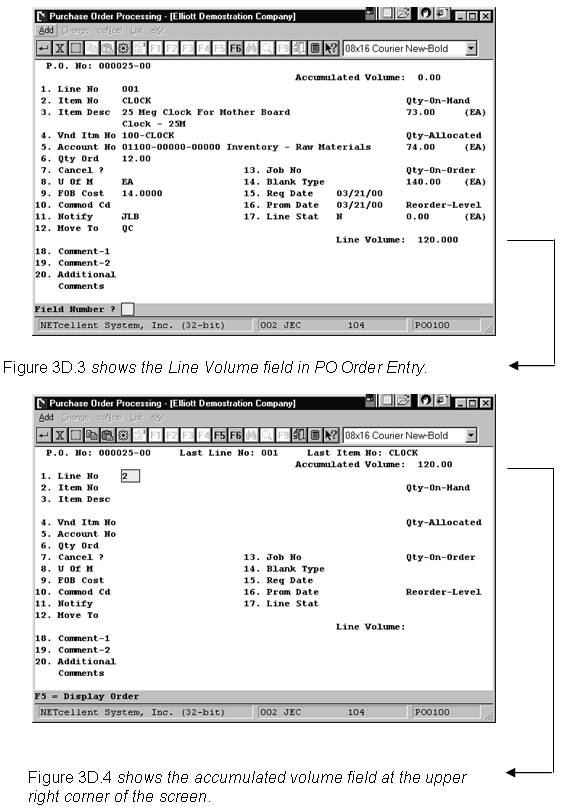
After setting up the enhancement, during PO Order Entry, the system will show the line volume field in the line item screen. In our example (Figure 3D.3), the first line item quantity ordered is 12. After entering 12 and pressing <Enter> the system automatically calculates the line volume based on the volume information entered in Item File Maintenance (Figure 3D.2). After completing the first line item, the system displays the accumulated volume at the upper right corner of the screen as shown in Figure 3D.4. The accumulated volume field has been updated to reflect the total volume of both line items entered for this purchase order.
The examples above show how volume information is displayed in PO Order Entry. Should you decide to use weight or amount instead of volume, the entry screen will have the accumulated weight or amount information instead of volume information.
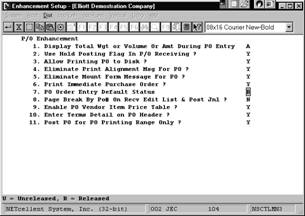
Warning: You can override the PO order header weight/volume field (Figure 3D.4) in the header screen. However, you should not override this field because you will cause the accumulated weight/volume/amount in the line item screen to display an incorrect value. Use Hold Posting Flag in P/O Receiving
Allow Printing of Purchase Order(s) to DiskEliminate Print Alignment Message for Purchase OrderEliminate Mount Form Message For Purchase Order
Print Immediate Purchase Order
This Enhancement allows for the convenience of printing a Purchase Order at time of entry or when in Change (Edit) mode. This will only work when Purchase Order Status is R, (Field #4, P/O Header Screen).
6. Print Immediate Purchase Order? Answer “Y” to enable this enhancement.
Printing Immediate Purchase Orders
Upon completion of Adding New Purchase Order or Change, message pops up in lower status bar asking if you want to print P.O. immediately (Figure 3D.6).
Purchase Order Entry Default Status
When adding new Purchase Orders the system defaults to a status of “U” (unreleased). This was designed for those organizations requiring systematic Purchase Order Procedures & Policies, i.e., review, approval, second review and approval, etc. Additionally, and in consideration of this, the Elliott system will not allow printing an unreleased P.O. nor will it reflect Status Type “U” in key reports.
For those companies not requiring such stringent Procedures and Policies or wishing to print a Purchase Order on demand, Elliott Software allows you to set the default status choice for Released or Unreleased default status.
Choose “R” for Released Default Status or “U” for Unreleased Default Status. (Figure 3D.7)
Figure 3D.7 Page Break By Po# On Receiving Edit List & Posting Journals
The Elliott System is designed to print the above reports continuously on full pages until completion for total session reporting and documentation storage. For those companies requiring receiving reports with payables processing , Elliott Software offers this enhancement by specific P.O. Number and Posting Journal
Answer “Y” for page breaks or “N” for continuous report.
Enable PO Vendor Item Price TableThe Elliott system is designed to default to the last cost or standard cost at the line item cost when adding a new Purchase Order. However, there are many vendors offering price breaks by quantity ordered. Elliott Software offers an enhancement to record, maintain and update vendor quantity pricing. This enhancement also offers the convenience of defaulting to vendor price based on quantity ordered, as well as, viewing vendor quantity pricing using the F2 key at the line item entry of P.O. processing.
Select “Y” to enable or “N” to not use the feature.
Note: If “Y” is selected, then you will be given the option of maintaining a Vendor Price Table. This table, 5 pricing levels based on quantity, is maintained in the Item Vendor file of the Purchase Order Module. See Figures 3D.7 and 3D.8.
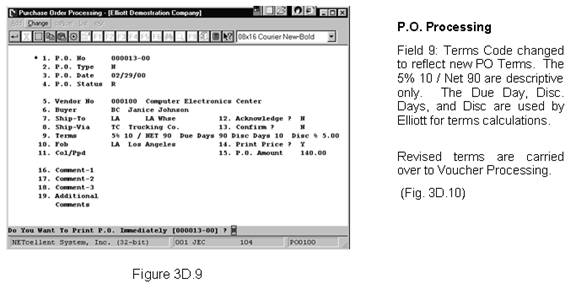
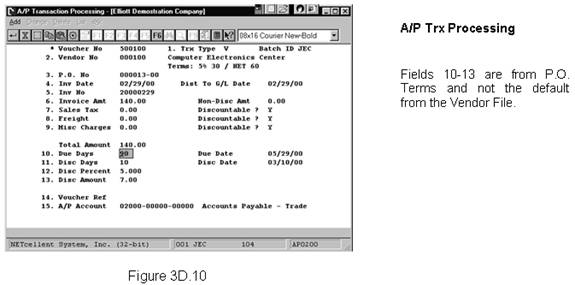
Enter Terms Detail On PO Header
When entering Purchase Orders, the system defaults to the terms code in the vendor file. However, there are occasions when special terms are negotiated on a case by case basis or the term are applicable to a specific purchase, i.e., 5% 10 days Net 90, etc. Elliott software offers an enhancement to handle such situations. Additionally, revised terms in the P.O. Header will be the default terms when processing vendor invoice by the P.O. Number.
10. Enter Terms Detail on PO Header? Answer “Y” to enable function.
Post PO for PO Printing Range Only
This is a performance enhancement for companies who maintain a large P.O. file and who do not purge historical data on a frequent basis. Rather than scan the entire database for purchase orders to post, this enhancement will read only the range of P.O.’s printed and only post that range.
The primary purpose of posting printed P.O.’s is to update the ordering information in the inventory item file. Posting of Purchase Orders occurs as a second step to Printing P.O.’s. After P.O.’s are printed, a window pops up and asks the user if the Purchase Orders just printed are okay. Answering “Y” to this question starts the posting (updating of the inventory item file) process.
For companies with a small P.O. file, the posting time is negligible and almost unnoticed. Processing (posting) time for companies with a large P.O. file might take several minutes and it is for them that this enhancement was added.
10. Post PO for PO Printing Range Only? Answer “Y” if you have a large P.O. File and if Posting P.O.’s might be a lengthy process.
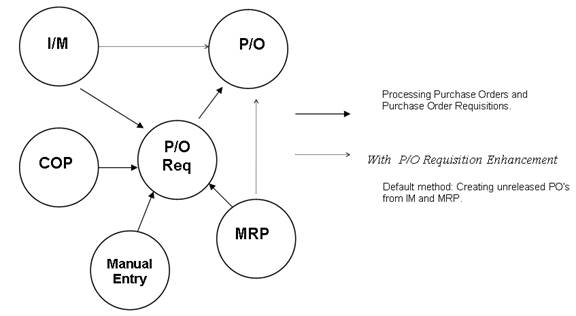
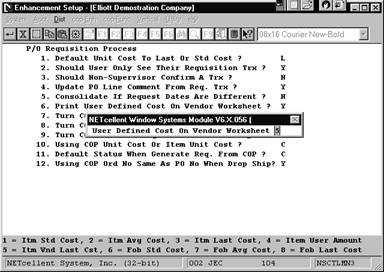
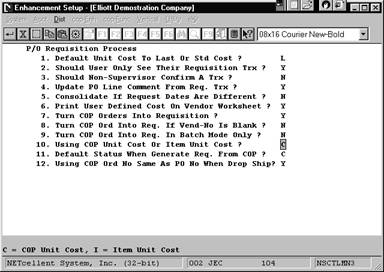
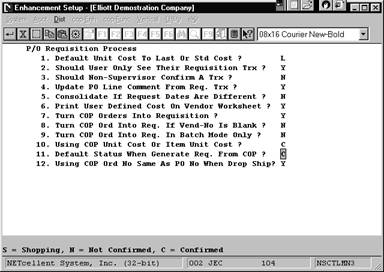
Purchase Order Requisition
Application Overview
This Enhancement is a preprocessing function for creating purchase orders by allowing you to enter requisition data from various modules into the PO Requisition Trx File. It will allow the purchasing supervisor to evaluate, adjust and confirm the requisition before creating purchase orders. The purchasing agent can use this enhancement to consolidate duplicate requisition trx. When used effectively, the price shopping work sheet will help to analyze costs for negotiation with vendors for better pricing.
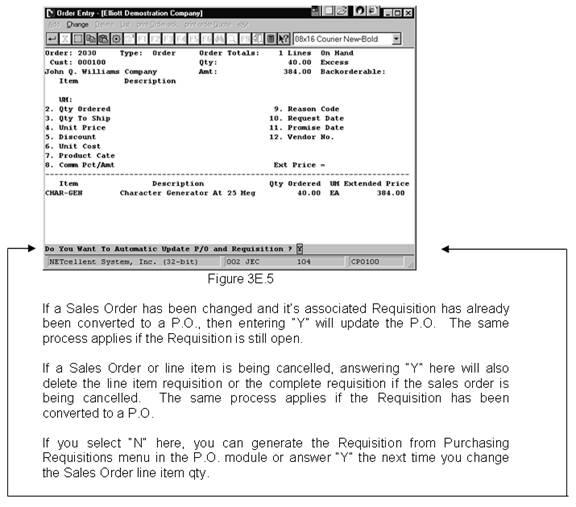
The advantage of this Enhancement is to manage and make adjustments to the requisition trx before creating a PO. This includes choosing a different vendor, negotiating a better price, choosing different shipping methods, different ship-to’s, and consolidating the same vendor’s requisitions into one single PO. The enhancement also allows COP orders to copy to the PO Requisition Trx file. Here, you can consolidate and combine requisition trx’s on a single PO when they are going to the same vendor.
Run Instructions
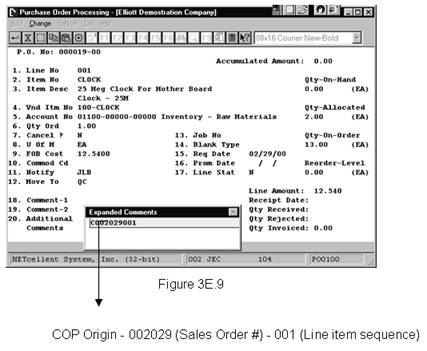
Cross Reference COP to PO
Global Setup
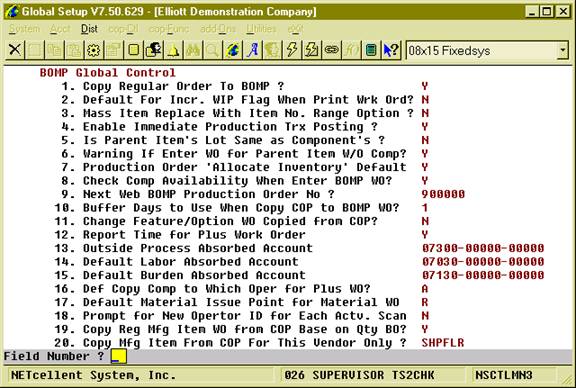
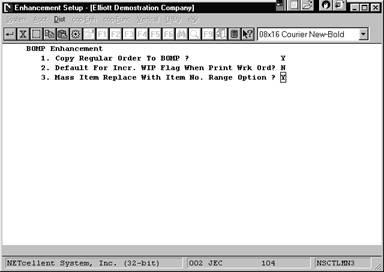
BOMP Global Control
Elliott Main à Global Setup à Dist à BOMP Global Control
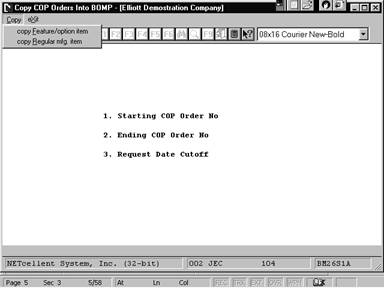
Figure 3A.1 shows the setup screen BOMP Global Control 1. Copy Regular Cop Orders Into BOMP
This enhancement allows you to copy a regular order with manufactured item(s) into BOMP as a work order (like feature/option item(s)). You can define a range of order numbers to copy into BOMP. The system will then create the production work orders.
1. Usage InstructionThis enhancement is very simple to use. It is similar to Standard Elliott’s copy feature item to BOMP function. When you enable the enhancement (refer to Figure 71.1), the system will display a second option, “Copy Regular Mfg. Item” (as shown in Figure 71.2).
Figure 3A.3.
After enabling this function under Enhancements Setup, the system will display a second option, “Copy Regular Mfg. Item” when you select copy COP Order into BOMP.
2. Default For Incr. WIP Flag When Print Wrk Ord?
This is a convenient function. It allows you to predefine the default values to “Y” WIP Distribution and Inv Reduction, “W” WIP Distribution Only, or “N” NOWIP.
Figure 3A.4
Default For Incr. WIP Flag When Print Wrk Ord?
There are three options: “N” = No WIP, “Y” = WIP Distribution, and “W” = WIP Distribution Only. 3. Mass Item Replace With Item Number Range
This function enhances the Standard Elliott Mass Item Replace function in BOMP. The Standard Elliott function will replace all parent items with the new component(s). However, with this feature, you can define a range of parent items.
Figure 3A.5 shows the Mass Item Replace With Item No. Range Option enabled.
4. Enable Immediate Production Trx Posting?
Allows production transactions to be immediately posted.
5. Is Parent Item’s Lot Same as Component’s?
Indicate whether the parent and component share the same lot number.
6. Warning If Enter WO for Parent Item W/O Comp?
A warning can be given if a work order is entered for an item without components.
7. Production Order ‘Allocate Inventory’ Default
You can specify if a work order should allocate inventory by default.
8. Check Comp Availability When Enter BOMP WO?
The system can check the availability of components when a work order is entered for an item.
9. Next Web BOMP Production Order No?
Enter the next Web BOMP Order Number.
10. Buffer Days to Use When Copy COP to BOMP WO?
How many buffer days should the system use when an order is copied from COP?
11. Change Feature/Option WO Copied from COP?
Indicate whether feature and option items should be changed when copied from COP.
12. Report Time for Plus Work Order
Options: o “Y” (Default) – The system will track operator time and production time. Labor Cost and Burden Cost will be calculated based on time information for each production. o “N” – The system will not track any time information and assumes no Labor and Burden Cost for the production. A simplified interface will be provided for scanning work. The system can still provide the current status in the shop. (Note: this flag cannot set to “N” at this moment.)
13. Outside Process Absorbed Account
This account needs to be entered if the production routings include an outside process.
14. Default Labor Absorbed Account
Newly created Department and Work Center entries will default to this value for the labor absorb account. It can be overridden in at Department Level and Work Center Level.
15. Default Burden Absorbed Account
This account can be overridden at the Department Level and Work Center Level.
16. Def Copy Comp to Which Oper for Plus WO?
Plus Work Order introduces routings which contain one or more steps to complete parent items. If the material issue point is not specified, the system will pick a step as the default material issue point based on this setting. Options: o A (Default) – Attached Operation. If the Attached Operation Number (5. Attaching Operation) is specified in the Product Structure, the system will use a corresponding operation if Operation Number exists in the routing. If Operation does not exist or the Attached Operation Number is blank, the system will use the first operation. o C – Currently Highlighted Operation. The highlighted operation will be used during data entry, like selecting a routing though Production Routing Maintenance. If there is no user interface, which is the case when a COP order is copied to BOMP, the first operation is used. o F – Always use the first operation. o L – Always use the last operation.
17. Default Material Issue Point for Material WO
Enter the default material issue point for Material Work Orders.
18. Prompt for New Operator ID for Each Actv. Scan
When operators select the Work Order Production function to report their jobs for a production, they will be prompted for an Operator ID and password. If this computer is shared by other operators, the system should prompt for the ID and password each time. Otherwise, the ID and password are only required the first time. This is the default setting for the whole Elliott system, but you can override this. Options: o “Y” (Default) – The system always prompts for Operator ID and password. o “N” – The system only prompts for the Operator ID and password the first time selected.
(Figure 6) BOMP Global Setup page 2
21. Immediately Post For Completed Scan Trx?
Allows an operator to immediately post the transaction that was reported through Work Order Production. Transactions reported in Production Transaction Processing use another flag to control immediate posting. Options: o “Y” (Default) – Allows you to post the transaction immediately. o “N” – Not allow. 22. Default for Work Order Exact Qty Flag?
WO+ introduces a new flag for each work order, Exact Qty Flag, where selecting “Y” indicates the quantity completed must match the quantity ordered. This global setup field is the default value for Exact Qty Flag, which appears when a work order is created through Work Order Entry. Options: o “N” (Default) – The default value is “N”. o “Y” – The default value is “Y”.
23. Default for WO Copy from COP Exact Qty Flag?
This is the default value of Exact Qty Flag when an order is copied from a COP Order. Options: o “N” (Default) – The default value is “N”. o “Y” – The default value is “Y”.
24. Default WO CSV Export Path and File Name
Enter the default path and file name for the Work Order CSV export file.
25. Default WO Report/CSV Export Sorting Sequence
Enter the default sorting sequence for the Work Order report CSV export
26. Force Logoff If Logon Over This Hours
Operators may forget to log off of the system and this can cause problems with production reporting. This field indicates the number of hours before the system considers it an exception. When this is exceeded the system will log the operator off and create an exception log. End Of Day and Meal Break are both considered a logoff function. Options: o 0 (Default ) – 12 Hours
27. Warning if Operator has no Break Aft This Hrs
A warning is given when the number of hours logged in exceeds this value without a break, normal or meal break. Options: o 0 (Default ) – 6 Hours
28. Default Direct Labor Grade in Work Order Plus
Default value for the Direct Labor Grade field in Departments and Work Centers. This labor grade is used for evaluations.
29. Default Shared Labor Grade in Work Order Plus
Default value for the Shared Labor Grade field in Departments and Work Centers. This labor grade is used for evaluations.
30. Default Machine Hours Calculation Method
Default value for the Machine Hours Calculation Method in Departments and Work Centers. This flag describes how the machine is operated in the work center and how the machine hours can be calculated. Options: o “M” (Default) – Man-Hours. Use this option when all the crew members are operating the same machine at one time. A Machine Hour is equal to the hours the crew spends on it. (Machine Hours = Labor Hours). o “C” – Crew-Hours. Use this option when each crew member is operating their own machine. A Machine Hour is the sum of the hours that each crew member spends on it. (Machine Hours = Labor Hours times Number Of Crew Members). o “S” – This means Machine Hours is not always related to Labor Hours. This is for situations where the machine can run independently without an operator involved, like a Computer Numerical Controlled (CNC) Machine. If “S” is selected, the following question will appear:
Default Machine Ends by Default If Labor Ends
Since a machine can run without an operator, this flag indicates the default behavior of a work center machine when an operator leaves. You can always override this behavior. Options: o “Y” – The machine usually stops after the operator leaves. o “N” – The machine keeps working after the operator leaves.
31. Def Days to Show in WC Oper Prod Activities
An option in the Work Center Operation/Inquiry screen shows all the production history of a work center. This value defines how many days will be displayed in this option. Qualified users can override this during the inquiry. Options: o 0 (Default) – All records
32. Def Days to Show in WC Oper Completed Prod
An option in the Work Center Operation/Inquiry screen shows the completed production history of a work center. This value defines how many days will be displayed in this option. Qualified users can override this during the inquiry. Options: o 0 (Default) – All records
33. Def Days to Show in WC Oper Terminated Prod
An option in the Work Center Operation/Inquiry screen shows the cancelled production history of a work center. This value defines how many days will be displayed in this option. Qualified users can override this during the inquiry. Options: o 0 (Default) – All records
34. Default Days to Show on Oper Time Clock Scrn
This value defines how many days will be displayed in the Operator Time Clock Maintenance/Inquiry. Qualified users can override this during the inquiry. Options: o 0 (Default) – All records
35. Default Shift for Operator
Default value for Operator file.
36. Copy PO FOB Cost to WO+ Outside Process
When products return from an outside process and the operator enters the Purchase Order Number of the outside process on the Production Transaction, this flag indicates if the system should use the most current FOB Cost in Purchase Order or the cost in Order Routing to calculate the outside process cost. Options: o “Y” (Default) – If a valid purchase order number is entered when reporting an Outside Process the system will use the FOB Cost from the PO Line Item instead of the one defined in Order Routing. o “N” – Always use the pre-defined value in Order Routing.
37. Update PO Receiving thru WO+ Outside Proc Rpt
When an operator reports the Purchase Order Number for an Outside Process, this flag indicates if the system should create a PO Receiving Record when the production transaction is posted. Options: o “Y” (Default) – If a valid PO number is entered for outside processing, the system will create a PO Receiving Transaction once the transaction is posted. o “N” – Never do PO Receiving though WO+.
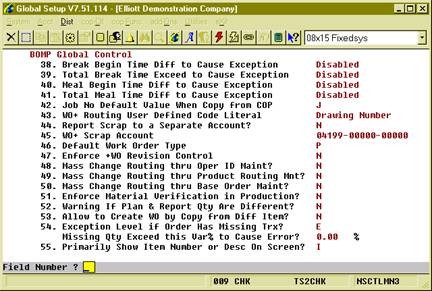
(Figure 7) BOMP Global Setup page 3
38. Break Begin Time Diff to Cause Exception
If an operator clocks out for a break earlier or later than the time defined in the Operator File and the difference in minutes is greater than this value, the system will consider this an exception and will notify the manager through an Elliott Event. The system will determine if it is 1st Break or 2nd Break based on the time it takes place. The manager can also specify a different value for each operator in the Operator File.
If the difference is negative, the operator took a break too early. If it is positive, the operator took a break too late.
Options: o 0 (Default) – Disable checking.
39. Total Break Time Exceed to Cause Exception
If an operator records a break time longer or shorter than the defined time in the Operator File and the difference in minutes is greater than this value, the system will consider this an exception and will notify the manager through an Elliott Event. The system will determine if it is 1st Break or 2nd Break based on the time it takes place. The manager can also specify a different value for each operator in the Operator File.
It is only considered an exception when the operator’s break is too long.
Options: o 0 (Default) – Disable checking.
40. Meal Begin Time Diff to Cause Exception
If an operator records a meal break earlier or later than the time defined in the Operator File and the difference in minutes is greater than this value, the system will consider this an exception and notify the manager through an Elliott Event. The manager can also specify a different value for each operator in the Operator File. Options: o 0 (Default) – Disable checking.
41. Total Meal Time Diff to Cause Exception
If an operator records a meal break longer or shorter than the time defined in the Operator File and the difference in minutes is greater than this value, the system will consider this an exception and notify the manager through an Elliott Event. The manager can also specify a different value for each operator in the Operator File.
It is only considered an exception when the operator’s meal break is too long.
Options: o 0 (Default) – Disable checking.
42. Job No Default Value When Copy from COP
This flag will indicate which value will be used as the Job Number by default when a work order is copied from a COP sales order. Options: o “J” (Default) – Sales Order’s Job Number o “O” – Sales Order Number o “C” – Customer Number
A Job Number will be automatically created if the Sales Order does not have a job number and Job Numbers are in use.
43. WO+ Routing User Defined Field Literal
This setting defines the literal for the 15 character user-defined field for each operation. The default value of “User Defined Field” will be used if the value is left blank.
44. Report Scrap to a Separate Account?
By default, the cost of scrap is absorbed into the Finished Goods account, or the Standard Variance account if the cost method is Standard Cost, and this increases the production cost or variance. Set this flag to “Y” if you want to separate this amount into another account. The system will use an algorithm to estimate this cost and distribute it to the scrap account. Options: o “N” (Default) – Not use another account for cost of scrap. The total production cost will increase due to scrap. o “Y” – Use another account to absorb cost of scrap.
45. WO+ Scrap Account
Scrap Account Number. Enter this account number if you plan to absorb the cost of scrap with a scrap account.
46. Default Work Order Type
This flag was moved from the Available to Promise Global Setup to BOMP. Since we now have three 3 types of work orders, this flag indicates which is the major type in use. This will affect several areas, such as creating a work order through ATP processing. The default work order type will depend on this flag. Options: o “P”(Default) – Plus Work Order o “M” – Material Work Order o “O” – Legacy Work Order
47. Enforce +WO Revision Control
After a Work Order is released to the shop floor, any change in order routing may cause confusion for the operators. Revision Control can prevent problems by requiring the operator to reprint the Traveler, which contains the order routing information, whenever the order routing is modified. Reporting for this work order will be suspended until the Traveler is reprinted.
The Revision Number of a Work Order is visible on many screen and reports. The original version of the order has a revision of zero.
Options: o “N” (Default) – Revision Control not enforced. o “Y” – Enforce Revision Control.
48. Mass Change Routing thru Oper ID Maint?
This global flag controls whether all the operations will be updated if a value is changed in the Operation ID file. These operations can be in Product Routing, Order Routing or Base Order. Options:
49. Mass Change Routing thru Product Routing Mnt?
This global flag controls whether all the work orders will be updated if a value is changed in the Product Routing file. These work orders can be Plus Work Orders or Base Work Orders. Options:
50. Mass Change Routing thru Base Order Maint?
When user changes the value in Base Work Order, all the work orders which is copied from this base order can be updated or synchronized at once. These work orders can be Plus Work Order. This global setup indicates if user wants to use this feature. Options:
51. Enforce Material Verification in Production?
Material Verification requires the operator to enter the item number or scan the UPC of each item used when reporting a production for the material. This feature can be activated with this global setup flag. Options:
If Material Verification is activated, another set of parameters will appear:
52. Warning If Plan & Report Qty Are Different?
A warning can be displayed if an operator reports a quantity which is different from the planned quantity when the production started. Options:
53. Allow to Copy from Another WO With Diff Item?
This flag determines if an operator is allowed to copy a routing and bill of material from another base plus work order to a plus work order and the item numbers on the two orders are different. The flag will not affect copying other orders to a base work order. Options:
54. Exception Level if Order Has Missing Trx?
The system will check for any missing transactions in the previous operations when posting a transaction for the last operation. For example, 98 pieces are reported for the first operation and now the operator wants to post 100 pieces to the last operation. The system would consider the first operation to be missing a transaction of 2 pieces. This flag determines if the missing transaction is an error, warning or not an exception. Options:
Another prompt will appear if this flag is “E” or “W”: “Missing Qty Exceed this Var% to Cause Error/Warning?”
55. Primarily Show Item Number or Desc On Screen?
You can select the item number or item description to be the primary display on the inquiry screens, depending on which one is more meaningful. Options:
|