 |
|
Global SetupBill of LadingApplication OverviewThis
feature is designed to print a Bill of Lading form used by trucking companies
for shipping. Our primary goal is to
save time by filling out the Bill Of Lading forms for the shipping department
staff. In order to use this feature,
users are required to have one of the following forms: 1) A short form which is
seven inches long, RapidForm form number 25654, or 2) A long form which is 11
inches in length, form number 22824. For
the best result, the long form is recommended. A sample of each form follows the last page
of this enhancement. Run InstructionsBefore
utilizing the function of printing a bill of lading, you need to set up Bill of
Lading through the setup process. You
can choose to either accept the default settings or customize the printing. Elliott
main menu à Util setup à Global setup à cop-ctl à Bill of
lading
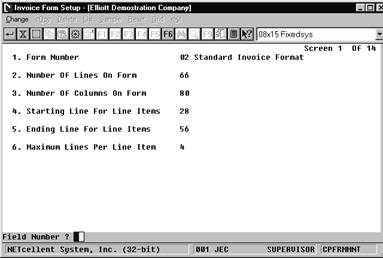
Figure 4A.1 shows
the setup screen for Bill of Lading. 1. Form Length To
Use? This flag controls the type of Bill of Lading
form to use (4A.2). Enter “1” if you
wish to use the RapidForms Short Form #2565, or “2” for the long form
#2282. For the best result, the long
form is recommended.
Figure 4A.2 2.
Packages Printing Options? On the Bill Of Lading
form, the user has to specify the number of packages. This question gives the user three options: 1)
Always Use Qty To Ship, 2)
Select During Order Entry, and 3)
Leave Blank. 4)
Qty-Ship/Item User Amount If
the user enters 1, the system will grab the Qty Shipped information from the
Order Line Item file to put it on the form.
If you enter 2, system will require the user to specify the number of
packages in the Order Line Item screen manually as is shown in Figure 4A.3.
Choosing option 3 will leave the No. Packages column blank and the warehouse
staff will fill it out manually. Choose
option 4 = Equal Qty-Ship/Item User Amount.
Item User Amount is a convention in Elliott to stand for Qty per Box for
each item. If you do specify this
information, then system can automatically determine number of box for each
line item when printing Bill of Lading. 3.
Weight Printing Options? This
flag controls the weight printing on the Bill of Lading form. You have three options: 1)
Item Weight, 2)
Leave Blank, and 3)
Manual Entry. Option
1 basically will retrieve the Item Weight from the Item File. Option 2 requires the warehouse staff to fill
in the weight manually. Option 3 will
prompt you to enter the total weight for each line item during order entry. 4.
Description Lines To Print? This
flag gives you four options to control how the package description should be
printed on the Bill Of Lading form. They
are: 1)
Line Item Desc 1 + Usr Def Code Desc, 2)
Line Item Desc 2 + Usr Def Code Desc, 3)
Both Line Item Desc + Usr Def Code
Desc, and 4)
User Def Code Desc Only. User
defined code stands for the category of the item. For example, if you are a monitor
manufacturer, you probably will not put your item description of “Model 7682
1024x768 15” Flat” on the bill of lading since the trucker wouldn’t understand
what it means. Chances are, you will put
something like ‘15” VGA Monitor’ on the bill of lading. The trucker should be able to understand this
and it conforms to the Department of Transportation’s regulation. You will need to set up a user defined code
of ‘15” VGA Monitor’ and indicate the item’s user defined code in item file
maintenance. If
you enter “1,”, the first line of the Line Item Description and the User
Defined description will be printed on the form, wereas option “2” will make
the system print the second line of the Line Item Description in the Order Line
Item file plus the description in the User Defined File, or “3” for all the
Line Item Description 1, 2 and the User Defined File description; option “4”
will have only the User Defined Description printed in the Package Description
column of the form. When you specify
“4,” the system can also consolidate bill of lading line items for line items
on the order with identical user defined codes. 5.
Comment Code for Note That Will Always Print If
this is your first time using this enhancement, we suggest you leave this field
blank and get familiar with our Note Function Enhancement first. The code specified here refers to the notes
associating with this code in the Note Windows.
This flag allows you to select a predefined note that will always print
on the Bill of Lading. This is a global
setting. Once set, all bills of lading will be printed with this note. If you do not have such a global note to
always print on the bill of lading, you should leave this field blank. More specific notes like order, customer,
item or line item notes can also be printed on the Bill of Lading (refer to the
Note Function Enhancement). 6. Update Order Picking Date After
Printing? If you are using Bill of Lading as your
picking ticket, answer “Y” to this question.
If you print a picking ticket separately from the Bill of Lading, you
should answer “N.” 7. Emergency Response
Phone No.? The
Department of Transportation requires you to provide an Emergency Response
Phone Number in case of a disaster, like a truck spill on the highway. 8. Warehouse Manager
Name? You
can enter name of the person in charge of the organization’s shipments. The name entered here will be designated as a
contact person in the company for emergency dealings. 9.
Print Company Name? Depending
on whether you have a generic form or a pre-printed form with your company’s
name and logo, you will answer “Y” or “N” accordingly. 10. Print Date of
Shipment? This
is a Yes/No flag triggering the printing of the shipment date on the top of the
BOL. The date will be entered during the
printing routine. 11.
Print Warehouse Address On Bill of Lading? Answer
“Y” if you wish to print the warehouse address on the Bill of Lading. 12.
Print Unit of Measure on Bill of
Lading? Answer
“Y” to use this function. 13.
Print Item No. On Bill of Lading? Answer
“Y” to use this function. 14.
Print Purchase Order No. On Bill
of Lading? If
you are using the Bill of Lading as a picking ticket, chances are you want to
answer “Y” to print the customer purchase order on the Bill of Lading. 15.
Print Shipping Instructions On
Bill of Lading? Answer
“Y’ to use this function. 16.
Print One Blank Line Between Each
Line Item? Answer
“Y” to use this function. USING BILL
OF LADING
Information On
Bill Of Lading There
are two files that the user has to maintain to ensure the correct information
will be printed on the bill of lading forms.
The first file is the User Defined File, and the second is the Item
File. A. User Defined File-
The
User Defined File controls the information printed on the bill of lading
forms. The records created in this file
will be used in the Item File so that each individual item has clear
information for the bill of lading. As
its name suggests, the User Defined File can be named by the user. Usually the more descriptive the literal, the
better it is for the user. The literal
defining of this file is done in Inventory Maintenance (please refer to that
manual). The user may either choose the
default value or enter any custom literal.
In our example, we use the default code, User Defined Code, as the
literal in the User Defined File. The
User Defined Code will later be used in the Item File for an item so that the
corresponding User Defined Code Desc, User Defined Code Class, Hazardous
Material, Item Category, and the ERG# information can be printed on the bill of
lading forms. Figure 30.1 illustrates
what we have created for this file.
Figure 4A.5. A User
Defined record has been built for the Item File to print the information
entered here on the bill of lading forms. 1) User Def Code-- A code uniquely
identifying each User Defined record. It
will be used in the Item File identifying which shipping category of the
trucking company that a particular item belongs to. 2) User Def Code Desc-- A detailed
description of a shipping category of the trucking company. This piece of information will be printed in
the column “KIND OF PACKAGE, DESCRIPTION OF ARTICLES, SPECIAL MARKS AND EXCEPTIONS”
on the form. 3) User Def Code Class-- This field
specifies which class of rate that the trucking company charges for the item’s
corresponding shipping category code (equivalent to User Def Code in our
example). It will be printed in the
column of “CLASS OR RATE” on the form. 4) Hazardous Material-- This field will
be printed in the column of “HM,” which indicates whether the item’s
corresponding shipping category code contains hazardous material or not. The user answers either “Y” or “N” to this
question. If the shipment contains hazardous materials, the long form must be
used. 5) ERG#-- This field has been regulated
recently by the government. It requires
the user to enter a two-digit Emergency Response Group Code for emergency
response personnel to provide proper services when there is a hazardous
material spill. B. Item File-
Once
the user sets up the User Defined File, the records can be used to print useful
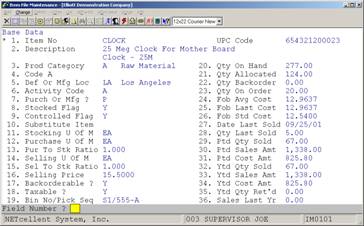
information on the bill of lading. Figure 4A.6 shows that Field 4 contains the
code description that we have seen in Figure 4A.5. “90” is used for the Item No Clock.
Figure 4A.6 In the Item
File, the user has to enter the code that he/she established in the User
Defined File to print the information on the bill of lading. HOW TO PRINT
THE BILL OF LADING There
are three files involved in the Bill Of Lading printing. They are the Ship Via File, the Customer File
and the Order Header File. Each one of
these have a chain reaction effect on the other. The user has to make sure that these files
are set up accurately to print out the bill of lading. Therefore, we will discuss these four files
as well as the bill of lading printing. Remember, it is a pre-requisite to
establish a correct relationship among these related files. A. The Chain Reaction Effect This effect derives from the fact that
the bill of lading printing is controlled by a flag set up in the Ship Via
File. In other words, when the user
enters the customer information in the Order Header, he/she has to be certain
that this particular customer has a Ship Via code that contains a printing
control flag. Figure 4A.7 depicts this
so-called chain reaction effect. The
detailed linking relationship will be stated in paragraph B, C, D and E in this
section. B.
Ship Via File
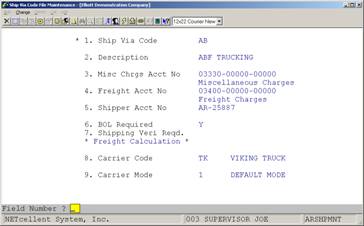
The Ship Via
Code File Maintenance contains the flag that controls printing of the Bill of
Lading (Figure 4A.7). C.
Customer File
As paragraph A and B state, the Ship Via
has to be specified in the Customer File.
Therefore, the Ship Via code AB that is set up with a legitimate Carrier
Code can be applied to the customer record.
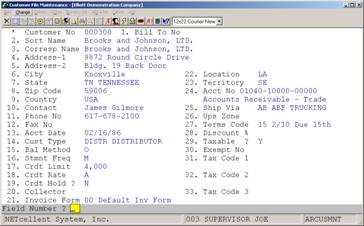
The Ship Via field for B&J Enterprises (Figure 4A.7b) is AB. The user will notice later that when we use
this particular customer during the Order Entry session, the corresponding bill
of lading information can be printed.
Figure 4A.7 Field 6 prompts “BOL Required”,
answer “Y” to print BOL. D. Order Header FileThis is the last setup step for the user
to go through to print out the bill of lading information. In the previous paragraph, we have
established the correct Ship Via code for Flaum Consultants, Inc., so we will
continue using this example to proceed with the order entry. Figure 4A.8 shows a customer set up to use
BOL.
Figure
4A.7b
Field 25 of
this customer record indicates that TC is being used for the future bill of
lading printing. E. Bill Of
Lading Printing
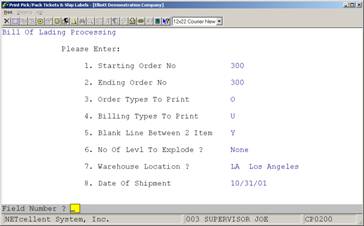
After setting up this enhancement, you can now begin to print Bills of Lading. Select COP à Processing à Print Pick/Pack Tickets & Ship Labels à Print à Bill Of Lading, and then fill in the Bill Of Lading Processing screen as in Figure 4A.9. For the Order Types To Print field, the user has three options: 1) printing “O”, Type O orders, 2) “I”, Type I orders, and 3) “B”, both types of orders. Since the user is assumed to understand different types of orders in COP, the meanings of these three types will not be discussed in this documentation.
Figure
4A.8 B&J Enterprises is
a “bill-of-lading legitimate” customer in our example and is used for Order
Entry. After the user specifies the order
type(s), the system will prompt the user to specify the Billing Types To
Print. He/she can then choose “B”illed
types only, “U”nbilled types only, or “A”, both. Field 5 in this printing screen is the
Blank Line Between 2 Items. The user may
answer “Y” to leave a blank line between 2 items or “N” to have no blank lines.
Figure
4A.9 Bill Of Lading printing header screen. It allows the user to print either “O” type
of orders, “I” type of orders or both. Checking Criteria For The Bill Of Lading
If
the Bill of Lading is not printing, please check the following: 1.
Order Header File: The order number must be between the
starting order and ending order (Screen Criteria 1 & 2). This order cannot be posted. The order type cannot be a Credit Memo
(“C”). The order type to print is “O” (Screen
Criteria 3), and the order type is “O”. The order type to print is “I” (Screen
Criteria 4), and the order type is “I”. The billing type to print is “B” (Screen
Criteria 4). The order is selected or invoiced. The billing type to print is “U”
(Screen Criteria 4), and the order is complete. The order Ship Via Code must exist
(Order Header Screen Field 15). Use the Freight Calculation
enhancement (license and control). The carrier code in the Ship Via Code
exists (Ship Via Code Maintenance Screen
Field 5). 2.
Order Line Item File No Comment Item. The line item cannot be posted. The line item qty. to ship is not
<= 0. The billing type to print is “B”
(Screen Criteria 4), and the line item is selected. Customer Item Reference SetupApplication OverviewSome customers place orders using their item numbers rather than
yours. Without a proper
cross-referencing system, it may not be easy to understand which item the
customer is referring to and could lead to situations such as shipping the
wrong item, consuming time to verify the correct item ordered, or even
possibly, losing the sale. This
application allows defining a cross-reference system. Run InstructionsBefore
setting up customer cross-reference item numbers, you must define where and how
you want to use them. To do this, go to: Main
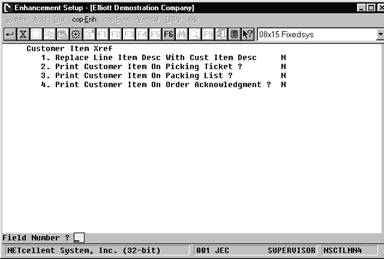
Menu ® Util-setup ® Global setup ® cop-Ctl ® customer Item x-ref. The following screen will then be displayed:
Customer Item Xref Setup Screen Entry
Field Descriptions
* Complete the setup screen to your
specifications. Using Customer Item Cross ReferenceMaintaining
Customer Item File
Before
understanding which items your customers are referring to by using their item
numbers, you need to build a cross reference table to match customers item
numbers to your item numbers. To do this,
select COP à Maintenance à Customer Item File. The maintenance screen appears. This
screen consists of three major fields to build a cross-reference record for a
customer’s specific item. Once the records are created, the user can use the
search function key at COP line entry to find the customers item number to fill
in the Item No. field.
Customer Item File Maintenance
Screen – Change Mode Like other Elliott
maintenance program windows, the user can also perform Change, Delete, and List
for Customer Item records. Utilizing
Customer Item Cross Reference in COP Line Item entry
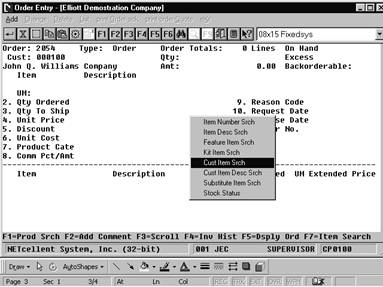
a. Customer Item Search At the Item
No. field, press the F7 key to select Cust Item Search. Choose to search by Item Number or Customer
Item Description. In the search screen,
type in the Item No. or Customer Description as described by the customer. The search by Customer Item will display your
Item Number, Description, and Customer Item Number. The search by Customer Description will
display your Item Number, Customer Description, and Customer Item number.
F7 Key – Customer Item Search
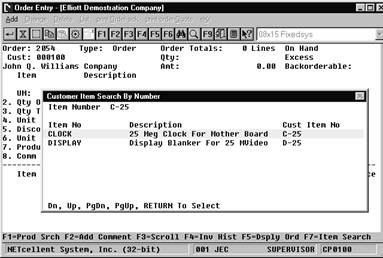
Customer Item Search by Customer
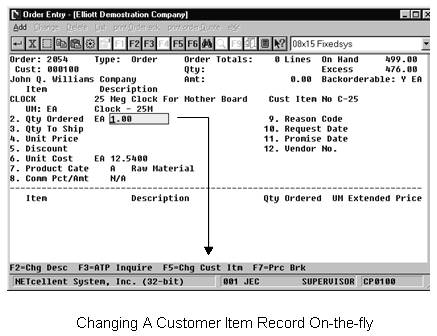
Item Number Changing
A Customer Item Record On-the-fly
Upon the selection of the item being
ordered, the screen will display the Customer Item No. to the right of your
Item No. and move the cursor to the field 2, (Qty Ordered). At this point, the
user can change the Customer Item No. if the customer requests changing it or
the description. Press F5, (bottom menu
bar options), and the system will move the cursor back to the Customer Item
No. field for changes to Item Number, Description 1, and Description 2.
Printing
Customer Item No. On Invoices and Picking Tickets
If you have turned on the control flag
to print customer item number on the picking tickets in the Enhancements Setup,
the Customer Item No. will be printed on the invoices as well as the picking
tickets if there are any. To print the Customer Item No. on the invoice, you
must set up an extra printing field for the invoice form that is used
for billing. There is no setup required
for picking tickets. Invoice Printing With Customer Item No. Setup Go to COP à Util_Setup à Invoice Form
Setup, and then select Change to bring up the desired form to which you would
like to add the extra field.
Invoice Setup Screen Field No. 6: Make sure to consider the extra line you will
put in for printing the Customer Item No. Proceed to the last screen of this
Invoice form format to enter the printing specification for the Customer Item
No. and/or Customer Item Description.
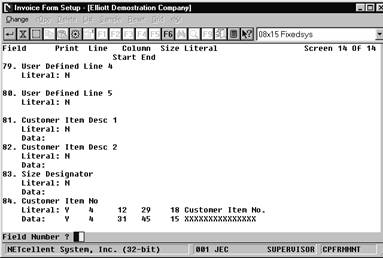
Invoice Setup Screen Field
84 shows the printing specification for the Customer Item No. The
specifications for this field are user-defined to allow you specific invoice
forms for specific customers.
Picking ticket – Line Item Example (When setup flag = “Y” to print Customer Item Number on Picking
ticket)
Invoice – Line Item Example (When setup field 1, Replace Line Item Description with Customer Description, flag = “Y” Freight CalculationApplication OverviewThe
Freight Calculation function provides you with a convenient and flexible method
of calculating freight charges. Perhaps,
in the past, you have had to look up the carrier freight charge and the carrier
freight zone to figure out what amount to bill, and then look up other charges
such as AOD charge, COD charge, hazardous material charge, etc. With the Freight
Calculation feature, the system will handle all the freight calculations
for you in just a few seconds. It not
only saves you time, but is also very simple and easy to use. Freight
Calculations Summary
Freight calculations are done in the
billing screen of COP Order Processing.
If would like access to the billing screen for “O” type and “Q” type
orders, you can enable feature in Order Billing Screen setup. You can also perform freight
calculations for an order from the COP Inquiry Menu. This is especially useful when you need to
discuss shipping charges with your customer.
All the information required for
freight calculations is predefined in four files for the following carriers: 1. UPS 2. Fed Ex 3. RPS 4. NOTE: You have the
ability to add additional carriers. The
four predefined A/R files containing all carrier information are: 1. Carrier File 2. Carrier Mode
File 3. Freight Rate
File 4. Freight Zone
File Note: The Freight
Zone File is location dependent. Setting
up an additional location for your geographical
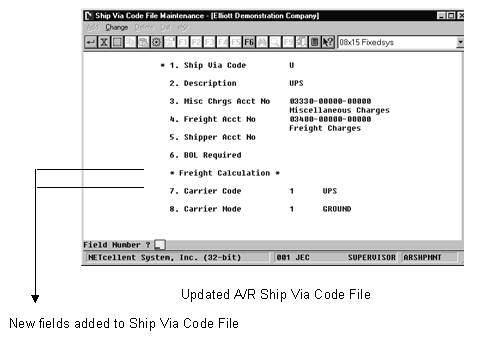
area will be discussed later in detail. Once you have properly setup the above
four files in Accounts Receivable Maintenance, you must update the two
new fields added to the A/R Ship Via Code file.
This file tells the system what information to use for freight
calculations. |


|
Name |
Type and Description |
|
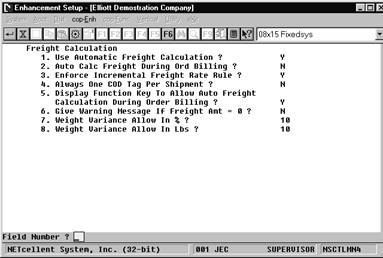
1. Use
Automatic Freight Calculation |
This flag must be set to “Y” to turn on the Automatic
Freight Calculation. “Y” adds two new fields to the A/R Ship Via Code file. |
|
2. Auto Calc
During Freight During Order Billing? |
Answer “Y” if you want to calculate freight
automatically during order billing. For an accurate freight amount, the items
ordered must have a weight amount set up in the Inventory Item File. Select “N” if you want to manually enter the weight,
value, number of boxes shipped, and adjust any additional or associated
charges such as COD, AOD, Call tags, Hazardous and Oversized packages. |
|
3. Enforce
Incremental Freight rule Table? |
This flag is an editing tool when entering freight
rates. It will force you to increase
the rates when the weight is increased. |
|
4. Always One COD Tag Per Shipment? |
This
flag provides users with flexibility when using the Automatic Freight
Calculation enhancement. If this flag is set to "Y", the freight
calculation only counts one COD tag charge for the entire shipment. If set to
"N", Automatic Freight Calculation will charge one COD tag for each
box if COD service is used. By
applying one COD tag per shipment, the high cost of COD service charges can
be avoided. For example, assume that you want to ship ten boxes to a customer
while the value of each box is low. If we implement one COD tag for each box,
the service might be too costly for the customer to accept. Therefore, one
COD tag per shipment is more appropriate and reasonable in this case. |
|
5. Display Function Key To Allow Auto Freight
Calculation During Order Billing? |
If
you answer “Y” to this question, the system will display a function key in
the order-billing screen that allows automatic freight calculation or manual
freight entry. |
|
6. Give Warning
Message If Freight Amount = $0.00 |
Answer
“Y” to enable this function. |
|
7.
Weight Variance Allow
In %? |
You
can enter a number to represent the discrepancy percentage, which is
calculated as Remaining Weight/System Calculated Weight. If the discrepancy
percentage is greater than the percentage amount entered, a warning will be
issued to the user. For example, if the user entered 5 (actually means 5%) as
a Weight Variance, the permissible range for the discrepancy percentage must
fall in the range between 0 and 0.05. |
|
8. Weight Variance Allow In Lbs.? |
This
flag works in the same manner as Weight Variance Allow in %. The number entered here represents an
absolute amount of weight that the discrepancy allows. For example, if the
user entered Weight Variance = 5, it means the permissible range for the
remaining weight must fall in the range between 0 and 5 pounds. |
Freight
Calculation Predefined A/R Files
|
A/R FILES |
LOCATION AND FILE DESCRIPTION |
|
1. Carrier File (Codes) |
A/R Maintenance: Contains all the carriers and
features provided by each carrier. You should review this file to see if any changes
need to be made to suit your specifications, as well as, adding an additional
carrier of your choice. |
|
2. Carrier Mode File |
A/R Maintenance: Contains all the different
methods of shipment available for a specific carrier |
|
3. Freight Rate File |
A/R Maintenance: Contains freight rates for all
carriers. Rate tables for UPS, RPS,
Fed Ex, and U.S. Postal Service are provided. |
|
4. Freight Zone File |
A/R Maintenance: Cross-links locations to zone
numbers for all the carrier modes. Freight Zone File is location dependent, and
since we set it up based on our location, it only works for areas with zip
codes ranging from 91001 to 91899. If
you are located in this area, you do not need to change anything. If you are
not in this area, you can either create your own Freight Zone File or change
the mismatched portion of our file in Freight Zone File Maintenance. If you
need to make a change in our Freight Zone File, you do not need to change the
zone setup for Federal Express, UPS Blue, or UPS Red because they apply to everyone,
regardless of area. |
|
INSTALL
NOTE: |
These four files must be initialized for a new
company setup and then imported from the Elliott root directory. Once this has been completed, they must be
setup in the exact number sequence.
After they have been setup, the A/R Ship Via codes must be updated
with the Carrier Codes and Carrier Modes. These four files and the updated
Ship Via codes must be set up in order to correctly use freight calculations |
REMINDER: After you have
added and reviewed the four predefined files, you must update the A/R Ship Via
Codes for the Carrier Code and Carrier Mode before you begin using the Freight
Calculation feature in COP Order Entry or COP Inquiry.
Using Freight Calculation
Detailed step-by-step instructions on how to calculate freight from the COP billing screen are in the Global Setup chapter titled Order Billing Screen.
Detailed step-by-step inquiry instructions are in the Inquiry section titled Freight Calculation Inquiry.
Order Inquiry Setup
Application
Overview
This function gives you fast and easy access to all the necessary information to provide customer service for open or posted orders on file for a customer. It allows you to quickly access and display a customer order using many different lookup options such as Customer P/O number and Ship-To number. You can also view outstanding items ordered by a specific customer, as well as, customers that have ordered a particular item.
Setup Instructions
Select:
Main Menu ® Util-setup ® Global setup ® cop-Ctl ® Order/invoice inquiry. The following screen will appear:
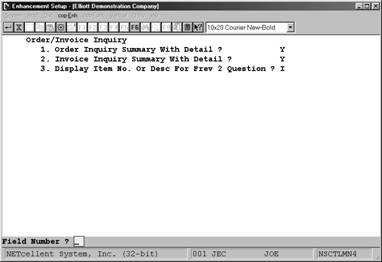
Order Inquiry Setup Screen
Entry Field Descriptions
|
Name |
Description |
|
Order Inquiry Summary With Detail? |
Answer “Y” if you want to view the line item
detail associated with the listed orders.
|
|
Invoice Inquiry Summary With Detail? |
Answer “Y” if you want to view the line item
detail associated with the listed invoices. |
|
Display Item No. or Desc In Detail Section? |
Select “I” or Item Number or “D” for Item
Description. |
NOTE:
This setup also controls the display information for the Invoice History
Inquiry function.
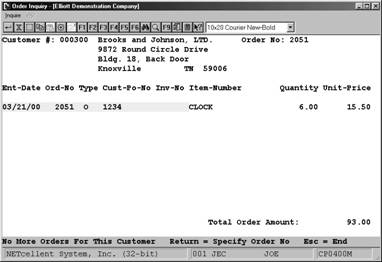
Order Inquiry Window w/Detail
Price By Whole Order
Application Overview
The
standard pricing code method does not provide pricing based on the total sales
order quantity amount or dollar value of the order and the net effective price
of an item is usually determined by the line item quantity. The
Price By Whole Order function is designed for companies who want to price each
item based on the total order quantity, or dollar value. This type of pricing method is used to
encourage customers to buy more when placing an order. The more the customer buys, the better the
discount they will receive. This function also handles pricing based on total
quantity or dollar value of each product category on an order.
Setup Instructions
Go to Elliott Main Menu Util-setup ® Global
setup ®
cop-Ctl ® price by Whole order. The following screen will appear:
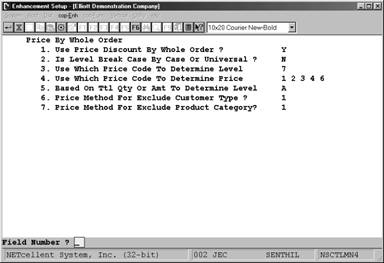
Entry Field Descriptions
|
NAME |
DESCRIPTION |
|
1. Use Price
Discount By Whole Order |
Select “Y” to enable this function. Select “N” to disable this function. Note:
If you enable this function, the valid price codes defined in the COP
setup are superceded by the price codes defined in this function. |
|
2. Is Level
Break Case By Case Or Universal Level breaks
are defined as the dollar or quantity amounts for an order used as a fixed
reference point. For example:
00-99 = Level Break 1
99-199 = Level Break 2 200-299 = Level Break
3 300+ = Level
Break 4 |
Y
= Level Break is Case by Case Select “Y” if you need different level
breaks for customers or customer
types. N = Universal Select “N” if all
customers or customer types have the same level breaks. |
|
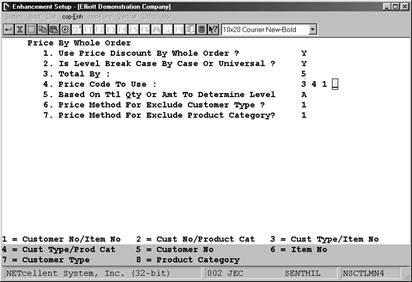
3. Total By: 3. Use Which
Price Code To Determine Level |
If
you answered “Y” for Case by Case
Pricing to question 2, there
are two options: 5 = Total by Whole order - This option
will enable you to use the whole order quantity or amount as the break point
to determine the price level. After
you enter “5”, a popup window will let you define up to 5 Product Categories
that you can exclude from Whole Order Pricing. For Product Categories that you exclude,
you can still define alternate pricing in field 8 of this setup procedure. 8
= Total by Product Category - This option will
enable you to use the total quantity or amount for the line item of the same
product category in an order. If
you answered “N” for Universal Pricing to
question 2, there are five options: 2 = Customer Number/Product Category 4 = Customer Type/Product Category 5 = Customer Number 7 = Customer Type 8
= Product Category Note: Price codes Customer Number/Item Number (1) and
Item Number (6) are not available since it is not practical to
determine an order total level by a single item. If you need these codes and are using the
Universal Pricing Method, disable this function and use the standard pricing
code method. You can define up to
three price codes for this option. If
you choose price code 2, 4, and/or 8, it means that you wish to set the price
discount by product category. If you
choose price code 5 or 7, it means that you wish to set the price discount by
whole order. You cannot use by whole
order and product category together.
For example, if you choose price code 2, the only other two valid
price codes you can choose are 4 and 8.
The system will not allow you to choose 2 and 5 together. |
|
4. Price Code To
Use 4. Use Which
Price Code To Determine Price |
Literal displayed when “Y” for Case By Case in question 2. Literal displayed when ‘N” for Universal in question 2. In
this field, you can use all the standard pricing codes: 1 = Customer Number/Item Number 2 = Customer Number/Product Category 3 = Price Code by Customer Type/Item Number 4 = Customer Type/Product Category 5 = Customer Number 6 = Item Number 7 = Customer Type 8 = Product Category Note: In the pricing
hierarchy, the first price code you enter takes precedence over the latter. |
|
5. Based On Ttl
Qty Or Amt To Determine Level |
A
= Base on Total Amount Q = Base on Total Quantity Your answer here determines how the level breaks
are structured. If the products have similar prices and the
customer only orders 1 each of an item, and you want to encourage this
customer to buy more, you should consider using “Q”, Base on Total
Quantity. If the product’s pricing
varies greatly, the typical order has multiple line items, and each line
item’s quantity is normally greater than one, it would be practical to choose
“A”, Base on Total Amount. |
|
6. Price Method For Excluded Customer Type |
In A/R
Maintenance of the Customer Type file you can exclude customer types from
Price By Whole Order. For excluded
customer Types, you will have the following pricing options: 1 = Price Codes This allows excluded customers to use the valid price
codes defined in COP Setup. 2
= Item Price |
|
7. Price Method
For Excluded Product Category |
If you
excluded product categories in Question 3, Total By Whole Order, you will
have the following pricing options: 1 = Price Codes 2
= Item Price |
|
NOTE: This applies fields 6 & 7 only. |
The “N” Universal method is by far the easiest and fastest
method to setup and maintain because it applies to all customers and customer
types. For this reason it does not
handle pricing code options well for excluded customer types or product
categories. When the Universal method
is selected in this setup, it is recommended that you only use the Item Price
option for excluded customer types and excluded product categories. |
The Price By
Whole Order function is very powerful and sophisticated function. The most critical element of this function is
the setup. To help you better understand
how this function works, we have setup the following three scenarios with Price
By Whole Order Setup examples:
1. Case By Case
Scenario
2. Universal
Scenario
3. Excluded
Customer Type and Product Category Scenario
(This is followed with a How-To process
the order example)
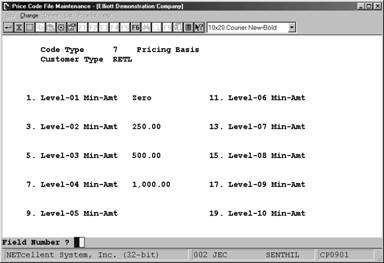
Example I -
Case by Case Method
Company ABC sells
four different items: A100, A200, A300, and B200. They determine the price breaks for each item
based on the total order value. They
also maintain different pricing for two Customer Types, RETL (retailers) and
DLR (dealers). The pricing tables
defined below reflect the pricing structure for each customer type.
Customer
type RETL
|
Item\Value of order |
Base Price |
< $500 |
$500 - $1,000 |
>= $1,000 |
|
A100 |
100 |
100 |
90 |
80 |
|
A200 |
150 |
150 |
135 |
125 |
|
A300 |
55 |
55 |
50 |
45 |
|
B100 |
75 |
75 |
68 |
60 |
Customer type DLR
|
Item\Value of order |
Base Price |
< $500 |
$500 - $1,000 |
>= $1,000 |
|
A100 |
100 |
90 |
81 |
72 |
|
A200 |
150 |
135 |
121 |
112 |
|
A300 |
55 |
49 |
45 |
40 |
|
B100 |
75 |
67 |
61 |
54 |
The “Base Price”
(Selling Price in the Inventory Item Master File) is used to calculate the
total order value and the total order value determines the price breaks. For example, assume that a customer (RETL)
placed an order for 4 A100s and 2 A300s.
Based on the “Base Price” column, the total order value for this order
is calculated as follows:
Standard
Order Processing
4
A100, at $100/EA = $400
2
A300, at $55/EA = $110
Total
$510 (before Price By Whole
Order is calculated)
Customer total
order price break is $500-$1,000
4
A100, at $90/EA = $360 (recalculated value to be billed)
2 A300, at $50/EA = $100
(recalculated value to be billed)
Total $460 (recalculated value to be billed)
This Case By
Case scenario would be set up as follows:
1. Price By Whole Order Setup
NOTE: You may define all 8 Price Codes in field #3. The system will use price codes in the sequence that they were entered.
2. Verify Customer Types are defined in
A/R Maintenance Customer Type File.
3. Verify Inventory Items have a Selling
Price Amount defined. This is done in
Inventory Maintenance - Item File
4.
Price Code File Maintenance
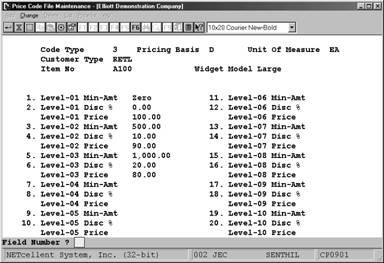
Pricing basis for this Price Code is Discount from Base
(Selling) Price, “D”. Other Pricing
basis available are:
M=Markup Percent, P=Price, A=Discount Amount, and U=Markup
amount. Markup from Price or Cost is
defined in the Order Entry Line Item Screen setup.
Price
Code Net Effect: Item A100 for Customer Type RETL
Total
Order Amounts: $0.00 to
$499.99 Discount is 0% Sell Price = $100.00
$500.00 to
$999.99 Discount is 10% Net Sell Price = $ 90.00 $1,000 + Discount is 20% Net Sell Price
= $ 80.00
Pricing Basis based on P = Price
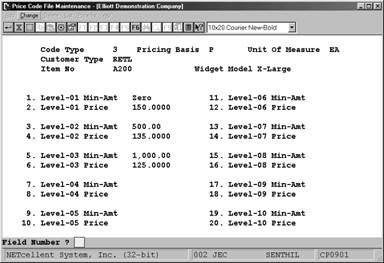
Price Code Net Effect: Item A200 for
Customer Type RETL
Total Order Amounts:
$0.00 to $499.99 Sell Price = $150.00
$500.00
to $999.99 Net Sell Price =
$135.00 $1,000 + Net Sell Price = $125.00
NOTE: Each pricing code is unique and you cannot
have Pricing Basis variations for that same
price code. For example:
|
Price Code |
Unique |
Not
Allowed |
Unique
- Allowed |
Unique - Allowed |
|
Type |
3 |
3 |
3 |
3 |
|
Pricing Basis |
Discount |
Price
|
Discount |
Discount |
|
Customer Type |
RETL |
RETL |
DISTR
|
RETL |
|
Item Number |
A100 |
A100 |
A100 |
A200
|
Example
II – Universal Method
This
method has separate levels for the items and customer types.
Table
1: Pricing levels for Customer Types
|
Type\Level |
Price Level 1 |
Price Level 2 |
Price Level 3 |
|
DLR |
<$250 |
$250-$500 |
>=$500 |
|
RETL |
<$500 |
$500-$1,000 |
>=$1,000 |
Table
2: Item Pricing Levels
|
Item\Level |
Base Price |
Level 1 |
Level 2 |
Level 3 |
|
A100 |
100 |
100 |
90 |
80 |
|
A200 |
150 |
150 |
135 |
125 |
|
A300 |
55 |
55 |
50 |
45 |
|
B100 |
75 |
75 |
68 |
60 |
The
advantage of this method over the Case By Case method is the ease of setup,
maintenance and updating pricing changes.
For example:
If we needed to add a
new Customer Type pricing level or revise an existing pricing level, we would
not need to add or revise each item break point as in the Case By Case Method
because all item pricing break points are identical for all customer
types. In essence, we also have
different pricing for customer types by how we define the Customer Type Price
Levels.
This
Universal Method scenario would be set up as follows:
- Price by
Whole Order Setup
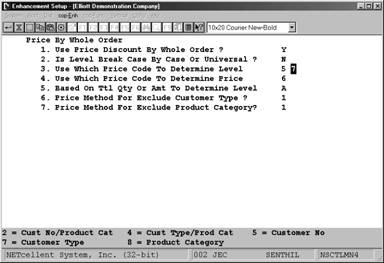
Note: Price Codes 5 & 7 sets the price
discount levels by whole order.
Price Codes 2, 4, and 8 sets the price
discount levels by product category.
In the pricing hierarchy, the system uses Price Codes in the
sequence entered. In our above setup
example, Price Code 5 (Customer Number) would be used first. Price Code 7
(Customer Type) would be used when there is not a Customer
Number Price Code defined for the order customer.
Prices codes may be
categorized as specific and general, and the specific should take precedence
over the general in the sequence entry.
Had we entered the sequence as 7 and 5, then Customer Type (general)
price codes would have priority and for all practical purposes nullify Customer
Number (specific) price codes.
Note: You can use all the eight pricing codes
here. Price Code 6, Item Number, was
selected as the price code to determine the net effective price for the pricing
levels defined in field 3. Although the
system will use the first price code entered, as per the pricing hierarchy, it
did not make sense to add additional price codes in this field since every item
sold has an Item Number.
- Define
Price Code for Customer Type RETL
Price Code
Net Effect: Customer Type RETL
Price Level
1 = Total
Order $0.00 to $499.99
Price Level
II = Total
Order $500.00 to $999.99
Price Level
III = Total
Order $1,000.00 +
- Define
Price Code for Customer Type RETL
Price Level 1 = Total Order
$0.00 to $249.99
Price Level
II = Total
Order $250.00 to $499.99
Price Level
III = Total
Order $500.00 +
- Setup
Item Price Codes

Note: Item A100 has 5 levels that determine the
price. This is to accommodate another
customer type that has 5 price levels for total order amount. This is the ease
and speed of setting up price codes using the Universal Method; the same price
for all customers, but what determines the net effective price to use is the
total order level setup in the Customer Type Price Levels.
Example III
-Case By Case Method with Excluded Customer Type
and Excluded Product Category
American
Window Films, Inc. (AWFI) sells
window tinting film to their dealer channels (mostly jobbers). AWFI has a competitor who sells to the same
dealer channels. AWFI’s dealers normally
order one roll of film whenever they have an installation to do. AWFI would like to encourage the dealers to
order more by offering quantity discounts based on the order quantity
total. This will help AWFI compete
against other competitors. The following pricing tables were defined by AWFI:
Price
Table for Customer Type JOB1, JOB2,
JOB3, JOB4 and JOB5
|
Item\Level Brk |
Base |
Qty = 1 |
Qty = 2 to 4 |
Qty >= 5 |
|
A100 |
100 |
100 |
90 |
80 |
|
A200 |
150 |
150 |
135 |
125 |
|
A300 |
55 |
55 |
50 |
45 |
|
B200 |
2 |
2 |
2 |
2 |
Item B200 is an
accessory with a small unit price and a large quantity. They do not wish to
give discounts to item B200.
Furthermore, they do not wish to include item B200 quantities for
calculating the order’s discount. The
product category for Item B200 is ACR.
AWFI
also offers price discounts for their key dealers. The following pricing table
was defined for their dealers (Customer type KEY):
Price
Table for Customer Type KEY
|
Item\Level Brk |
Base |
Qty = 1 |
Qty >2 |
|
A100 |
100 |
90 |
80 |
|
A200 |
150 |
135 |
125 |
|
A300 |
55 |
50 |
45 |
|
B200 |
2 |
1.5 |
1.5 |
AWFI
also exports their films to foreign countries.
When they export, they do not wish to use price discount by whole order.
Each export customer has a special negotiated price for each individual
item. For export customers, the customer
type is EXP.
This
Case-By-Case scenario with excluded Customer Types and Product Categories would
be setup as follows:
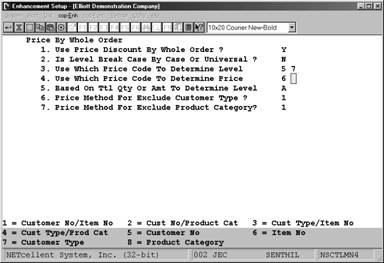
1. Price by Whole Order Setup
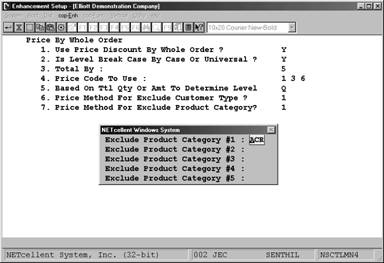
Note: Field 3
If option 5
(Total By Whole Order) is selected, you can define up to five product
categories to exclude from Price By Whole Order.
Field 4
Price Codes selected:
1
= Customer Number/Item Number
3
= Customer Type/Item Number
6
= Item Number
Field 5
Q = Base On total Quantity selected as basis to determine Levels
2.
Verify in A/R Maintenance Customer
Type File that Customer Type EXP does not use Price By Whole Order
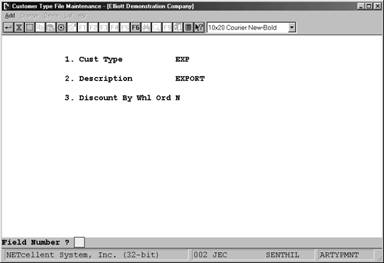
Note: Field 3
The choices here are “Y” = Yes and “N”
= No. The default value is “Y” and if
this field is left blank, it accepts “Y” as the default. For this reason, if you want to exclude a
customer from Price By Whole Order you must enter “N” in this field.
- Set Up
Price Codes 1, 3, and 6.
Code 1: Customer No./Item No. for Export Customers
Each export
customer has a special negotiated price for each item and do not use Price By
Whole Order pricing.
Code 3: Customer Type/Item No. for Customer Type Key
Code 6: Item
No. for All Other Customers, (JOB1 – JOB5)
In the pricing hierarchy, customers who are not
excluded, (Type EXP), and who are not Key type customers will receive this
pricing based on total order quantity.
This code then fits customers who we want to encourage to buy more by
offering quantity discounts based on the total order quantity.
Price Code 6 Setup for Item A100
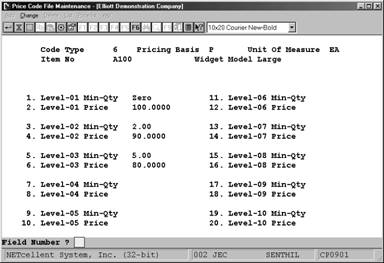
NOTE: The “Min-Qty” applies to the whole order
quantity. In this particular scenario, the whole order quantity includes items
A100, A200, and A300. If order has 2 ea.
A100, 2 ea. A200, and 1 ea. A300, the total order quantity would be 5; the customer would pay $90.00 for Item A100,
and the respective Level 03 Prices for Item A200 and A300.
Using Price
By Order
In this order entry example,
we will be using the Case By Case method, pricing by whole order, and the break
levels are based on quantity. These are
the same defaults defined for Example III, American Window Films, Inc.
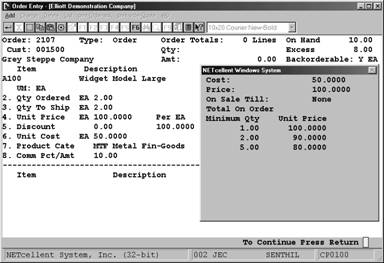
The above figure shows that we have entered 2 ea. A100,
the Unit Price is $100.00, but the Price Break Popup window (F7 Key) shows that
if our total order quantity is 2, the price should be $90.00. This is because we must recalculate the order
using the F4 Key to reflect the discount pricing. This is done after you have completed the
line item entry. If you have not
recalculated your order after you complete all line entry items, the system
will do it automatically when you exit the line item screen and go to the billing
screen.
We will recalculate this line item, enter a few more
items, and then show you an example of how to recalculate an order.

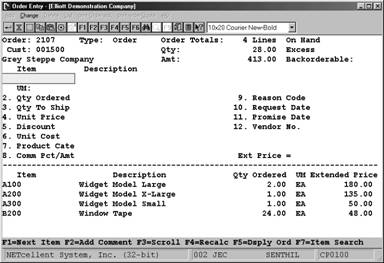
The order now has 4 line items and a total quantity
of 28 ea. This information is displayed
in the upper right portion of the line item entry screen. In the lower section of the screen, we see
that Item A200 does not reflect total order quantity pricing, nor does Item
A300. Since we have not recalculated
after completing the line item entry for Item A100, we cannot be sure if this
is the right price or not. It is
important, especially if you are on the telephone with your customer, that you
recalculate after each line item entry to know the correct selling price. It is equally important that you use the F7
Key to be aware of the break levels so that you recommend to your customers
that they bump their order to get a better price.
Recalculation is simple, easy, and very
straightforward. All it requires is
pressing the F4 Key after completing a line item entry. For this example, we will recalculated and
show you the net effect on the next page.
Order recalculated and Items A200 and A300 now
reflect the 2 to 4 quantity discount pricing.
The system did not use the quantity for B200 in the recalculation
because B200 is product category ACR which we excluded from Price By Order.
Price List by Customer
Application Overview
This enhancement is an improved price list from Elliott’s
original design. It provides an easier way to read a customer(s) price
list. You can locate an item price for
a customer more quickly, and this list can be sent to a customer(s) with more
concise information. This enhanced list
can be sorted by Item Number, Product Category, User Defined Code, and
Warehouse Location, etc.
Run Instructions
Elliott Main Menu à Util setup à
Global setup à
cop-ctl à
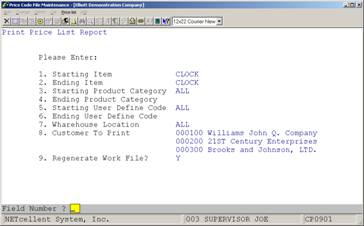
Price list by customer
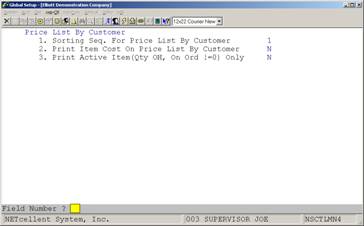
Figure 4G.1 shows the setup screen for Price List by Customer.
Using Price List by Customer
1.
Select Distribution form the Elliott Main Menu.
2.
Select Customer order processing.
3.
Select Maintenance.
- Select
Price code file.
- Select Price list.
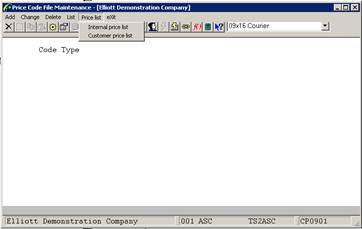
Options to Generate
Internal (House Use) or Customer
Example of how to generate the Price List by Customer.
|
Run Date: Oct 31, 2001 - 10:33pm Elliott Demonstration Company Page 1
P
R I C E L I S T B
Y C U S T O M E R
Ranges: Item CLOCK Thru CLOCK All
Product Categories
All
Locations
Customer 000100 Williams John Q. Company 000200 21ST Century Enterprises 000300 Brooks and Johnson, LTD.
Product Category A Raw Material
Us Item-Number
Item-Desc
Um Price Price Price Cd
Cust 000100 Cust 000200 Cust 000300
Type
DISTR Type RETL Type DISTR
Product Category A Raw Material
CLOCK 25 Meg Clock For
Mother Board EA 15.50 15.50 15.50 |
Internal price list
showing the pricing information on a specific item for three different
customers.
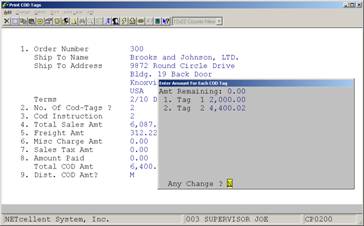
Print COD Tag
Application Overview
This enhancement gives users the ability to print one or multiple COD tags for an order number. Note: This enhancement only prints a COD tag for order type "O" or "I". The enhancement has the capability of printing either the customer number, plus the order number plus the box number as the alternate control number, or the customer number plus the invoice number plus the box number as the alternate control number.
This enhancement allows users to print COD tags under two environments. One environment is the one-step COD tag. This is the case where the order is taken, a picking ticket is printed, all items are picked and ready to be shipped, and finally COD tags are selected to be printed for warehouse. The disadvantage of this environment is that the total amount is not saved, freight amount has not been determined, and the invoice number is not available. Under this environment, the user cannot use the invoice number as part of the alternate control number since no invoice number exists.
The enhancement has the capability of printing the UPS shipper number. In order for this to be done, the user must set the UPS shipper number in the Global Setup.
If the order is not selected for billing, this enhancement will calculate the total sales amount and sales tax amount. The user can override these amounts. If the order is selected for billing or the order invoice is printed, then total sales, freight, miscellaneous, and sales tax amounts are available. The enhancement will display these amounts, but the user cannot override them.
The enhancement will calculate the total COD amount after all amounts are calculated. The user can enter how many tags are to be printed. Next, the user enters if the payment should be cash only or not. Finally, the user must decide whether the total COD amount is to be distributed or not distributed among the COD tags.
This enhancement provides protection for orders that are not COD's. If the terms code description is not "COD" or "C.O.D.", then a warning message will appear asking if the user wants to continue. If the answer is "yes", the user can then enter the rest of the information. If the answer is "no", then the user can select another order number.
For cash-only orders, the enhancement will mark the cash-only box on the COD ticket. This box will be marked when the user answers "yes" for the question "Cash Only" or when the terms code description includes the word "CASH" or "Cash". If the box is not marked, the instruction will be "Company Check OK".
Run Instructions
Elliott Main Menu à Util setup à Global setup à cop-Ctl à print cod Tag
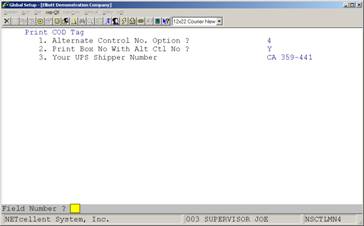
Figure 4H.1 shows the setup screen for Printing COD Tags.
Field Entry Descriptions
1. Alternate Control No. Option?
This flag is very important. This information will be used internally to reference back to the order. When you receive the check from UPS, it will have this alternate control Number which can be used to determine what order it was for. There are 5 options: 1 = Cust No, 2 = Order Number, 3 = Invoice Number, 4 = Cust Number + Order Number, & 5 = Customer Number + Invoice Number.
2.
Print Box No. With Alternate Control
Number?
If you answer “Y” to this question, the system will print box numbers with the alternate control number.
3.
Your UPS Shipper Number
Enter your UPS shipper number. This information will print on the COD tag.
Using Printing COD Enhancement
The user
has two options of applying the total COD amount. The first option is to print only 1 tag, Field
2. This will print the total COD amount on one COD tag and as a result, 1 COD
tag per order.
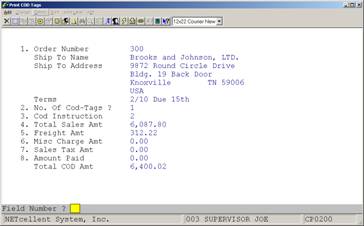
Generate COD Tags
Key Field Entry Description
Field 3: Determines
how COD is to be paid.
0 = No
instructions
1 = Certified
Check/Money Order
2 = Company
Check
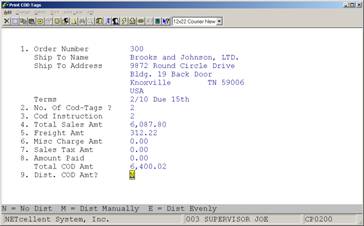
The second option is to print more that one COD tag per order. If the user selects this option, then the system adds Field 9 to the screen. This field prompts the user on how they want to distribute the COD amount. The choices are:
1. N = No Distribution. Total amount goes to 1 tag.
2. M = Manually Manually distribute the COD amt. to the number of tags printed.
3. E = Dist. Evenly System will distribute COD amt. evenly to the number of tags.
If M=Manually is selected, a window will pop up and the user can enter an amount for each COD tag. After an amount is entered, the projected total COD amount remaining will be displayed. See figure next page.
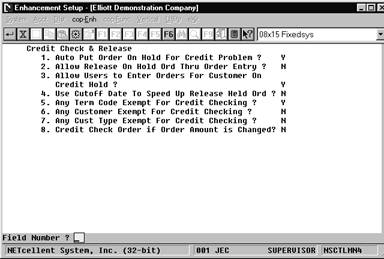
Credit Check & Release
Application Overview
This
function allows you to put an order on hold and release a held order based on
two criteria: 1) Customers exceed the credit limit, or 2) Customers have a past
due amount. It also allows selected A/R
term codes, customers, and customer types to be exempt from this automatic
credit checking procedure. If a
customer’s account meets one of these two hold criteria, the order will be put
on hold automatically. If needed, only
authorized persons such as credit managers or supervisors can be allowed to
release an On-Hold order. This release
can be done through COP Order Entry or a special separate Release function,
which provides additional credit information for the credit manager or
supervisor to review before releasing an order.
Run Instructions
Go to Elliott Main menu: Util-setup ® Global setup ® cop-Ctl ® credit check & Release. The following screen will appear:
Entry Field Descriptions
|
Name |
Type and Description |
|
1. Auto Put Order On hold for Credit Problem |
Select
“Y” to enable this function. If
enabled, a popup window appears and this is where you define the following
credit checking criteria: 1.
Customer has exceeded his credit limit? Select
“Y” Or “N” 2.
Customers actual aged account balance for
Period 1 is greater than xxx, xxx.xx (user specified amount). 3.
Customers acutal aged account balance for
Period 2 is greater than xxx, xxx.xx (user specified amount). 4.
Customers acutal aged account balance for
Period 3 is greater than xxx, xxx.xx (user specified amount). 5.
Customers acutal aged account balance for
Period 4 is greater than xxx, xxx.xx (user specified amount). If field 1 is “Y”, then any orders matching these
criteria will be put on-hold. If an
order exceeds any of the user-specified amounts in fields 2 – 5, that order
will be put on-hold. |
|
2. Allow
Release On Hold Ord Thru Order Entry |
Select “Y” to allow the user to release this order
during order entry. If “N” is selected,
then orders can only be released using the Release Held Order menu
function. This menu function can be
password protected for a supervisor or Credit manager. |
|
3. Allow Users
To Enter Orders for Customer On Credit
Hold |
“Y” or “N” is dependent on your credit hold policy. |
|
4. Use Cutoff Date To Speed Up Release Ord |
This question applies to the Release Held Order menu
function. When you release held orders, the system will read the entire order
header file and display all held orders.
If you do not wish to display all, select “Y” to specify a cutoff date
option. The cutoff date options to
select from are “S” = System Date or
“E” = Earliest Date “ |
|
5. Any Term Code
Exempt For Credit Checking |
Select “Y” to define up to 5 Terms Codes, (popup
window), that will exempt from Credit Checking. Select “N” for no exceptions. |
|
6. Any Customer
Exempt For Credit Checking |
Select “Y” to define up to 5 Customers, (popup window),
that will exempt from Credit Checking.
Select “N” for no exceptions. |
|
7. Any Cust Type
Exempt For Credit Checking |
Select “Y” to define up to 5 Customer types, (popup
window), that will exempt from Credit Checking. Select “N” for no exceptions. |
|
8. Credit Check
Order If Order Amount Changed |
After an On-Hold order has been approved and released,
the system does not perform additional credit checks when the order is
changed. This is a convenience factor
to reflect changes in terms, shipping instructions, salesmen, etc. However, this presents a potential loophole
where the customer or salesman can substantially increase an approved
credit-risk order and escape a second credit check. Select “Y” to close this loophole by having
the system do credit checking anytime the order dollar amount has been
changed. |
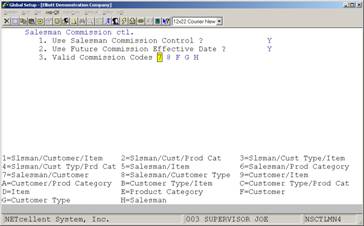
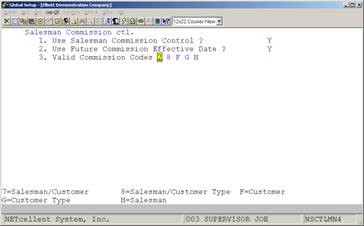
Sales Commission Control
Application Overview
This
function will provide you with a very flexible method of defining sales
commissions. It is similar to the
Elliott Pricing Structure. You can predefine as many commission codes as you need
and specify an effective date for the sales commission. With 17 different commission codes to choose
from and 10 levels for break points, this function will allow you to define
almost any kind of commission.
Run Instructions
Elliott
Main Menu à Util-Setup à Global Setup
– cop-Ctl à Sales
commission Ctrl
Commission Codes Available when COP
Setup Calc Commissions = I (Item)
Commission Codes Available when COP
Setup Calc Commissions = S (Sales)
Commission Codes Available when COP
Setup Calc Commissions = M (Margin)
Field Entry Descriptions
- Use Salesman Commission Control?
Select “Y” to enable. If not enabled, “N”, the system will base commissions on the default value in COP Setup.
- Use Future Commission Effective Date”?
If “Y”, allows you to specify a Starting and Ending date, (if applicable), for a commission code.
- Valid Commission Codes
Determines which codes will be available in COP Commission Structure File.
User Defined Code Setup
Application Overview
This
feature gives you the ability to assign a “User-Defined Code” in the COP line
item screen for special tracking purposes.
In the Order Line Item Entry Screen, the system will prompt you to enter
a User-Defined Code. You can either
press enter to skip this field or enter a valid code (F7 search key is
provided). When posting invoices to A/R,
the system will update COP Invoice History, User Defined Code/Year, and
Customer User Defined Code/Year Files.
This information can be used later for reporting and analysis
purposes. We have also provided an
initialize, export, import, and rebuild function for these three files.
Run Instructions
Before setting up User Defined Codes. You must define what, where, and
how you want to use them. To do this, go
to:
Main Menu ® Util-setup ® Global setup ® cop-Ctl ® User defined code. The
following setup screen will then be displayed:
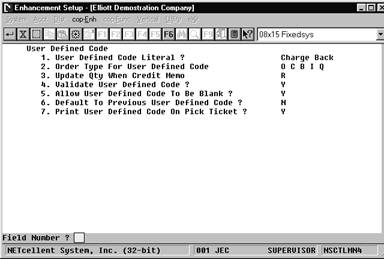
User Defined Code Setup Screen
Entry Field Descriptions
|
Name |
Type and
Description |
|
1. User Defined
Code Literal |
This
question prompts you for the field literal that will display in the COP line
item screen. For example purposes, the
literal “CHARGE BACK” is used |
|
2. Order Type
For User Defined Code. |
You
can select the type of orders that will display the line item user defined
code, “CHARGE BACK”. There are five options displayed at the bottom of the
screen. You can press <Enter> to
select ALL. |
|
3. Update
Quantity When Credit Memo |
If
you want to return item qty. back to inventory, enter “R”. If you want to give the customer a qty.
credit, enter “C”. This option only
applies to credit memos. |
|
4. Validate User Defined Code |
Answer
“Y” to validate the User Defined code when entered in COP Line Item screen. |
|
5. Allow User
Defined Code To Be blank |
Answer “Y” to allow users to enter a blank value. |
|
6. Default To
Previous User Defined Code |
If
you answer “Y” to this question, the system will use the code entered in the
last order. |
|
7. Print User
Defined Code On Picking Ticket |
Answer
“Y” to enable this function. |
Using
User Defined Code
After
enabling this function, you will need to define the “Charge Back” codes using
the User-Defined Code file maintenance.
To do this, go to:
Customer Order
Processing ® Maintenance ® User defined code file
The
screen that appears is where you define your codes, as well as the change,
delete, and list functions. Some
examples of user defined codes are COOP Advertising, Damaged Goods, Defective
Merchandise, Direct Mail Sales, Telemarketing Sales, etc. With careful planning and forethought to user
defined codes, these codes can be powerful reporting and analytical tools.
After
defining your “Charge Back User Defined Codes” (Charge Back is just a literal
expression) and you enter an order type as defined in the setup, the line item
screen will display a “CHARGE BACK” for your input. At this field, we have provided an F7 key
function to search for your codes. After
posting invoices to A/R, the system will update the User-Defined Code/Year file
and the Customer User Defined Code/Year file.
These are the two files used for reporting and analysis.
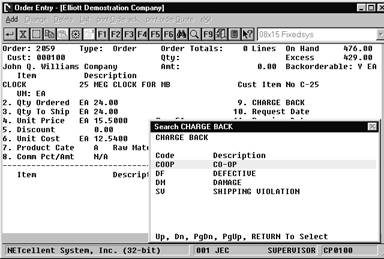
Charge
Back field 9 and F7 popup Search window display.
The
User-Defined Code/Year file is
divided into 12-month buckets. It
displays the Sales Amount, Quantity, and Cost.
You can print a listing based on a “CHARGE BACK” (user-defined) range
and year range. This information can be
used as an analysis tool.
To
access this file: Customer Order Processing ® Yearly
user defined file.
The
Customer User-Defined Code/Year file
is divided into 12- month buckets. This
file is similar to the User-Defined Code/Year file. The only difference is that you can display
information for a specific customer. It
displays the Sales Amount, Quantity, and Cost.
You can print a listing based on a customer range, “CHARGE BACK” (user-defined)
range and year range. This information can be used as an analysis tool.
To
access this file: Customer
Order Processing ® yearly cust user Def code.
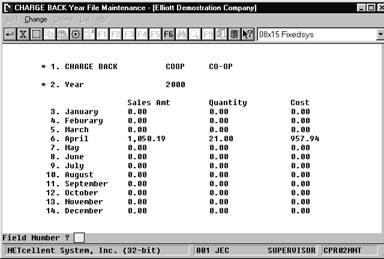
User-Defined Code Year/File
Maintenance Screen
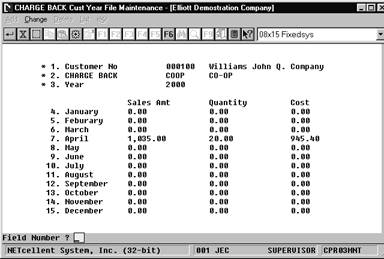
Customer User-Defined Code/Year
File Maintenance Screen
Stock Status Inquiry Setup
Application Overview
This function provides you with a wealth of customer service information
available by using Function Keys. For
maximum benefit, the users should thoroughly familiarize themselves with the
many item inquiry options. These
features are also available in our Sales Desk program.
The COP Stock
Status Inquiry provides for a Customer Number so that when you do an item
inquiry for that customer, you have access to pertinent A/R, I/M, and COP
data. Some key features found in this
program are:
1. Item
inquiries listing one or all locations where an item is stocked. Also included in the item inquiry are
stocking totals and Bin numbers. Being
able to view stock status by all locations is extremely useful when you ship from
different locations or have the need to transfer from one location to
another. It is also helpful when you
have multi locations within your warehouse, (refurbished items, returned goods
for resale, factory seconds, inspection, quarantine, etc.), to view stock
status totals for that item.
2. Ability to use wildcards to specify the
locations you wish to see stock statuses for.
3. The option to enter a caller’s name. This helps the user in remembering who they
are talking to, as well as, logging the persons name for future reference.
4. After you have entered the customer’s number
for an inquiry, and if no caller name was entered, then the caller name will be
automatically filled with this customer’s contact name.
5. While you are viewing an item’s stock status,
you have the following added functions:
a.
View customer price breaks for this customer and item.
b.
Create a quote from the customer’s inquiry.
c.
Create a sales order from the quote.
b. View general customer information for the
customer.
c. View credit & YTD information for the
customer.
d.
Perform a Substitute Item Search by location
e.
Perform a Component Available Inquiry to show the stock
statuses of all components for a parent item to determine the quantity of the
parent that can be built.
f. Perform
an Available To Promise Inquiry to
display a listing of future quantity available, (by date), for the
inventory item being viewed.
Run
Instructions
SELECT:
Main Menu ® Util-setup ® Global setup ® cop-Ctl ® Order/invoice inquiry. The following screen will appear:
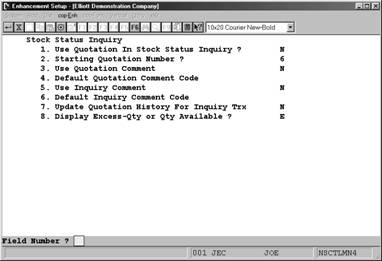
Stock Status
Setup Screen
Note: The setup default values affect both COP and I/M
Entry
Field Descriptions
|
Name |
Description |
|
Use
Quotation In Stock Status Inquiry |
Select “Y” to create a Quote from an inquiry. When you create the quote, you have the
option to confirm it. If confirmed,
the system will allow you to enter a COP sales order for this quote during
stock status inquiry. If not
confirmed, these quotes are kept in the Quotation History file and can be
called up for review, and/or converted to an “O” or “I” type order. Select “N” if you do not want users
creating sales orders from this inquiry mode. Note: If you find yourself becoming a power user
of quotes using the Stock Status Inquiry screen; we recommend you use our
Sales Desk program for tighter quote management and more flexible features. |
|
Starting
Quotation Number |
Enter Starting Quote Number, this is an
internal number used in Stock Status Inquiry and not related to COP Quote
numbers |
|
Use
Quotation Comment |
Select “Y” if you want
to add comments to your quotes.
Comment codes are maintained in COP maintenance. Quotation comments are mainly for used
historical sales analysis purposes to track the reasons why you don’t get a
sale from a quote. |
|
Default
Quotation Comment Code |
If you the enable the previous field, then
you may specify the default comment code here. Comment codes are maintained in COP
maintenance. |
|
Use
Inquiry Comment |
Select “Y” if you want to add comments to
your inquiry |
|
Default
Inquiry Comment Code |
If you enabled the previous field, then you can specify the default
comment code here. |
|
Update
Quotation History For Inquiry Trx |
Select “Y” to keep a history of caller inquires in the Quotation
History file. The Inquiry Trx’s will then show up when doing a quote
inquiry. |
Sales Desk
Application Overview
Sales Desk is
a powerful program that can greatly improve the speed and efficiency of
processing orders, quotes, capturing new business, and building customer relationships. After setting up Sales Desk, you should set
up a Procedures and Policy guideline for COP sales entry personnel and Sales
Desk users. Many of these procedures and
policies can be defined in Sales Desk setup.
Sales Desk does not currently support the following:
- Vertex Sales Tax Interface
- “I” and “C” type of Orders for Serial/Lot and Multi-Bins
- Feature/Option & Kit items.
Run Instructions
Goto: Elliott Main Menu à Util Setup à Global setup à cop-ctl à sales Desk
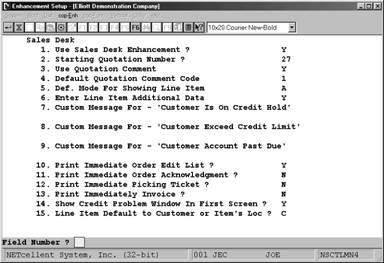
Sales Desk Setup Screen
1. Use
Sales Desk Enhancement?
Select “Y” to enable this feature.
2. Starting Quotation Number?
Enter starting quote number. This number is used only in Sales Desk and
does not affect COP orders. The default
value is “1”.
3. Use Quotation Comment?
Default value is “N”. Select “Y” if you want to add comments to your quotes. Comment codes are maintained in COP maintenance. Quotation comments are mostly used for historical and sales analysis purposes to track reasons why you did not get a sale for the quote.
4. Default Quotation Comment Code
The default value is blank. If you enabled the previous field, then you can specify the default comment code here. Comment codes are maintained in COP maintenance.
5. Def. Mode For Showing Line Item
When
entering line items in Sales Desk, you have the choice of confirming the line
tem or leaving it open as a quote. This
flag lets you choose if you want to view all the line items as you are entering the order, or only the confirmed
items. Confirmed items are those that get generated onto the sales order. This is a default mode only and the system
allows changing from mode to mode during data entry.
Select “A” for Show All, or “C” for Show
confirmed items only.
6. Enter Line Item Additional Data
Additional Data Window contains line item discount percent, unit cost,
vendor number, product category, user defined code, and request and promise
dates. These are fields from Elliott
order entry line item screens. Most of
the time, you simply accept the default values for these fields in the order
line item screen. If this is the case,
you should answer “N” and this will speed up your process in Sales Desk. If you need to enter data in any one of those
fields, answer “Y” and during entering of line item in Sales Desk, the
additional data window will popup and prompt for the information.
7. Custom Message For - 'Customer Is On Credit
Hold'
By default “Customer Is On Credit Hold” will be displayed if Sales Desk
detects such a condition. Even though a
customer may be put on credit hold, you may not want the customer to know they
are on credit hold. To prevent your
staffs from telling customers that they are on “Credit Hold”, you can put a
custom message here. If you leave this
field blank, the system will use the default message.
8. Custom Message For - 'Customer Exceed
Credit Limit'
Similar to previous field, to prevent your staff from telling customers
they “exceed credit limit”, you can put a custom message here.
9. Custom Message For - 'Customer Account
Past Due'
Similar to previous field, to prevent your staff from telling customers
that their “account is past due”, you can put a custom message here.
10. Print Immediate
Order Edit List?
Select “Y” if you want to print an immediate order edit list when an
order is entered through Sales Desk.
Select “N” to disable this feature in Sales Desk if you wish to manually
print order edit list in Order Entry.
11. Print Immediate
Order Acknowledgment?
Select “Y” to immediately print an Order Acknowledgement when an order is
entered through Sales Desk. Select “N”
to disable this feature in Sales Desk if you wish to manually print Order
Acknowledgement in Order Entry.
12. Print Immediate Picking Ticket?
Select “Y” to immediately print a Picking Ticket when an order is entered
through Sales Desk. This is helpful if
the order needs to be picked right away and pick tickets are printed on an
individual basis. Select “N” to disable
this feature in Sales Desk if pick ticket is printed on the batch basis.
13. Print Immediately Invoice?
Select “Y” to immediately print an Invoice for an “I” type of order
entered through Sales Desk. This may be
helpful for over the counter sales, or if you use the invoice as a pick
ticket. Select “N” to disable this
feature if invoices are printed on a batch basis.
14. Show Credit Problem Window In First
Screen?
Select “Y” if you want Sales Desk people to be made aware of the customer
credit status before entering an order.
If you select “N”, a credit problem window will still come up when you
confirm the order. If you want to get
order first and worry about the credit problem later, you should answer
“N”. Otherwise, answer “Y”.
15. Line Item
Default to Customer or Item's Loc ?
This flag is only relevant if you use the multiple locations feature in Elliott. By default, system default s a line item’s location to customer’s default location.
If you are a distributor who stocks inventory at all warehouse, then this is the right choice for you.
If you are a manufacturer producing produce and stocking items at different locations, then you should default line item’s location by item’s default location (as setup in the item master record).
Select “C” for customer default location or “I” for item default location. This is a default value and the actual line item location can be changed at line entry time.