The Purchase Order
Processing application allows the entry of purchase orders. Once entered,
purchase orders may later be modified, canceled or printed out on the Purchase
Order Edit List. Closed orders may be purged from the file and blanket orders
may have releases issued against them. The purpose and function of each of
these features is discussed below. Refer to The Purchase Order Cycle in the
Package Overview for supplemental information.
Purchase Orders
A purchase order
is a formal request for the delivery of merchandise or services. It is also a
written contract that itemizes what should be delivered, how much it should
cost, where it should be delivered, how it should be shipped, what the payment
terms are, etc. This information is printed on a purchase order form by means
of the Print Purchase Orders application and is then sent to the vendor. A
printed purchase order is a formal commitment to accept delivery of and pay for
the goods or services that it lists (except in the case of blanket orders).
The data entered
on a purchase order is of two basic types: that which is of interest to the
vendor and that which is of purely internal interest. The vendor needs to know
what you want, where you want it shipped and when it is supposed to be
delivered, for instance. The company needs to keep track of the asset or
expense accounts that are affected by the purchase, what job the merchandise or
services are for, where the merchandise should be transferred once it is
received and who should be notified in the event of any problems that arise
during receiving or accounts payable voucher entry. Both types of data are
entered on the purchase order and are retained until the order is physically
purged from the file.
Purchase Order Types
There are four
purchase order types. Both kinds of data are entered on the purchase order
regardless of its type. The most common purchase order type is called the
normal type. On such purchase orders you simply list what you want to order,
print the data on a purchase order form and send it to the vendor. The vendor will
then ship you merchandise or deliver services on the basis of the order.
The second type is
the drop shipment purchase order. This is an order which is to be delivered to
one of your customers directly by the vendor. Except for this difference, it is
exactly the same as a normal order.
Another purchase
order type is called the blanket type. Like a normal order, a blanket order
lists goods and services to be delivered. A blanket order, however, is not a
true order. It is, instead, merely an agreement to purchase specific goods and
services over a period of time.
Each purchase that is made of items listed on a
blanket order is referred to as a release. This is the fourth purchase order
type. A release is very similar to a normal purchase order except that it
references the blanket order against which it is released and it is allowed to
specify only those items that were included on the blanket order.
Adding Purchase Orders
Purchase orders
are entered on two screens. The first screen accepts the entry of general
order information such as the vendor number, buyer, shipping destination and
terms. The program validates the data as it is entered. For instance, the
vendor number that is entered must be that of a vendor that has been defined in
the Vendor file. If this condition is not satisfied the entry is disallowed
and a message displays explaining why. You may enter normal and blanket
purchase orders in this manner. The general information on the first screen is
sometimes referred to as the purchase order header. You then advance to a
second screen upon which specific items or services are ordered. One screen
full of data is required to described each item on the order. Each of these
items is referred to as a line item since it is a single line on the purchase
order and it pertains to a particular item. The data required to describe a
line item includes the item number, unit cost, quantity ordered and request
date. There may be up to 999 line items on a single purchase order.
Changing Purchase Orders
The change mode
allows you to change, within limits, information on purchase orders. If
changes occur after the purchase order is printed, there are certain changes
that the vendor needs to be informed of. For instance, if an additional item
is added to the order or if the quantity of an item on the order changes, it
would be pointless to merely make the changes without notifying the vendor. Consequently,
changes of this nature trigger the printing of change orders. A change order
lists the original order plus the changes. Change orders, like original
orders, are printed by means of the Print Purchase Orders application.
Cancel Purchase Orders
Just as you cannot
arbitrarily change an active purchase order without notifying the vendor, you
cannot delete one unless you first cancel it and inform the vendor of the
cancellation. The Cancel Purchase Orders function provides you with the
ability to cancel orders. The package sees to it that a cancellation order is
later printed through the Print Purchase Orders applications. Once the
cancellation order has been printed, the status of the purchase order will
automatically be set to X (canceled) and the order will then be eligible for
deletion.
Closed orders, (those which have been fully received
and invoiced and which have had their order status set to C), and canceled
orders may be deleted by means of the Purge Closed Purchase Orders
application. This application optionally allows the deletion of orders which
have not been formally closed (have not had their order status changed to C),
but which are eligible to be closed. It also allows the deletion of
disapproved orders that were never printed.
During the purge
process, the program posts historical information about the order to the Vendor
file and the Purchase Line History file. This information is later accessed to
produce the Vendor Performance Analysis Report and the Purchase Line History
Report.
Copy PO Function
When
users press F3, they may create a PO by copying from an existing PO. Once the PO is copied, the user will be in the change mode to make further changes if
necessary. In addition, this PO Copy function has been improved to support
copying the comments and notes.
Printing the Edit List
The final major function in this application is the
Purchase Order Edit List. This function enables you to print for internal use
the information entered on the purchase orders. The report accommodates a
variety of range parameters. For instance, you can specify which purchase
order types and statuses are to be included; which vendor's orders, which
buyer's orders and which shipping destination's orders should be included (one
or all in each case); a range of purchase order dates; and a range of purchase
order numbers. Consequently you can evaluate the purchase orders that are on
file from a number of different viewpoints. This makes the edit list useful as
a tool for management, purchasing and even finance.
Create PO by Sales History
The
F3 key has been enabled in the P/O Line Item Screen “1. Line No” field.
Pressing the F3 key will provide up to two years of sales history breakdown by
month, to assist the buyer with purchasing, in a popup window that prompts for
the following selection criteria:
·
Product Categories
·
User Defined Codes
·
Buyer Codes
·
For Qty Available Less Than
·
Show Item Qty on Order > 0
·
Only Show Qty Available <
Re-Order Level
·
(Qty Avail/Last Year Usage) Less
Than
·
(Qty Avail/YTD Qty Usage) Less
Than
Based
on the criteria the user provides, a list of items will be displayed in the
next list window. In the list window, as each item is highlighted, the details
of sales/usage history of that item will be displayed. In addition, the user
can drill down to stock status inquiry and further drill down to many other
functions to obtain more details of this item. The information provided will
assist the buyer with determining how many to purchase for each item. The
buyer can simply indicate how many to order in the list window. Once the user
is done editing the list window, they can simply exit by using the ESC key.
The system will create the PO line items based on the quantity the user
indicated in the list window.
Select
Purchase Order Processing from the pull down P/O Processing window. The
following screen will then be displayed:
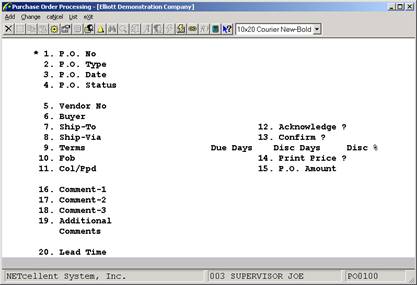
Purchase Order
Processing Entry Screen
The
following options are available:
* Select
the desired mode from the Purchase Order Processing menu bar
* Enter
the data requested on the screen
* When
you add an order a screen will display upon which you enter general order
information such as the order type, order date, vendor number, buyer code,
terms, etc. This information is sometimes referred to as the order header.
* Once
you have entered the general order data, you will advance to a screen upon
which you specify the items you are ordering. These items are referred to
commonly as line items or order lines. There is only one order header per
order but there are as many line items as you choose to enter, up to 999. When
you have entered all of the line items for the order, you may F10 or ESC for
entry of a new order.
* To
Cancel Purchase Orders you will be asked to specify the number of the order you
wish to cancel. After the program has verified that the order exists, that it
is an order that has not already been canceled or closed and that it is an
order that has been printed, a message will display on the screen asking if you
wish to cancel the order. If you answer Y, a message will then display on the
screen asking if the order is being canceled because of vendor negligence. If
you answer Y, the program will cause the vendor's performance statistics to be
updated accordingly when the order is deleted. Whether you answer Y or N, the
order will be marked for cancellation but the order will not actually be
canceled yet. In this manner you may mark as many orders for cancellation as
you like. When there are no more orders to cancel, press ESC while the cursor
is positioned for entry of the purchase order type. Once an order has been
canceled it can only be reinstated if the cancellation order has not been
printed. If the cancellation order has been printed, then it cannot be
reinstated. To do so you must re‑enter the order through the add mode,
assigning it a different number and treating it as an entirely new order.
* Next
you must print the orders through the Print Purchase Orders application. This
application will complete the cancellation process for you automatically. Once
the cancellation orders have been printed you may physically delete the orders
by means of using the Purge Closed Purchase Orders application
To return to the menu bar, press the ESC or F10 key. To leave
this application, press X for EXIT when positioned at the menu bar.
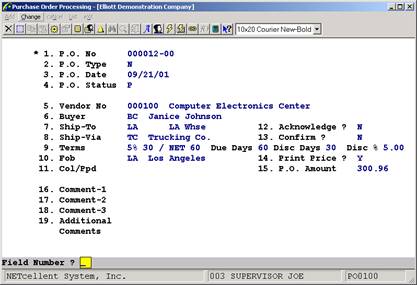
Entry Field Descriptions
Order Header Entry
The field
descriptions presented here are valid for the Add, Change, Cancel and List
modes. Restrictions that pertain to a particular mode of operation are
specified for the entry field to which they apply.
|
Name
|
Type
and Description
|
|
1. P.O. No
|
6
numeric digits (999999).
In the add mode, you may
press the F1 key to default to the next available order number.
In the cancel mode, two
additional numeric digits are required to specify the release number.
When
adding an order, enter the purchase order number (or press the F1 key for the
next order number. You may specify any number that you like but the program
will check to make sure that the number has not been used by another order
currently on file.
|
|
2. P.O. Type
|
1
alphabetic character.
N, B or D.
A submenu will display to
remind you of the options.
Enter the purchase order
type.
The valid entries are
N = Normal
B = Blanket
D = Drop‑Ship Order.
The entry defaults to N.
In
the cancel mode, enter the 6‑digit purchase order number and then enter
the 2‑digit release number. For normal and blanket orders the release
number is zero, so you may press RETURN for the release number to default the
entry to zero. A non zero release number is only required for releases of
blanket orders.
|
|
3. P.O. Date
|
A
date in the standard date format.
Enter the purchase order
date.
This is a reference date for
determining how long a purchase order has been on file. It is not a reliable
indicator of how long the vendor has had the order, however, since an order
may remain on file indefinitely before it is printed and sent to the vendor.
The package automatically keeps track of the date the order was printed since
that is a more useful indicator of how long the vendor has had the order.
The
entry defaults to the current date.
|
|
4. P.O. Status
|
1
alphabetic character.
U or R.
In the add mode this field
defaults automatically to U, unreleased but you may change the value to R,
for released. There are several valid purchase order statuses, but some of
them are assigned by various programs in the package and cannot be modified
by the operator once they have been set.
The possible values are:
U = Unreleased
R = Released
X = Canceled
P = Printed
C = Closed
An
unreleased order is one which is on file pending modifications and approval.
It may or may not be in the state it will be in when the vendor receives it.
Line items on an unreleased order may be changed and deleted at will. The
package will not make any effort to keep track of these changes since the
vendor need not be notified of them. The Print Purchase Orders application
will disregard orders that have a status of U when it is determining which
orders should be printed.
|
|
P.O. Status (continued)
|
A
canceled order is one which was previously a released order for which a
purchase order was printed and sent to the vendor. Later, the decision was
made to retract the order so it was canceled through the Cancel mode. A
cancellation order was printed by the Print Purchase Orders application and
during the process of printing the cancellation, the program automatically
set the order status to X.
You are not allowed to
manually change the status to X since to do so would bypass the steps
necessary to get the cancellation order printed. Also, once an order has a
status of X, the status may not be changed. A canceled order, once printed,
may not be uncanceled.
A closed order is one for
which all line items have either been fully received and fully invoiced,
canceled, or fully received and the Close P.O.'s Not Fully Invoiced flag in
Purchase Order Setup is Y. You may change the status to C manually from the
status of P if all of the line items are fully received and billed or
canceled.
The primary advantage of
manually setting the status of an obsolete order to C is that doing so will
speed up processing for those programs that are designed to specifically
ignore or specifically look for closed purchase orders. In the change mode,
you are allowed to change the purchase order status from U to R or R to U.
The status may also be
changed from P to C (providing the other qualifications for closing an order
are met) or C to P.
The normal sequence of
events is that a purchase order begins with a status of U. The status is
then changed to R once the order has been approved. The order next then gets
printed and its status is automatically changed to P. Once all items on the
order have been received and invoiced, the status gets set to C. Later, the
order is purged.
A
released order is one which has been finalized and is ready to printed. You
must set the status of an unreleased order to R in order for the Print
Purchase Orders application to print it.
|
|
P.O. Status (continued)
|
A printed order is a
released order which has been printed through the Print Purchase Orders
application. This application automatically changes the status from R to P.
Once an order has a status of P you may not change the status back to U or R.
|
|
5. Vendor No
|
6
alphanumeric characters.
Enter the number of the
vendor with whom this order is being placed. The vendor's name will display
beside the entry. The vendor that you specify must be on file in the Vendor
file.
Pressing the F7 key will
allow you to search for the vendor by number or pressing the F8 key will
allow you to search for the vendor by name.
The
program will check to make sure that the vendor is one from whom purchases
are allowed. If the A/P Vendor File specifies that the vendor should not be
purchased from, a message will display on the bottom of the screen asking
Vendor Should Not Be Purchased From - Ok to place order ? You must respond
to the question by answering Y or N. There is no default. If you answer N,
the program will position the cursor for re‑entry of the vendor
number. Generally when this situation arises, you will want to stop the
order. You may do so by pressing the ESC key for the vendor number's entry.
|
|
6. Buyer
|
2
alphanumeric characters.
Enter the Buyer code of the
buyer for whom this order is being entered. The code entered must be that of
a buyer that is on file. The buyer's name will display beside the entry.
If you know the buyer's name
but not his code, you may press the F1 key to display the code and name of
the first (and subsequent) buyers that are on file. You may page through all
of the Buyer codes in this manner. When the Buyer code that you require displays,
answer Y to the Right Buyer ? question; remember that 1 and 2 are also valid
answers to Yes/No questions.
In
add or change mode, press the F7 key to search for Buyer Code.
|
|
7. Ship‑To
|
6
alphanumeric characters.
Enter the Ship‑To code
for the warehouse or receiving location where the merchandise on the order
should be shipped. The code entered must be that of a valid Ship‑to
code on file. Once a valid code has been entered, its description will
display beside the entry.
You may review the Ship‑To
codes that are on file by pressing the F1 key while the cursor is positioned
for entry of the Ship‑To code. Once the correct code displays, answer
the Right Ship-To ? question by entering Y.
Changing the Ship‑To
code for an order that has already been printed is not allowed since it is
this code that identifies the location for which the material is on order.
If the wrong Ship‑To code was entered, the order must be canceled and a
new order released.
For drop‑shipment
orders the Ship‑To code must be one that specifies the address of one
of your customers. There is a code on each Ship‑to record which indicates
whether the record is of this type.
You may enter the code
directly or use the F1 key to page through the ship‑to on file if the
one you need has been entered previously.
In
the add or change mode, press the F7 key to search for Ship-to Code.
|
|
8. Ship‑Via
|
2
alphanumeric characters.
Enter the Ship‑via
code for the means by which the merchandise should be shipped. The code
entered must be that of a valid Ship‑via code on file. Once a valid
code has been entered, its description will display beside the entry.
You may review the Ship‑via
codes that are on file by pressing the F1 key while the cursor is positioned
for entry of the Ship‑via code. Once the correct code displays, answer
the Right Ship-Via? question by entering a Y.
In Add or Change mode, press
the F7 key to search for Ship-via code.
Defaults
to the vendor's recommended ship‑via method as specified in the Vendor
file.
|
|
9. Terms
|
15
alphanumeric characters.
Defaults
to the vendor's terms specified in the Vendor file. Enter the description of
the terms of sale. The terms entered here will print on the purchase order to
advise the vendor of the terms you expect, but they serve a documentary
purpose only. The package will not take any measures to enforce them.
|
|
10. Fob
|
2
alphanumeric characters.
Defaults the FOB code for
the FOB point. The code entered must be that of a valid code on file. Once
a valid code has been entered, its description will display beside the
entry.
You may review the FOB codes
that are on file by pressing the F1 key while the cursor is positioned for
entry of the FOB code. Once the correct code displays, enter Y.
In
add or change mode, press the F7 key to search for FOB code.
|
|
11. Col/Ppd
|
1
alphabetic character.
C, P or Blank.
Valid entries are C for
Collect and P for Prepaid. A submenu will display to remind you of the
options. You may leave this field blank if the proper code is unknown.
Enter the Collect/Prepaid
code.
Enter
C if you wish to be billed for freight by the freight company; enter P if you
wish the vendor to pay freight and bill you for it along with the
merchandise. This information will print on the purchase order to advise the
vendor of how you wish to be billed for freight but the package will not
actually enforce this condition. The field serves a documentary purpose
only.
|
|
12. Acknowledge ?
|
1
alphabetic character.
The valid entries are Y for
acknowledgment required, N for acknowledgment not required and A for
acknowledgment received. A menu will display to remind you of the options.
A is only allowed from Field
Number ?
Defaults to the vendor's
acknowledgment requirements specified in the Vendor file.
Order acknowledgments are
useful in that they allow you to verify that the vendor has (or has not)
correctly interpreted your purchase order. This is particularly important
for such factors as terms, shipping address, quantities ordered, unit costs
and request dates. It is also important just to know that the vendor
received the order and intends to fill it.
You
would enter Y or N at the time the order is being entered. You would change
this value to A once the acknowledgment is received.
|
|
13. Confirm ?
|
1
alphabetic character.
The valid entries are Y for
confirmation required, N for confirmation not required and C for
confirmation received.
C is only allowed from Field
Number ?
Defaults to the vendor's
confirmation requirements specified in the vendor file.
An
order confirmation is notification from the vendor that the merchandise on an
order has been shipped. The value entered here prints on the purchase order
so that the vendor will know whether or not confirmation is required. Once
confirmation has been received you may change the value to C so that there
will be a record of the confirmation.
|
|
14. Print Price ?
|
Y or
N.
Answer Y if you wish the
unit price that you expect to pay to be shown on the purchase order. Answer
N if you wish the prices to be blank on the purchase order.
Defaults
to the vendor's price printing response specified in the vendor file.
|
|
15. P.O. Weight
|
10
numeric characters with 4 decimal positions (999,999.9999).
The
entry of this field is not allowed during add mode. The program will
automatically calculate the purchase order weight as line items are entered.
Changes are allowed to this field during the change mode to provide override
capability.
|
|
16. Comment‑1
|
2
alphanumeric characters.
Order header comments print
at the bottom of each page of the purchase order.
You may press RETURN to skip
the entry of any field.
You may review the Comment
codes that are on file by pressing the F1 key while the cursor is positioned
for entry of any code. Once the correct code displays, answer Y to the Right
Comment ? question by entering Y.
In add or change mode, press
the F7 key to search for Comment code.
Enter
here the Comment codes for up to three comments that you wish to appear on
the purchase order.
|
|
17. Comment‑2
|
2
alphanumeric characters.
Order
header comments print at the bottom of each page of the purchase order.
|
|
18. Comment‑3
|
2
alphanumeric characters.
Order
header comments print at the bottom of each page of the purchase order.
|
|
19. Additional Comments
|
3
lines of 30 alphanumeric characters.
Space for additional
comments is allowed so that comments specific to a particular vendor can be
communicated on the purchase order without setting up Comment codes for
them. This field allows the free‑form entry of three lines of comments
that will print on the bottom of each page of the purchase order.
For
drop ship orders you will want to use these comments to take advantage of the
opportunity to pass information about the customer and the customer's order
back to COP to facilitate billing. The Drop Ship Receivings Report (See
Receivings Processing) prints these comments verbatim. It is this report
that is reviewed in COP to determine when to bill the customer for a drop
shipment.
|
Line Item Entry
The field
descriptions presented here are valid for the add, change and list modes.
Restrictions that pertain to a particular mode of operation are specified for
the entry field to which they apply.
|
Name
|
Type
and Description
|
|
1. Line No
|
3
numeric digits (999).
The entry defaults to the
next available line number in the add mode.
The line number is the means
by which one line item is distinguished from another. Line items will
appear in numeric order on the purchase order form and on other reports where
the order data is printed. You may specify any line number for an item that
you like, as long as the number has not already been used on the order.
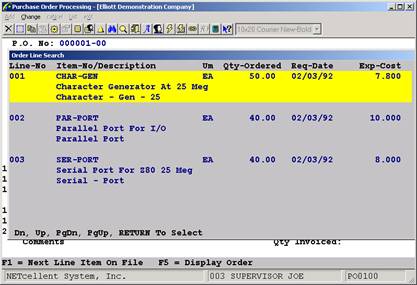
In
change mode you can access a particular line item by specifying its line
number. You may also add a line item to the order by specifying a line
number that has not yet been used, then answering Y to the question that asks
whether you wish to add the line item. You may bring up previously entered
line items for change by pressing the F1 key in change mode.
|
|
1. Line No (continued)
|
In add and change modes, you
can press the F6 key to display all line items currently on the order. You
can then highlight a line item using the up/down arrow keys, and then display
it by pressing the RETURN key.
In add mode, you can press
the F3 key to obtain sales history for the vendor based on certain criteria.
You will be prompted in a new window for Product Categories, User Defined
Codes, Buyer Codes, For Qty Available Less Than, Show Item Qty On Order >
0, Only Show Qty Available < Re-Order Level, (Qty Avail/Last Year Usage)
Less Than, and (Qty Avail/YTD Qty Usage) Less Than.
|
|
2. Item No
|
15
alphanumeric characters.
Enter the line item's item
number. The item's description will display below the entry, if the number
entered is a valid item number.
The item number does not
need to be an item on file in the Item file if you are not using the Lifo or
Fifo costing methods. (If you are using the Lifo or Fifo costing methods,
the Item number entered here must be defined in the Item file.) For
instance, the item may be some customer order that will never be stocked, it
may be an expense item or it may be a service. If you enter an invalid item
number, the program will display a warning message and ask if you are sure
the number is okay.
You may also enter the item
number of an item that is normally manufactured in‑house rather than
ordered from a vendor. The program will display a warning and ask if the
entry is okay.
The only requirement for an
item number is that something be entered. A blank item number on a purchase
order is not allowed.
Pressing
the F7 key will allow you to search for an item by number or pressing the F8
key will allow you to search for an item by description.
|
|
3. Item Desc
|
2
fields of 30 alphanumeric characters each.
The item description will
display automatically if a valid item number is entered. It is possible to
change the description of an item that is on file but the change will be
effective only on the purchase order. Changing the description here has no
effect upon the item description in the item file.
If
the item number entered above is not that of a valid item, you will be
required to enter a description here. Any non‑blank entry is allowed.
|
|
4. Vnd Itm No
|
15
alphanumeric characters.
The
vendor's item number will automatically display here if there is a Item
Vendor record on file for the order's vendor number and the line item's item
number.
|
|
4. Vnd Itm No (continued)
|
You
will not be allowed to change it (unless you first change the Item Vendor
record through the Item Vendor Maintenance application). If no such record
exists, you will be prompted to enter the number and what you enter will
generate an Item Vendor record.
If
you do not know the vendor's item number, leave this field blank. A blank
vendor item number will not generate an Item Vendor record, nor will an Item
Vendor record be created in the case where the item number entered above is
that of an invalid item.
|
|
5.
Account No
|
An
account number in the standard format.
Enter the number of the
inventory asset or expense account that will be affected by the payment for
goods or services received against this line item. An entry is not required
but accounts payable processing will be more productive if an account number
is available on the purchase order.
Pressing the F7 key will
allow you to search for the account by number or pressing the F8 key will
allow you to search for the account by description.
The
field defaults to the account number in the Material Cost Type/Loc File or
the Inventory Setup if nothing is found in the first file.
|
|
6. Line Stat
|
1
alphabetic character.
This field is automatically
assigned. Its value may not be changed through this program.
During the initial entry of
the line item in the add mode, the line status is automatically assigned a
value of N for New.
Once the line item has
appeared on a printed purchase order, its status is assigned a value of P for
Printed.
If
the line item is ever canceled, it will be assigned a status of X once the
line item has appeared as canceled on a printed purchase order.
|
|
7. Cancel ?
|
Y or
N.
During
the initial entry of the line item, this field is automatically assigned a
value of N for No. A change is not needed to this field during the add mode
since if you wish to eliminate the line item from the order at this stage,
you need merely press the ESC key to stop the entry.
|
|
7. Cancel ? (continued)
|
In
the change mode, you may change the value to Y for Yes. If the line item has
not yet appeared on a printed purchase order, changing this field to Y means
that you wish to delete the line from the order. The program will verify
that this is your intention, then remove the line from the order. If it has
appeared on a printed purchase order, it means that you wish the line item
to be printed on a change order as a canceled line. Once it has been printed
as a canceled line its line status (see above) will automatically be changed
to X.
There are two basic reasons
why you would want to cancel a line item. You decide you no longer want the
item or you are forced to procure the item elsewhere because the vendor has
failed to deliver it on time. Whenever you cancel a line item, a question
will display on the screen asking if the cancellation is required because of
vendor negligence. If it is, the program will keep track of this information
so that the vendor performance statistics can be updated accordingly.
Once
an item has been canceled, and has appeared as such on a change order, it may
not be uncanceled. To reinstate a canceled item you will be required to add
it newly to the order.
|
|
8. U Of M
|
2
alphanumeric characters.
Defaults to the item's
purchase unit of measure in the item record.
You may
enter either the purchase or stock unit of measure that is specified in the
item record.
|
|
9. Unit Cost
|
10
numeric digits with 4 decimal positions (999,999.9999).
Defaults to the last cost at
which the item was ordered (specified in the Item file).
Enter
the item's unit cost that you expect to pay when the vendor bills you for the
order. The difference between this expected unit cost and the actual unit
cost at which you get billed is the basis for the price variance statistic by
which the vendor's performance is evaluated.
|
|
10. Commod Cd
|
4
alphanumeric characters.
If
the line item is for a valid item, this field will automatically display the
item's commodity code from the item file and you will not be allowed to
change it. If the item is not on file in the item file you may enter any
value.
|
|
11. Notify
|
3
alphanumeric characters.
Defaults to the default
notification initials specified in P/O Setup.
Enter
the initials of the individual within the company who should be notified of
problems and major developments with the order. These should be the initials
of someone such as the buyer or the department head whose department will
receive the merchandise, someone who is aware of the terms and price
agreements on the order and who is in a position of authority.
|
|
12. Move To
|
3
alphanumeric characters.
Defaults to the default move‑to
location specified in P/O Setup.
Enter
the identifying abbreviation, initials or department number of the area to
which the merchandise should be relocated once it has been received.
|
|
13. Job No
|
6
alphanumeric characters.
Enter the number of the job
for which this merchandise or service is destined. This must be a valid code
in the Job Code File in the Maintenance section of A/P.
In
add or change mode, press the F7 key to search for Job number.
|
|
14. Blank Type
|
1
alphabetic character.
Defaults to E on blanket
orders.
This
field is only required if the order type is B (blanket).
|
|
Blank Type (continued)
|
The
entry here indicates to the vendor the degree of commitment you are making on
a blanket order. The allowable entries are:
F = Firm
E = Estimate
N = Minimum
X = Maximum
Firm means that the amount
on the blanket order is the amount that you actually expect to order.
Estimate means that the amount you end up ordering may be more or it may be
less but that this is the best guess you have. Minimum means you will order
at least the amount specified. Maximum means you will order no more than the
amount specified.
For
blanket orders one of these values must be entered.
|
|
15. Req Date
|
A
date in the standard date format.
Enter
the date on which you wish to receive the shipment.
|
|
16. Prom Date
|
A
date in the standard date format.
This
field is not entered in the add mode. In the change mode you may enter a
promise date. The promise date is a negotiated request date. If the vendor
is unable to meet the request date for the line item, he will propose a
different date that can be met. You should enter that date as the promise
date, leaving the request date as it was originally entered. Doing so will
enable you to see how late the shipment was compared to the original request
date.
|
|
17. Qty Ord
|
A
standard quantity format.
Enter the quantity ordered
for this line item.
In
the change mode you may delete a new line item by changing its quantity
ordered to zero. The screen will ask if you wish to delete the line item and
will physically remove the line from the order if you answer Y. If the line
item does not have a status of new, a message will display to inform you that
the line cannot be deleted; it can only be canceled.
|
|
18. Comment‑1
|
2
alphanumeric characters.
Line item comments print on
the purchase order immediately below the line item's order data. Enter here
the comment codes for the comments that you wish to have associated with a
particular line item. You may press RETURN to skip entry of either field.
If you are unsure of what
comment code to enter, you may press the F1 key while the cursor is
positioned for entry of either code to display, in order, the cost that are
on file. Once the correct code displays, answer Y to Right Comment ? to
accept it.
In
the add or change mode, press the F7 key to search for Comment code.
|
|
19. Comment‑2
|
2
alphanumeric characters.
Line item comments print on
the purchase order immediately below the line item's order data. Enter here
the comment codes for the two comments that you wish to have associated with
a particular line item. You may press RETURN to skip entry of either field.
If
you are unsure of what comment code to enter, you may press the F1 key while
the cursor is positioned for entry of either code to display, in order, the
cost that are on file. Once the correct code displays, answer Y to Right
Comment ? to accept it.
|
|
20. Additional Comments
|
2
lines of 30 alphanumeric characters.
This field allows free‑form
entry of two lines of comments that will print on the purchase order
immediately below the line item's order data.
The
F2 key allows for expanded comments to be entered on the purchase order
immediately below the line items order data.
|
Line Item Display Fields
|
Name
|
Type
and Description
|
|
P.O. No
|
Display
only.
This
is the number of the purchase order that is currently being added or
changed. It serves to remind you of which purchase order you are working on.
|
|
Last Line No
|
Display
only.
This
is the last number of the last line item added to the order. During entry of
the first line item on an order this field is blank. This field helps you to
keep track of your position on the purchase order.
|
|
Last Item No
|
Display
only.
This
is the item number of the last line item to be added to the order. This
field is blank during entry of the order's first line number. Like the last
line number, it helps you keep track of your position on the purchase order.
|
|
Qty‑On‑Hand
|
Display
only.
This
is the quantity of the item that is on‑hand at the warehouse location
specified in the Ship‑To record. If the ship‑to location is the
item's default location, the quantity that displays is the quantity for All
locations; otherwise it is merely the quantity at the location where the
order is destined to be shipped. The quantity displays in the item's
stocking unit of measure and the description for this unit of measure
displays beside the quantity.
|
|
Qty‑Allocated
|
Display
only.
This
is the quantity of the item that is currently allocated. As for the quantity
on‑hand, the amount that displays depends upon the ship‑to
location. If the order is for the item's default location, the amount that
displays is the quantity allocated at All locations; otherwise it is merely
the quantity allocated at the location where the order is to be shipped. The
quantity displays in the item's stocking unit of measure and the description
for this unit of measure displays beside the quantity.
|
|
Qty‑On‑Order
|
Display
only.
This
is the quantity of the item that is currently on order at the order's ship‑to
location. The quantity displays in the item's stocking unit of measure and
the description for this unit of measure displays beside the quantity.
|
|
Reorder‑Level
|
Display
only.
When
the stock level of the item hits this level at the order's ship‑ to
location, reordering is recommended. The display of this field allows you to
compare the quantity on‑hand with the reorder‑level to see where
you stand. The reorder‑level displays as it was entered in the Item
file in the item's stocking unit of measure.
|
|
Line Weight
|
Display
only.
The
program automatically multiplies the weight of an item by the number of
items, then displays the extended line weight.
|
|
Receipt Date
|
Display
only.
Change
mode only. This is the date of the most recent receiving against this line
item.
|
|
Qty Received
|
Display
only.
Change
mode only. This is the quantity received against this line item so far. It
displays in the unit of measure entered for the purchase order line.
|
|
Qty Rejected
|
Display
only
Change mode only. This is
the quantity the vendor shipped against this line item that was rejected.
For
blanket orders, the quantity that has been released displays instead. The
units display in the unit of measure entered for the purchase order line.
|
|
Qty Invoiced
|
Display
only.
Change
mode only. This is the quantity that has been invoiced against this line
item. It displays in the unit of measure entered for the purchase order
line.
|
List
|
Name
|
Type
and Description
|
|
Starting P.O. Number
|
6
numeric digits followed by 2 numeric digits (999999‑99).
Defaults to All.
Enter
the purchase order number of the first purchase order that is to be eligible
to appear on the Edit List.
|
|
Ending P.O. Number
|
6
numeric digits followed by 2 numeric digits (999999‑99).
Defaults to the starting
number's value.
Enter
the purchase order number of the last purchase order that is to be eligible
to appear on the Edit List.
|
|
Starting P.O. Date
|
A
date in the standard format.
Defaults to All.
Enter
the earliest purchase order date that will enable a purchase order to appear
on the Edit List.
|
|
Ending P.O. Date
|
A
date in the standard date format.
Defaults to the starting
date's value.
Enter
the latest purchase order date that will qualify a purchase order to appear
on the Edit List.
|
|
P.O. Type
|
Four
1‑character alphabetic fields.
The valid entries are N, B,
and D.
The first field defaults to
All.
Enter
the purchase order types that will qualify a purchase order to appear on the
Edit List.
|
|
P.O. Status
|
Five
1‑character alphabetic fields.
The valid entries are U, R,
P, X, and C.
The first field defaults to
All.
Enter
the purchase order statuses that will qualify a purchase order to appear on
the Edit List. This feature enables you to print lists of only closed
orders, only canceled orders, only closed and canceled orders, only unreleased
orders and other such combinations.
|
|
Vendor Number
|
6
alphanumeric characters.
Defaults to All.
Enter
the vendor number of the vendor whose purchase orders are to appear on the
Edit List. The vendor's name will display below the entry. The Edit List
may be printed to include one or all vendors.
|
|
Ship‑To Code
|
2
alphanumeric characters.
Defaults to All.
Enter the Ship‑To code
of the shipping destination which is to receive the order. The Ship‑To
code's description will display beside the entry. The Edit List may be
printed to include orders for one or all Ship‑To codes.
You
may display each Ship‑To code that is on file by pressing the F1 key
while the cursor is positioned for entry of the code. Once the correct code
displays, press RETURN to accept it.
|
|
Buyer
|
6
alphanumeric characters.
Enter
the appropriate buyer code or F1 to display the next buyer on file. Once the
correct code displays, press RETURN to accept it.
|
|
Show Headers Only ?
|
Y or
N.
Defaults to N.
Answer
Y if you wish the Edit List to show purchase order header information only.
This feature allows you to print an abbreviated version of the Edit List
which excludes the item information. Answer N if you wish all purchase order
information to be shown.
|
Purchase Order
Processing Screen 1
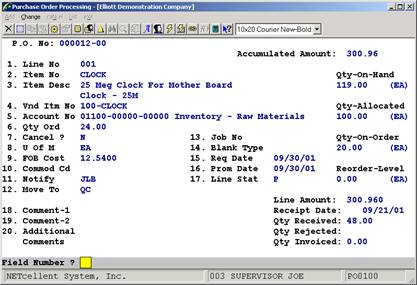
Purchase Order Processing
(Screen #2)
Purchase Order Processing (F5
Display Order)
Run Date: Nov 13, 1992 ‑ 12:05pm Elliott
Electronics Co.
Page 1
P U R C
H A S E O R D E R E D I T L I S T
Range: All Purchase Order Numbers
All Purchase Order Dates
All Purchase Order Types
All Purchase Order Statuses
All Vendors
All Ship‑To Codes
All Buyers
P.O. Number: 000001‑00 Ordered
From: Ship To: Order Comments:
P.O. Date: 02/03/92 Computer Electronics Center
The Computer Unlimited Company
P.O. Type: Normal 1874 North Lake Ave
2441 Honolulu
P.O. Status: Printed Los Angeles, Ca Montrose, CA 91020
Cancelled ? N 93478
Changed ? Y
Code: LA LA Whse
Print Date: 05/10/92 Location:
LA Los Angeles
Vendor No: 000100 Name: Computer Electronics Center Buyer: Janice Johnson Terms: 5% 30 / NET 60 Col/Ppd:
Fob: Los Angeles Ship‑Via: Trucking Co. Confirm: No Acknowledge: No Print Price: Yes Order Weight: .000
Line‑No: 001 Item‑No: CHAR‑GEN
Desc: Character Generator At 25 Meg Qty‑Ord: 50.000 Req‑Date:
02/03/92
Status: P Vnd‑Itm:
Character ‑ Gen ‑ 25 Qty‑Rec: 10.000 Prom‑Date:
Cancel ? N Acct‑No: 01100‑00000‑00000
Comm: Qty‑Rej: .000 Rcpt‑Date:
02/03/92
U‑Of‑M: EA Job‑No:
PC100 Qty‑Inv:
.000 Rejection:
Blanket: Comm‑Cd:
Exp‑Cst: 7.8000 Line‑Cost: 390.00
Notify: JLB Move‑To:
QC Act‑Cst:
7.8000 Amt‑Inv: .00
Packaging must be handled through shippment with
extra paper packing. Multiple layers of paper should be applied.
********************************************************** Any aditional
handling should be prepared by manufacturing
and met by shippment
management.
************************************************************
These Parts are very sensitive and need to be boxed
at top of shippments.
Line‑No: 002 Item‑No: PAR‑PORT
Desc: Parallel Port For I/O Qty‑Ord: 40.000 Req‑Date:
02/03/92
Status: P Vnd‑Itm: Parallel Port Qty‑Rec: 10.000 Prom‑Date:
Cancel ? N Acct‑No: 01100‑00000‑00000
Comm: Qty‑Rej: .000 Rcpt‑Date:
02/03/92
U‑Of‑M: EA Job‑No:
PC100 Qty‑Inv:
.000 Rejection:
