|
Release Blanket Orders
Through the
Release Blanket Order function, you will specify the blanket order against
which the release is to be issued. The program will automatically assign the
release a unique purchase order number. Order numbers are in the format 999999‑99,
where 999999 is considered to be the order number and 99 is referred to as the
release number. Releases use the same order number as the blanket order from
which they were derived but the release number is unique for each release of a
given blanket order. Up to 99 releases may be issued against a single blanket
order.
After the
release's order number has been assigned and its header information has been
modified as appropriate, you will specify which of the line items on the
blanket order are to appear on the release. Once the release has been created,
it will be treated similarly to a normal type order. The idea is that only
those items which appeared on the blanket order should appear on a release, and
that the release should refer back to the blanket order it was issued against,
so that both you and the vendor will know that you are meeting your blanket
order commitments.
Select
Release Blanket Orders from the pull down P/O Processing window. The following
screen will then be displayed:
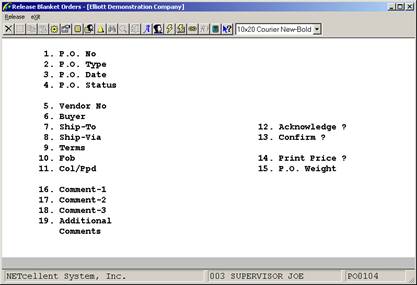
Release Blanket
Orders Processing Entry Screen
The following options are available:
* Select
the release mode from the Release Blanket Orders menu bar
* Enter
the data requested on the screen
* With
this application, you will be able to specify which of the line items on a
blanket order are to appear on the release and in what quantities.
* This
application functions much the same as the change mode in the Purchase Order
Processing application. You may access the application in order to create a
release of a blanket order or to modify
an existing release of a blanket order. When you enter the
application you will be prompted to enter the Purchase Order number. If you
wish to create a new blanket order release, press RETURN at the release number
of the Purchase Order number. The program knows that the order number is that
of a new blanket order. If you wish to modify a release, enter the Purchase
Order number and the release number of the release that is to be modified. In
either case, the number you enter must be that of a valid blanket order or
release. The program will then display the header information of the order.
After you have selected or entered a blanket order number, you must then
release the blanket order. This is accomplished by entering an R in the P/O
status field to release the blanket order release.
To
return to the menu bar, press the ESC or F10 key. To leave this application,
press X for EXIT when positioned at the menu bar.
Entry Field Descriptions
Order Header Entry
|
Name
|
Type
and Description
|
|
1. P.O. No
|
6
numeric digits (999999).
Enter
the purchase order number of the blanket order from which a release is to be
created or enter the number of the release that you intend to modify.
|
|
2. P.O. Type
|
1
alphabetic character.
This field displays the
previously defined type for this order.
Valid P.O. Types are:
B = Blanket
|
|
3. P.O. Date
|
A
date in the standard date format.
This
field displays a reference date for determining how long a purchase order has
been on file.
|
|
PO Date (continued)
|
It is
not a reliable indicator of how long the vendor has had the order, however,
since an order may remain on file indefinitely before it is printed and sent
to the vendor. The package automatically keeps track of the date the order
was printed since that is a more useful indicator of how long the vendor has
had the order.
The date can be changed by
selecting #3 from the Field Number ? prompt.
The
entry defaults to the current date.
|
|
4. P.O. Status
|
U or
R.
This field delineates
whether the order is U unreleased or R released.
A released order is one
which has been finalized and is ready to printed. You must set the status of
an unreleased order
to R in order for the Print
Purchase Orders application to print it.
It
defaults to U unreleased, but you may change the value to R, for released
through Field Number ?.
|
|
5. Vendor No
|
6
alphanumeric characters.
Displays the number of the
vendor with whom this order was placed. The vendor's name is also displayed
beside the entry. This information is obtained from the Vendor File.
It defaults to the vendor
associated with this order. This field may not be changed.
If
the vendor number needs to be changed, then this order must be canceled if a
new order is generated.
|
|
6. Buyer
|
2
alphanumeric characters.
Displays the Buyer code of
the buyer for whom this order was entered.
It
defaults to the buyer associated with this order. You may change the
information from the Field Number ? prompt.
|
|
Buyer (continued)
|
If
you know the buyer's name but not his code, you may press the F1 key to
display the code and name of the first (and subsequent) buyers that are on
file. You may page through all of the Buyer codes in this manner. When the
Buyer code that you require displays, answer Y to the RIGHT BUYER ?
question.
If
you need to change the buyer code, pressing the F7 key will allow you to
search for the appropriate buyer code. The code entered must be that of a
buyer that is on file. The buyer's name will display beside the entry.
|
|
7. Ship‑To
|
6
alphanumeric characters.
Displays the Ship‑To
Code for the warehouse or receiving location where the merchandise on the
order will be shipped.
You may review the Ship‑To
codes that are on file by pressing the F1 key while the cursor is positioned
for entry of the Ship‑To code. Once the correct code displays, answer
the RIGHT SHIP‑TO ? question by entering Y.
If you need to change the
Ship-To code, pressing the F7 key will allow you to search for the appropriate
ship-to code. The code entered must be that of a code that is on file. The
ship-to code name will display beside the entry.
Changing the Ship‑To
Code for an order that has already been printed is not allowed since it is
this code that identifies the location for which the material is on order.
If the wrong Ship‑To code was entered, the order must be canceled and a
new order released.
For drop‑shipment
orders the Ship‑To code must be one that specifies the address of one
of your customers. There is a code on each Ship‑to record which indicates
whether the record is of this type.
It
defaults to the Ship-To Code associated with this order. You may change the
information from the Field Number ? prompt.
|
|
8. Ship‑Via
|
2
alphanumeric characters.
Displays
to the vendor's recommended ship‑via method as specified in the Vendor
File.
|
|
Ship‑Via (continued)
|
It
identifies how the merchandise should be shipped.
You may review the Ship‑Via
codes that are on file by pressing the F1 key while the cursor is positioned
for entry of the Ship‑via code. Once the correct code displays, answer
the RIGHT SHIP‑VIA ? question by entering Y. The code entered must be
that of a code that is on file. The ship-via code name will display beside
the entry.
If you need to change the
Ship-Via code, pressing the F7 key will allow you to search for the
appropriated ship-via codes
This
field defaults to the Ship-via code associated with this order. You may
change the information from the Field Number ? prompt.
|
|
9. Terms
|
15
alphanumeric characters.
Displays the vendor's terms
specified in the Vendor File.
You may change the
information for this order from the Field Number ? prompt.
The
terms description will print on the purchase order to advise the vendor of the
terms you expect. However, they serve a documentary purpose only. The package
will not take any measures to enforce them.
|
|
10. Fob
|
2
alphanumeric characters.
Displays the Fob code for
the Fob point.
You may change the
information for this order from the Field Number ? prompt.
You may review the Fob codes
that are on file by press the F1 key while the cursor is positioned for entry
of the Fob code. Once the correct code displays, enter Y.
If
you need to change the Fob code, pressing the F7 key will allow you to search
for the appropriate Fob code.
|
|
11. Col/Ppd
|
1
alphabetic character.
Displays whether this order
is Collect or Prepaid.
The Valid entries are C, P
or Blank.
You may change the
information for this order from the Field Number ? prompt.
A submenu will display to
remind you of the options. You may leave this field blank if the proper code
is unknown.
Enter
C if you wish to be billed for freight by the freight company; enter P if you
wish the vendor to pay freight and bill you for it along with the
merchandise. This information will print on the purchase order to advise the
vendor of how you wish to be billed for freight but the package will not
actually enforce this condition. The field serves a documentary purpose
only.
|
|
12. Acknowledge ?
|
1
alphabetic character.
Displays Y for
acknowledgment required, N for acknowledgment not required and A for
acknowledgment received.
You may change the
information for this order from the Field Number ? prompt.
A submenu will display to
remind you of these options.
Order acknowledgments are
useful in that they allow you to verify that the vendor has (or has not)
correctly interpreted your purchase order. This is particularly important
for such factors as terms, shipping address, quantities ordered, unit costs
and request dates. It is also important just to know that the vendor
received the order and intends to fill it.
You would enter Y or N at
the time the order is being entered. You would change this value to A once
the acknowledgment is received.
Defaults
to the vendor's acknowledgment requirements specified in the Vendor File.
|
|
13. Confirm ?
|
1
alphabetic character.
Displays whether this order
is to be confirmed.
The valid types are Y for
confirmation required, N for confirmation not required and C for
confirmation received.
You may change the
information for this order from the Field Number ? prompt.
An order confirmation is
notification from the vendor that the merchandise on an order has been
shipped. The value entered here prints on the purchase order so that the
vendor will know whether or not confirmation is required. Once confirmation
has been received you may change the value to C so that there will be a
record of the confirmation.
It
defaults to the vendor's confirmation requirements specified in the Vendor
File.
|
|
14. Print Price ?
|
Y or
N.
Displays whether the price
is to be displayed on the purchase order.
You may change the
information for this order from the Field Number ? prompt.
The valid entries are:
Y = The Unit price is displayed on purchase order.
N = The Unit price is not displayed on the purchase
order.
This
field defaults to the vendor's price printing response specified in the
Vendor File.
|
|
15. P.O. Weight
|
10
numeric characters with 4 decimal positions (999,999.9999).
This field displays the
total weight of line items that were previously added to the purchase order.
You
may change the information for this order from the Field Number ? prompt.
|
|
P.O. Weight (continued)
|
The changes made to this field
provide you with an override capability over the original settings.
|
|
16. Comment‑1
|
2
alphanumeric characters.
Displays the Order header
comments that will subsequently be printed at the bottom of each page of the
purchase order.
You may change the
information for this order from the Field Number ? prompt.
You may review the Comment
codes that are on file by pressing the F1 key while the cursor is positioned
for entry of any code. Once the correct code displays, answer Y to the RIGHT
COMMENT ? question by entering Y.
In you need to change the
Comment code, pressing the F7 key will allow you to search for the
appropriate Comment code.
Enter
here the Comment codes for up to three comments that you wish to appear on
the purchase order.
|
|
17. Comment‑2
|
2
alphanumeric characters.
Order
header comments print at the bottom of each page of the purchase order.
|
|
18. Comment‑3
|
2
alphanumeric characters.
Order
header comments print at the bottom of each page of the purchase order.
|
|
19. Additional Comments
|
3
lines of 30 alphanumeric characters.
Space
for additional comments is allowed so that comments specific to a particular
vendor can be communicated on the purchase order without setting up Comment
codes for them. This field allows the free‑form entry of three lines
of comments that will print on the bottom of each page of the purchase
order.
|
Line Item Entry
|
Name
|
Type
and Description
|
|
1. Line No
|
3
numeric digits (999).
You must specify which of
the blanket order's line items are to be included on the release. You do so
by entering the line number of the blanket order's line item. If the line
item is already included on the release, its data will display and you will
be allowed to modify it. If it is not yet included on the release, it will
display and you will be asked if you wish to release this line item, in which
case you will be allowed to make changes to it.
You
may press the F1 key to have the program locate and display the next line
item on the release. You also have the option of pressing the F2 key to
display the next unreleased line item on the blanket order.
|
|
2. Item No
|
15
alphanumeric characters.
Once you select to correct
the line number, the item number and the description will display below the
entry and no change to the item number will be allowed.
The
item number does not need to be an item on file in the Item file. For
instance, the item may be some customer order that will never be stocked, it
may be an expense item or it may be a service. If you need to change an item
number then this order must be canceled and a new blanket order must be
entered in the P/O Processing application.
|
|
3. Item Desc
|
2
fields of 30 alphanumeric characters each.
The item description will
display automatically. This is the description that was entered on the
Blanket order. It is possible to change the description of an item that is
on file but the change will be effective only on the purchase order.
Changing the description here has no effect upon the item description in the
item file.
If
the item number entered above is not that of a valid item, you will be
required to enter a description here. Any non‑blank entry is allowed.
|
|
4. Vnd Itm No
|
15
alphanumeric characters.
The vendor's item number
will automatically display here if there is a Item Vendor record on file for
the order's vendor number and the line item's item number.
You will not be allowed to
change it (unless you first change the Item Vendor record through the Item
Vendor Maintenance application). If no such record exists, you will be
prompted to enter the number and what you enter will generate an Item Vendor
record.
If
you do not know the vendor's item number, leave this field blank. A blank
vendor item number will not generate an Item Vendor record, nor will an Item
Vendor record be created in the case where the item number entered above is
that of an invalid item.
|
|
5. Account No
|
An
account number in the standard account format.
Enter the number of the
inventory asset or expense account that will be affected by the payment for
goods or services received against this line item. An entry is not required
but accounts payable processing will be more productive if an account number
is available on the purchase order.
Pressing the F7 key will
allow you to search for the account by number or pressing the F8 key will
allow you to search for the account by description.
The
field defaults to the account number in the Material Cost Type/Loc File or
Inventory Setup if nothing is found in the first file.
|
|
6. Line Status
|
1
alphabetic character.
This field is automatically
assigned. Its value may not be changed through this program.
During
the initial entry of the line item in the add mode of P/O Processing, the
line status is automatically assigned a value of N for New.
|
|
Line Status (continued)
|
Once
the line item has appeared on a printed purchase order, its status is
assigned a value of P for Printed.
If
the line item is ever canceled, it will be assigned a status of X once the
line item has appeared as canceled on a printed purchase order.
|
|
7. Cancel ?
|
Y or
N.
During the initial entry of
the line item in the P/O Processing application, this field is automatically
assigned a value of N for No. A change is not allowed to this field during
the add mode since if you wish to eliminate the line item from this release
at this stage, you need merely stop the entry.
If this line has appeared
on a printed purchase order, and you wish the line item to be printed on a
change order as a canceled line then change the value to Y for Yes. Once it
has been printed as a canceled line its line status (see above) will
automatically be changed to X.
There are two basic reasons
why you would want to cancel a line item. You decide you no longer want the
item or you are forced to procure the item elsewhere because the vendor has
failed to deliver it on time. Whenever you cancel a line item, a question
will display on the screen asking if the cancellation is required because of
vendor negligence. If it is, the program will keep track of this information
so that the vendor performance statistics can be updated accordingly.
Once
an item has been canceled, and has appeared as such on a change order, it may
not be uncanceled. To reinstate a canceled item you will be required to add
it newly to the order.
|
|
8. U Of M
|
2
alphanumeric characters.
Displays
the item's purchase unit of measure that was used on the blanket order in the
item record.
|
|
9. Unit Cost
|
10
numeric digits with 4 decimal positions (999,999.9999).
Displays
the cost at which the item was ordered on the Blanket order (specified in the
Item file).
|
|
Unit Cost (continued)
|
Enter the item's unit cost
that you expect to pay when the vendor bills you for the release order. The
difference between this expected unit cost and the actual unit cost at which
you get billed is the basis for the price variance statistic by which the
vendor's performance is evaluated.
|
|
10. Commod CD
|
4
alphanumeric characters.
This
field will automatically display the item's commodity code which was entered
on the Blanket order and you will not be allowed to change it.
|
|
11. Notify
|
3
alphanumeric characters.
Displays to the notification
initials specified on the Blanket order.
Please
see the section on Notify in the P/O Processing application.
|
|
12. Move To
|
3
alphanumeric characters.
Displays to the default move‑to
location specified on the Blanket order.
Please refer to the section
on Move To in the P/O Processing application.
You
may change the field information from the Field Number ? prompt.
|
|
13. Job No
|
6
alphanumeric characters.
Displays the job for which
this merchandise or service is destined. This must be a valid code in the Job
Code file.
Press
the F7 key to search for Job number.
|
|
14. Blank Type
|
1
alphabetic character.
This field is only required
if the order type is B (blanket).
Defaults
to E on blanket orders.
|
|
Blank Type (continued)
|
The
entry here indicates to the vendor the degree of commitment you are making on
a blanket order. The allowable entries are:
F = Firm
E = Estimate
N = Minimum
X = Maximum
Firm means that the amount
on the blanket order is the amount that you actually expect to order.
Estimate means that the amount you end up ordering may be more or it may be
less but that this is the best guess you have. Minimum means you will order
at least the amount specified. Maximum means you will order no more than the
amount specified.
For
blanket orders one of these values must be entered.
|
|
15. Req Date
|
A
date in the standard date format.
Enter
the date on which you wish to receive the shipment.
|
|
16. Prom Date
|
A
date in the standard date format.
This
field is not entered the first time you release the blanket order. If you go
into and change a release order then you may enter a promise date. The
promise date is a negotiated request date. If the vendor is unable to meet
the request date for the line item, he will propose a different date that can
be met. You should enter that date as the promise date, leaving the request
date as it was originally entered. Doing so will enable you to see how late
the shipment was compared to the original request date.
|
|
17. Qty Ord
|
A
standard quantity format.
Enter the quantity ordered
for this line item.
Once
you have entered a Release order you may delete a line item by changing its
quantity ordered to zero. The screen will ask if you wish to delete the line
item and will physically remove the line from the order if you answer Y. If
the line item does not have a status of new, a message will display to inform
you that the line cannot be deleted; it can only be canceled.
|
|
18. Comment‑1
|
2
alphanumeric characters.
Line item comments print on
the purchase order immediately below the line item's order data. Enter here
the comment codes for up to two comments that you wish to have associated
with a particular line item. You may press RETURN to skip entry of either
field.
If you are unsure of what
comment code to enter, you may press the F1 key while the cursor is
positioned for entry of either code to display, in order, the cost that are
on file. Once the correct code displays, answer Y to RIGHT COMMENT ? to
accept it.
In
the add or change mode, press the F7 key to search for Comment code.
|
|
19. Comment‑2
|
Line
item comments print on the purchase order immediately below the line item's
order data. Enter here the comment codes for up to two comments that you
wish to have associated with a particular line item. You may press RETURN to
skip entry of either field.
If you are unsure of what
comment code to enter, you may press the F1 key while the cursor is
positioned for entry of either code to display, in order, the cost that are
on file. Once the correct code displays, answer Y to RIGHT COMMENT ? to
accept it.
In
the add or change mode, press the F7 key to search for Comment code.
|
|
20. Additional Comments
|
2
lines of 30 alphanumeric characters.
This
field allows free‑form entry of two lines of comments that will print
on the purchase order immediately below the line item's order data.
|
Line Item Display Fields
|
Name
|
Type
and Description
|
|
PO No
|
Display
only.
This
is the number of the purchase order that is currently being added or changed.
It serves to remind you of which purchase order you are working on.
|
|
Last Line No
|
Display
only.
This
is the last number of the last line item added to the order. During entry of
the first line item on an order this field is blank. This field helps you to
keep track of your position on the purchase order.
|
|
Last Item No
|
Display
only.
This
is the item number of the last line item to be added to the order. This
field is blank during entry of the order's first line number. Like the last
line number, it helps you keep track of your position on the purchase order.
|
|
Qty‑on‑Hand
|
Display
only.
This
is the quantity of the item that is on‑hand at the warehouse location
specified in the Ship‑To record. If the ship‑to location is the
item's default location, the quantity that displays is the quantity for All
locations; otherwise it is merely the quantity at the location where the
order is destined to be shipped. The quantity displays in the item's
stocking unit of measure and the description for this unit of measure
displays beside the quantity.
|
|
Qty‑Allocated
|
Display
only.
This
is the quantity of the item that is currently allocated. As for the quantity
on‑hand, the amount that displays depends upon the ship‑to
location. If the order is for the item's default location, the amount that
displays is the quantity allocated at All locations; otherwise it is merely
the quantity allocated at the location where the order is to be shipped. The
quantity displays in the item's stocking unit of measure and the description
for this unit of measure displays beside the quantity.
|
|
Qty‑on‑Order
|
Display
only.
This
is the quantity of the item that is currently on order at the order's ship‑to
location. The quantity displays in the item's stocking unit of measure and
the description for this unit of measure displays beside the quantity.
|
|
Reorder‑Level
|
Display
only.
When
the stock level of the item hits this level at the order's ship‑to
location, reordering is recommended. The display of this field allows you to
compare the quantity on‑hand with the reorder‑level to see where
you stand. The reorder‑level displays as it was entered in the Item
file in the item's stocking unit of measure.
|
|
Line Weight
|
Display
only.
The
program automatically multiplies the weight of an item by the number of
items, then displays the extended line weight.
|
|
Receipt Date
|
Display
only.
This
is the date of the most recent receiving against this line item.
|
|
Qty Received
|
Display
only.
This
is the quantity received against this line item so far. It displays in the
unit of measure entered for the purchase order line.
|
|
Qty Rejected/Qty Released
|
Display
only.
This
is the quantity that has been released. They display in the unit of measure
entered for the purchase order line.
|
|
Qty Invoiced
|
Display
only.
This
is the quantity that has been invoiced against this line item. It displays
in the unit of measure entered for the purchase order line.
|
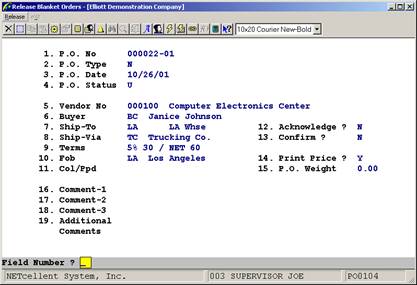
Release Blanket
Orders Screen 1
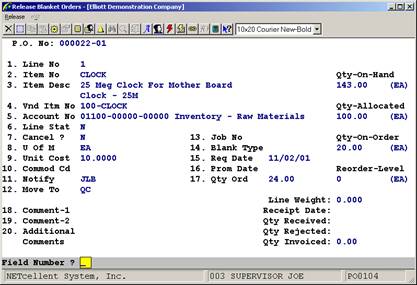
Release Blanket
Orders Screen 2
Screens
|
