|
|
Receivings ProcessingApplication Overview
The Receivings Processing application records the receipt of shipments ordered through the Purchase Order Processing application. Once recorded, receivings may also be changed or deleted.
The application allows the recording of multiple receivings transactions for each line item on a purchase order. A receivings transaction updates an item's quantity on hand and quantity on order. It also sends a record to the Receivings Audit Trail File. These records may be printed via the Receivings Audit Trail Report application.
The P/O package offers two options for recording receivings transactions and updating the appropriate data files.
The user may choose to record receivings on-line. This means that inventory quantities and other files will be updated as soon as a receiving is entered. This method provides the most up to the minute status of inventory for those applications that access the inventory files. To select this option, set the Online Update Receivings Trx ? flag (#15) in P/O Setup to Y.
The second option is batch processing where entered receivings are sent to a Transaction File to be posted later via the Post Receivings Transactions application. This method offers the flexibility of verifying the accuracy of transactions before they effect inventory levels. It also allows the user to distribute the value of the received inventory to one or more G/L accounts. To select this option, set the Online Update Receivings Trx ? flag (#15) in P/O Setup to N.
Note: Switching back and forth between on-line and batch processing can corrupt the data files. It is recommended to choose one method or the other and to stay with it.
If it is necessary to change from on-line processing to batch processing, first post any receivings remaining in the receivings TRX files, then re-initialize the Receivings Transaction, Receivings Transaction Distribution, and Receivings Transaction Serial Files using the File Utilities application under the Util_setup window of the Elliott main menu.
Warning: Initializing these files will erase any receivings information recorded in them. Changing from batch type processing to on-line is not recommended.
For more specific information on the two types of receivings processing, refer to the Online Receivings Processing and Batch Receivings Processing sub-sections of this Application Overview.
Mass Receiving
The Elliott Systems allows receiving an individual Purchase Order all at once rather than line by line. It will receive items at the price ordered and at the quantity ordered. Once received, the P/O receiving is still open for review, editing or changes prior to posting the receiving. Locating The Correct Order And Line Item
When you enter a receiving you may be working from a packing slip, invoice or other such vendor document. You may not know which purchase order the merchandise was ordered on or which line items on the purchase order are represented in the shipment. The receivings processing application is set up to help you locate the correct purchase orders and then to locate the correct line items on those purchase orders to record the receiving against.
The first field that you must enter is the purchase order number. If you do not know the receiving's purchase order number, you may press the F1 key to display a screen upon which you can obtain a list of likely order numbers based upon the vendor number and item number that you enter. This screen will list every purchase order upon which this item was ordered from this vendor. For each order that is listed, the screen will show the purchase order number, the line number for this item, the line item's promise date, quantity ordered, quantity due, unit of measure and expected cost. All of this information can help you distinguish among similar line items to locate the one that the vendor actually intended to fill with this shipment.
Once you have entered the correct purchase order number you must specify which line item on the order was received. If you have the purchase order in front of you, you may simply enter the line item's line number. If you do not know the precise line number, you may press a function key to display the purchase order's line items one at a time until the correct one comes up. If you do not know the line number and the order is too big to step through all of its line items, you may enter the line item's item number. During the entry of this field you will have the option of entering the item's description to locate the item number. If you do not know the line item's line number or its item number, you may enter the vendor's item number from the shipping document to locate the correct line item. By one of these means you will be able to locate the line item in question, assuming that you entered the correct order number.
Streamlined Transaction Entry
There is another means of accessing a line item that provides the means for rapidly entering large numbers of transactions. You will be allowed to press a function key during entry of the line number that will cause the program to display the next line item on the purchase order that has not yet been fully received. The receiving will display default values for all fields except the quantity received, then immediately prompt you for that field's entry. Once the quantity has been entered, you will be asked if there are any changes and, if not, the receiving will be written out.
This method reduces the number of key strokes required to enter a receiving and it can be used for the majority of all receivings. Certain receivings, such as those with a quantity rejected or those whose unit cost is different from the cost at which the item was ordered, would not be eligible to be processed in this manner.
Receivings Data
Once the line item has been selected, information about it will display on five lines in the center of the screen. This information includes the line item's average cost, last cost, standard cost, notification initials, move to location, job number, promise date, request date, (if no promise date was entered), commodity code, expected cost, purchase unit of measure, quantity ordered, quantity due, the ship-to location's description and the inventory location's description. This data merely displays for informational purposes. It cannot be altered.
At this point you are ready to enter data pertinent to the receiving. You will need to enter the receipt date, quantity received, quantity rejected, unit of measure in which the goods were received, the unit cost (optional) and the initials or code of the person responsible for verifying and processing the receiving.
Warning Messages
During the entry of these fields there are a few situations that could trigger warning messages on the screen. If the receipt date is earlier than the scheduled receipt date by a margin greater than what is acceptable per P/O Setup, the screen will display:
Shipment XXX Days Early - Notify XXX - Accept Shipment ?
In most cases this will simply be an indication that you are posting the receiving against the wrong purchase order, in which case you would stop the transaction and re-enter it for the correct order. If the vendor really did ship early, you may notify the person in your company responsible for making decisions about such problems, as the message suggests, before accepting the receiving. If your company has specific policy regarding such situations, follow it. The message on the screen is merely a means of informing you about a problem. If you wish to continue processing the transaction, answer Y. If you answer N, the transaction will be discontinued.
Another situation that could arise is over-shipment. If the vendor ships more than you ordered, the following message will display:
Over-Ship By XXX,XXX - Notify XXX - Accept Shipment ?
This situation is also frequently an indicator of the wrong purchase order. It may also indicate that the vendor consolidated purchase orders before shipping, so you would need to post the receiving against two or more purchase orders. If it was simply a case of negligent over-shipment, notify the appropriate person in your company as the message suggests or do as your company policy requires.
The final situation that the program warns you about is overprice. If the unit cost that is entered is too great by a margin that exceeds what is acceptable per P/O Setup, the following message will display:
Overprice By XXX,XXX.XXX - Notify XXX - Accept Shipment ?
An overprice is not so likely to be the result of the wrong purchase order, but it could be. Take whatever actions are necessary when this situation arises.
Quantities Received And Rejected
When merchandise is received it is customarily examined for shortages, damage and defects before the receiving is posted against the purchase order. Certain problems with the shipment are the responsibility of the vendor while others are the responsibility of the shipper. The problem may be a case shortage or a shortage concealed within the case, for instance. The shipper would be responsible for a case shortage while the vendor would be responsible for a concealed shortage. Other considerations such as the FOB point and whether the merchandise is shipped prepaid or collect can complicate the issue. This is an area that can best be left to the freight department and to receivings personnel on the dock. Receivings personnel who encounter such problems should be trained to write down all pertinent information and gather as much corroborating evidence as possible.
When you post a receiving against its purchase order you need merely look at the documentation provided by receiving personnel to see what was received, what was rejected and what was short. This documentation should also tell you the reason for any rejections.
The quantity received that you enter is the quantity that was received in good condition and that you are willing to pay for.
The quantity rejected is the amount received in poor condition or in the wrong size, color, model, brand, etc. Following the entry of the quantity rejected, you will be required to enter the reason for rejection. Rejected items are processed outside of the Purchase Order and Receiving package and will not be paid for when billed.
The purchase order does not keep track of shortages in receivings that are posted against it so the entry of a quantity short is not relevant.
The Unit Of Measure
The vendor may ship the merchandise in a unit of measure different from what you ordered. For instance, you order boxes and the vendor ships cases.
Every item that is defined in the Item File has two units of measure that are acceptable, the purchase unit of measure and the stocking unit of measure. The unit of measure that you enter on the screen must be one or the other. If the vendor shipped in some completely different unit of measure, you will have to manually calculate the quantity at one of the two acceptable units of measure before entering the quantities received and rejected.
Inventory records are updated in the stocking unit of measure. The purchase order is updated in the unit of measure at which the merchandise was ordered, which may be either the purchase or stock unit of measure. The Unit Cost
The entry of a unit cost is optional at this time. The vendor may not have provided this information with the shipping documentation. It is also possible that the vendor provided only the extended line amount, not the unit cost.
You may skip the unit cost field if the unit cost is not available. If you have only the total cost, you may press a function key that allows entry of this figure and then automatically calculates the unit cost from the quantities received and rejected.
LIFO And FIFO Cost Method
A layer is a single record in the LIFO/FIFO file that records for each item each receipt or purchase and associated cost and quantity. Posted receivings from the Inventory Management, Bill Of Material Processor, and Purchase Order and Receiving packages will create LIFO/FIFO layers. Posted credit memos from the Customer Order Processing package will also create a layer.
A further explanation on implementation of LIFO/FIFO is contained under Inventory Transaction Processing in I/M.
Serial Transactions
If the Serialized/Lot Items flag is S in I/M Setup, then serialized items and transactions are allowed. All items are not automatically assumed to be serialized. The second screen of Item File Maintenance has both a serialized item question and length of warranty question. These fields are used to selectively create serialized inventory.
Entry of serial numbers on receipts is not mandated.
Lot Transactions
If the Serialized/Lot Items flag is L in I/M Setup, then lot items and transactions are allowed. All items are not automatically assumed to be tracked by lot. The second screen of Item File Maintenance has a lot number question to allow selective creation of inventory items requiring lot tracking.
Each receipt of a lot item and issue of a lot item creates a record in the Serial/Lot file. These history records may be inquired or printed through the Serial/Lot Processing application.
Lot records are created by receivings from both the Inventory Management and Purchase Order and Receiving packages. Each receipt transaction relates directly to a stocked lot record in the Serial/Lot file.
Change And Delete Modes
In order to access a receiving transaction to change it or to delete it, you must enter the transaction's purchase order number and item number. The program will prompt you to enter these fields, skipping the entry of the purchase order line number. You may press RETURN for the item number to display the first (and subsequent) receivings for the purchase order. If you enter a specific item number, the program will display the first receiving on file for that item on that purchase order and ask if it is the correct receiving. You may review all receivings of a particular item on a particular purchase order in this manner. Once you select the correct receiving, you will be asked for the Field Number or you will be asked if you wish to delete this receiving, depending upon whether you are in change or delete mode.
In change mode you will be allowed to change all fields from Receipt Date through Receiver with the exception of the Unit Of Measure field.
If you are using on-line processing, in delete mode you will in effect be creating a delete transaction rather than actually deleting the original transaction. This delete transaction will show up on the Audit Trail Report along with the add and change transactions.
If you are using batch processing, deleting a transaction will simply remove it from the Transaction File. On-Line Receivings Processing
When a receiving is entered, an audit trail record is created to record the addition of the transaction. This original transaction is referred to as an Add transaction. If the data about the receiving gets changed through the change mode, the add record is unaffected. A Change transaction is created to record the changes. Each subsequent change to the record causes a new change record to be created with all prior transaction records being unaffected. Therefore, after the fifth time a receivings transaction has been changed there will be one add record and five change records for that transaction in the Audit Trail file. If the transaction is then deleted, a Delete transaction is created. Once a receiving has been deleted it is no longer accessible except through the Audit Trail Report where you would see listed one add record, five change records and one delete record.
It is important for you to understand how the information that you enter is stored, primarily so that you will know how to interpret the Audit Trail Report. The application functions pretty much as if it were a more traditional type of transaction entry module. You do not need to worry about locating the most recent change transaction, for instance, since the program will automatically do that for you when you specify which receiving you want. Standard Cost Variance
Beginning with Elliott V7.4, the system now supports both Purchase Cost Variance as well as Standard Cost Variance. Standard Cost Variance is the difference between Standard Cost and Receiving Cost. Standard Cost Variance is created during PO Receiving (the same principle applies to Landed Cost Variance). The receiving accrual is created from the receiving cost. Purchase Cost Variance is the difference between Receiving Cost and Invoice Cost. Purchase Cost Variance is created during the AP Voucher Process. This behavior is different from previous Elliott versions because (1) There was no differentiation of Standard Cost Variance and Purchase Cost Variance in the past and everything was lumped into one Purchase Cost Variance Account; (2) The receiving accrual was created from the standard cost; (3) The variance was created through the AP voucher process only.
In I/M Material Cost Type Location Account File, you may see the “Standard Variance” account now if you are using standard cost. You may leave it blank, which implies your standard variance account is the same as the purchase variance account. In the same maintenance screen, you may decide whether you wish to “Use Standard Cost Variance.” In most situations, you should answer “Y.” You may answer “N” for certain material cost types where your standard cost is zero. This may be, for example, expense items like manufacturer tooling where it is not a real inventory item, but you may want to keep them in your item master to track their quantity.
Prior to Elliot V7.3, Elliott did not create standard cost variance for any item where the standard cost was zero. In Elliott V7.3 or higher, if you do not wish to create standard cost variance you must define this in the material cost type location account file and answer “N” to “Use Standard Cost Variance.”
Receive PO Parent Line Item’s Components
This is a special enhancement for purchasing manufactured parent items. For example, you may wish to purchase all the components of a manufactured parent item from a vendor (like your parent company) for assembly. It is mutually understood between you and your vendor the purchase is for the components, not the assembled parent item itself. You may use this feature by indicating “Y” to field 13 (Recv Comp) in the PO Line Item Screen and the ATP details will be created for the parent item. Upon actual receiving, the quantity updates will be made to the component items. To use this feature, you must turn on P/O Global Control “23. Allow to Receive Parent Item’s Components in PO” and the PO Line Item must be a Manufacturing Parent Item as defined in Bill of Material Structure.
Run Instructions - On-Line Receivings Processing
Select Receivings Processing from the pull down P/O Processing window. The following screen will then be displayed:
The following options are available:
* Select the desired mode from the Receivings Processing menu bar * If you select to Add Receivings, you will be asked to identify the purchase order and line item against which a receiving is to be posted. First, you will be prompted to enter the purchase order number. Once you have entered a valid order number, you will be prompted to enter the purchase order line number. If you do not know the line number, you may skip this field to enter the item number. You may even skip the entry of this field to enter the vendor item number. You are required to enter a value for at least one of these fields since the line item could be located by a combination of
the purchase order number and the line number, item number or vendor item number. There are options available during the entry of these fields that provide you with even more flexibility when locating a line item. These features are presented below in the discussion of the entry requirements for each field. * If you entered a specific line number, the line item will display and you will be allowed to enter the receivings data. If you entered an item number or vendor item number, the program will display the first line item on file for that item and ask if this is the right line item. if you answer N, the next line item on the order for that item will display. In this manner all line items on the order that have the item number that you entered can be displayed until you locate the correct one. Once you find the one you want and answer Y, the cursor will be positioned for entry of the receivings data. * During entry of the line number there will be two function key options. You may press the F1 key to display the next line item on the purchase order that has not yet been fully received. Having done so, the program will ask if this is the right line item and allow you to enter the receiving against it. * You may also press the F2 key at this point. Like the F1 key option, this option will display the next line item that has not yet been fully received and ask if this is the right line item. Once the line item has displayed, the cursor will be positioned for immediate entry of the quantity received. You may enter some positive quantity or zero. If no receiver has yet been entered, the cursor will next prompt you for entry of the receiver's initials. Otherwise, this field along with all others will default to appropriate values. * If you have selected the line item by any means other than the F2 option, enter the receivings data in fields five through ten and make any changes that are required. The data entry requirements for these fields are discussed below. When there are no more changes, press RETURN in response to Field Number ? The receiving will be written out and the cursor will be positioned for entry of the next receiving's purchase order number. * When there are no more receivings to enter, press ESC while the cursor is positioned for entry of the purchase order number. * If you select to Change Receivings, you can specify the receiving that you wish to review or change. You will first be prompted to enter the purchase order number of the order against which the receiving was posted. You will then be prompted to enter the receiving's item number. You may press RETURN to display the first (and subsequent) receiving on file for the purchase order; or you may enter a specific item number, in which case the program will display the first (and subsequent) receiving on file for the purchase order and the item number. In either case you will be asked if the receiving that is displayed is the one you want. If you answer Y, you will be allowed to change fields five through ten except eight. * When there are no more changes, press RETURN in response to Field Number ? and the screen will be cleared for the selection of another receiving to change or review. * If you select to Delete Receivings, you will be able to select a receiving to delete just as you selected one to change in the change mode. Once you have answered Y to the right transaction question, a question will display asking if you wish to delete this receiving. If you answer Y, the receiving will be deleted. What actually happens is that a delete transaction is created. This delete transaction will be invisible to all applications except for the Audit Trail Report application. So for all practical purposes you can consider the receiving to be physically deleted and inaccessible.
To return to the menu bar, press the ESC or F10 key. To leave this application, press X for EXIT when positioned at the menu bar. Entry Field Descriptions
The following entries will be requested if the item has serial numbers:
The following entries will be requested if the item has lot numbers:
Receivings Display Fields
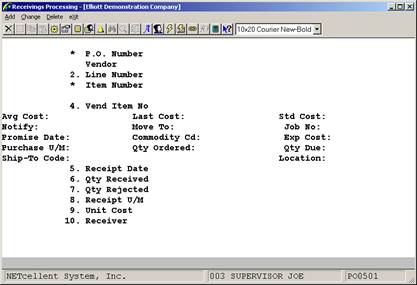
P.O. Number Search Screen
Online Receivings Processing Screen 1
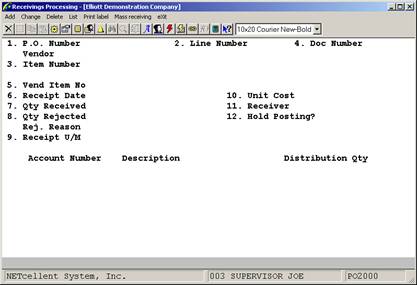
Batch Receivings Processing
This option allows you to enter multiple receivings for each line item on a purchase order. Each transaction is stored in the Transaction File and is identified by a unique document number. Information stored with each transaction record includes receipt date, quantity received, quantity rejected and unit cost.
You may define multiple G/L accounts to distribute the receivings. The asset account(s) to be debited will be entered after each receiving transaction. You may distribute receivings by dollar amount or by item quantity depending on how flag #17 (Distribute By Amt Or Qty ?) is set in P/O Setup. The application will prompt you to enter an account number followed by the amount or quantity to be distributed to it. The total amount of each transaction must be distributed before the application will allow you to go on to the next one.
The Receivings Accrual Account to be credited must be entered in P/O Setup before receivings can be entered. This global accrual account holds the value of received inventory until the appropriate invoice is entered in the Accounts Payable package. The account is not tied to individual line items. For more information on using the Receivings Accrual Account, see the Package Overview section of this manual.
After entering all receivings and distributions, you should print the Receivings Edit List to verify that the information is correct. For each transaction, the list prints such details as item number and description, vendor, quantity received, unit and total cost, and distribution accounts. After any corrections are made, you may post the transactions using the Post Receivings Transactions application. Run Instructions - Batch Processing
Select Receivings Processing from the pull down P/O Processing window. The following screen will then be displayed:
Batch Receivings Processing Entry Screen
The following options are available:
* Select the desired mode from the Receivings Processing menu bar * If you select to Add Receivings, you will be asked to identify the purchase order and line item against which a receiving is to be posted. First, you will be prompted to enter the purchase order number. Once you have entered a valid order number, you will be prompted to enter the purchase order line number. If you do not know the line number, you may skip this field to enter the item number. You may even skip the entry of this field to enter the vendor item number. You are required to enter a value for at least one of these fields since the line item could be located by a combination of
the purchase order number and the line number, item number or vendor item number. There are options available during the entry of these fields that provide you with even more flexibility when locating a line item. These features are presented below in the discussion of the entry requirements for each field. * If you entered a specific line number, the line item will display and you will be prompted to enter a document number. If you entered an item number or vendor item number, the program will display the first line item on file for that item and ask if this is the right line item. If you answer N, the next line item on the order for that item will display. In this manner all line items on the order that have the item number that you entered can be displayed until you locate the correct one. Once you find the one you want and answer Y, the cursor will be positioned for entry of the receivings data. * During entry of the line number there will be two function key options. You may press the F1 key to display the next line item on the purchase order that has not yet been fully received. Having done so, the program will ask if this is the right line item and allow you to enter the receiving against it if it is. * You may also press the F2 key at this point. Like the F1 key option, this option will display the next line item that has not yet been fully received and ask if this is the right line item. Once the line item has displayed, the cursor will be positioned for immediate entry of the quantity received. You may enter some positive quantity or zero. If no receiver has yet been entered, the cursor will next prompt you for entry of the receiver's initials. Otherwise, this field along with all others will default to appropriate values. * If you have selected the line item by any means other than the F2 option, enter the receivings data in fields six through twelve and make any changes that are required. The data entry requirements for these fields are discussed below. When there are no more changes, press RETURN in response to Field Number ? The application will prompt you to enter the distribution account number(s). * If you are receiving a lot item and lot items are being used (see field #9 in I/M Setup), you will be required to enter a lot number and expiration date for each transaction. If you are receiving a serialized item and serial items are being used, you will have the option of entering serial numbers after each transaction. * After entering the receivings data, you must enter one or more distribution accounts to counterbalance the receivings accrual account read from the P/O Setup. Enter an asset account number or search for a valid G/L account number using the F7/F8 options, then enter the amount to be distributed to that account. You may distribute to as many accounts as you wish. You may enter negative amounts or amounts greater than the transaction amount but the net amount remaining to distribute must be zero before the application will allow you to exit the screen. * When there are no more receivings to enter, press ESC while the cursor is positioned for entry of the purchase order number. * If you select to Change Receivings, you can specify the receiving that you wish to review or change. You will first be prompted to enter the purchase order number of the order against which the receiving was recorded. You will then be prompted to enter the receiving's item number. You may press RETURN to display the first (and subsequent) receiving on file for the purchase order; or you may enter a specific item number, in which case the program will display the first (and subsequent) receiving on file for the purchase order and the item number. In either case you will be asked if the receiving that is displayed is the one you want. If you answer Y, you will be allowed to change fields six through twelve except nine. * When there are no more changes, press RETURN in response to Field Number ? and the screen will be cleared for the selection of another receiving to change or review. * If you select to Delete Receivings, you will be able to select a receiving to delete just as you selected one to change in the change mode. Once you have answered Y to the right transaction question, a question will display asking if you wish to delete this receiving. If you answer Y, the receiving will be deleted.
To return to the menu bar, press the ESC or F10 key. To leave this application, press X for EXIT when positioned at the menu bar. Entry Field Descriptions
Receivings Display Window
P.O. Number Search Screen
List
Batch Receivings Processing Screen 1
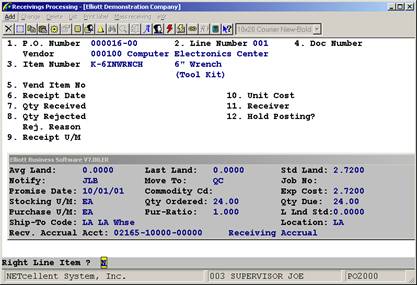
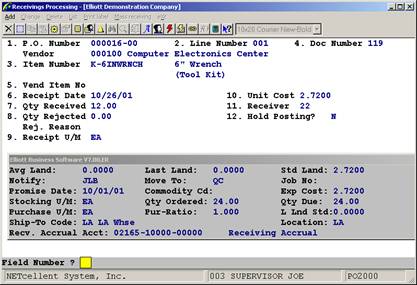
Batch Receivings Processing Screen 2
Batch Receivings Processing Screen 3
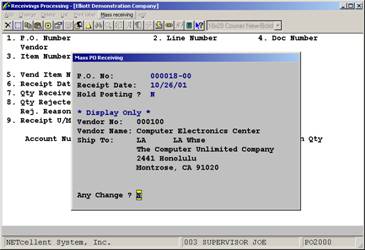
Mass Receiving
The Elliott System that allows receiving an individual Purchase Order all at once rather than line by line. It will receive items at the price ordered and at the quantity ordered. Once received, the P.O. receiving is still open for review, editing or changes prior to posting the receiving.
To utilize the feature go to P.O. Receiving Menu. At the main Receiving menu bar, select Mass Receiving. Once selected, a secondary window pops up and prompts you for P.O. information (See Figure below). After you have entered the P.O. #, Receipt Date, and Hold Posting status, Elliott will receive the P.O. in its entirety, print a MASS PO RECEIVING REPORT, and then prompt you for the next P.O. for which you wish to do a Mass Receiving for.
Mass Receiving – P/O information entry screen
Landed Cost Receivings
The Landed Cost feature touches 4 packages:
System Manager: Landed Cost Setup Purchase Orders: Receive Landed Costs Items Inventory: Calculate Item Landed Cost Accounts Payable: Post and Distribute Landed Cost
It is advisable that all data entry people from the above four departments coordinate and be aware of how Landed Cost works through out the system. Purchase Order Receiving
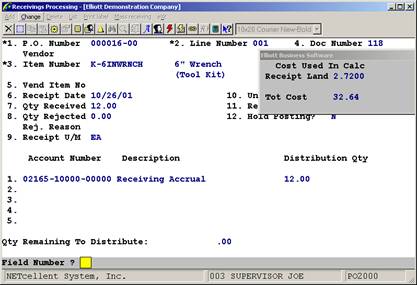
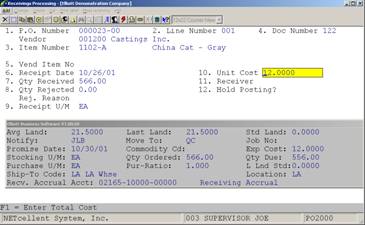
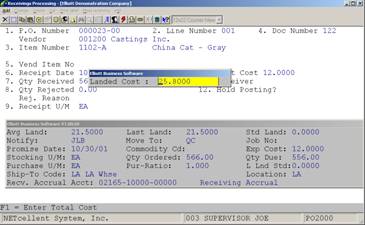
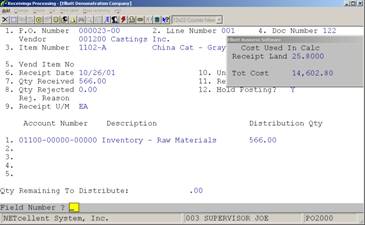
Fields 10 and 12 are the keys in processing Landed Costs
Field 10: Default Unit Cost from Purchase Order. When you press enter here, a window will pop up with displaying the Landed Cost with the Landed Cost Factor applied, (Inventory Item File Maintenance, Field 92), or the last Landed Cost. The cost that displays is based on the Landed Cost Setup Field 7.
In this popup window, the users has three choices:
1. Manually enter a Landed Cost Amount 2. Accept as is (Landed Cost Factor applied or the last Landed Cost) 3. Accept as is and put the line receiving on Hold, Field 12.
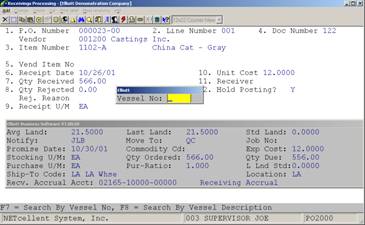
Field 12: If you select “N” the system will use the Landed Cost displayed above when you post.
If you select “Y” you will be prompted for a Vessel Number. When the Inventory manager runs the calculation process in Vessel Maintenance, he/she can release this line item for posting.
Use the F7 or F8 to search for Vessel No.
In the distribution screen for this “Hold Posting: Y” line item, the system will display the default calculated Landed cost. The true Landed Cost will be calculated in Inventory Vessel File Calculation. After this process has been run, the P.O. line item receiving can be posted.
Distribution Screen:
Landed Cost Calculation (Inventory Vessel File Maintenance)
Post Receivings TransactionsApplication Overview
The Post Receivings Transactions application transfers all transactions previously created in Receivings Processing from the P/O Transaction File to several files and accounts. Among the files updated are the I/M Item File, and I/M Distribution to G/L File. Receivings transactions are also posted to the I/M Transaction Audit File if the Audit Trail On Inv. Transactions ? flag is set to Y in I/M Setup.
The application automatically generates a journal of all transactions posted during a run. The journal provides essentially the same information as the Receivings Processing Edit List including purchase order number, item number, G/L accounts effected, unit and total cost.
Note: This application will only be used if P/O is set up for batch receivings processing. The Online Update Receiving Trx ? flag in P/O Setup must be set to N for the system to allow access to this application. Run Instructions
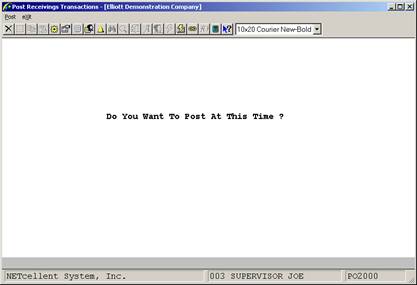
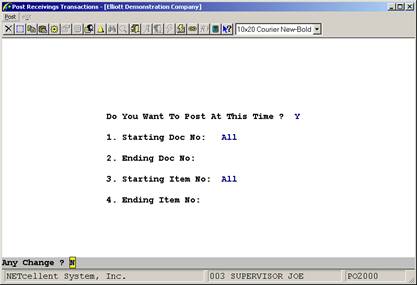
Select Post Receivings Transactions from the pull down P/O Processing window. The following screen will then be displayed:
Post Receivings Transactions Entry Screen
The following options are available:
* Select the desired mode from the Post Receivings Transactions menu bar. * Enter the data requested on the screen.
To return to the menu bar, press the ESC or F10 key. To leave this application, press X for EXIT when positioned at the menu bar. Entry Field Descriptions
Post Receivings Transactions
Run Date: Oct 26, 2001 - 3:37am Elliott Demonstration Company Page 1
R E C E I V I N G S P R O C E S S I N G J O U R N A L
Journal Number: PO0041
P.O. Num Line Item Num Item Description Loc Vendor Recvr Qty Received Land Unit Cost Total Cost Doc No Rec Date Um Serial/Lot Exp M/Y Qty Rejected Reject Reason Total Std Cost
000016-00 001 K-6INWRNCH 6" Wrench LA 000100 12.00 2.7200 32.64 000118 10/26/01 EA (Tool Kit)
Accrual Acct: 02165-10000-00000 Receiving Accrual 12.00-
Distributions: 02165-10000-00000 Receiving Accrual 12.00
000016-00 001 K-6INWRNCH 6" Wrench LA 000100 22 12.00 2.7200 32.64 000119 10/26/01 EA (Tool Kit)
Accrual Acct: 02165-10000-00000 Receiving Accrual 12.00-
Distributions: 01190-10000-00000 Kit Component 12.00
Total Qty Received: 24.00 Total Cost: 65.28
Grand Total Qty Received: 24.00 Grand Total Cost: 65.28 Total Transactions Posted: 2 Tot Qty Recv Tot Qty Rej Grand Total Cost
24.00 .00 65.28
000007‑00 003 K‑SX1‑1.44 1.44 Drive For Personal LA 000400 BCC 5.000 189.0000 945.00 000102 06/25/92 EA Computer
Accrual Acct: 04900‑00000‑00000 Inventory Clearing Account 5.000‑
Distributions: 01190‑00000‑00000 Kit Finished Goods 5.000
000007‑00 004 K‑SX1‑IDE 386SX IDE Drive For Personal LA 000400 BCC 3.000 255.0000 765.00 000103 06/25/92 EA Computer
Accrual Acct: 04900‑00000‑00000 Inventory Clearing Account 3.000‑
Distributions: 01190‑00000‑00000 Kit Finished Goods 3.000
000007‑00 005 K‑SX1‑V512 VGA Card with 512 Ram LA 000400 BCC 2.000 80.0000 160.00 000104 06/25/92 EA Chip Manual
|
|||||||||||||||||||||||||||||||||||||||||||||||||||||||||||||||||||||||||||||||||||||||||||||||||||||||||||||||||||||||||||||||||||||||||||||||||||||||||||||||||||||||||||||||||||||||||||||||||||||||||||||||||||||||||||||||||