|
|
P/O Form SetupApplication Overview
We are constantly striving to develop flexible and compatible business applications. The P/O Form Setup application enhances this objective, by combining Elliott's standard form definitions, with a procedure that customizes form layout so forms can be printed on any form designed by your art department or acquired through an outside vendor. This capability also permits maintenance of up to 99 definitions that serve various requirements.
The P/O Form Setup is loaded with our standard P/O form definition. You may use it in conjunction with Elliott Form No. 110, or as a template in designing a new definition. If you are using this form, then stop reading here. You don't need to go any further with the P/O Form Setup. All the work involved in defining a definition has already been completed, and you are ready to start printing.
However if you select some other preprinted form, consider the following questions before proceeding further.
1. Which Fields Are To Be Printed?
This refers to the Data or Literal field information printed on your form.
The first type, Data fields are those that display resulting output information from the program. They print only the actual data that will appear in a given field. For example, if the field is named "Company Name",and the data in the field is "Jones Inc.", you are selecting to print that field information, and not the "Company Name" title.
Some additional examples include, the Form Number, Purchasing Company Address, Order Dates, Order Types, Vendor Name, Vendor Address, Ship-To Address, Buyer Name, and other field variables.
In contrast, Literal Fields enable you to print special text messages, such as:
DUPLICATE ORDER ONLY SHIP WITH AUTHORIZED REL.
If you plan to use Elliott's default form definition as a template please note that it's Data and Literal field definitions are preset to match the requirements of our form. Consequently, you will need to change these settings, and determine which fields must be printed or eliminated from your form.
2. What Is The Physical Length And Width Of Your Form?
You need to know the physical line length and column width of the form. Is it 66 lines long and 80 columns wide?...or some other dimension. By using the Print Grid application, print a layout grid on your preprinted form. Then mark the appropriate line length and column width of each field you want to print. This may require several forms until the proper dimensions are determined.
3. What is the Vertical Line And Horizontal Column Position Of Each Field To Be Printed?
This refers to the starting physical line, column,and ending column location position of each printed field. The Print Layout Grid function is your road map in designing a new invoice form. It labels vertical lines and horizontal columns "1234567890." As illustrated, you can coordinate a given physical location field position, by matching the numbered vertical lines with their corresponding column position. In this example the Starting Vertical Line, and Horizontal column location positions are equal to 3 and 3.
The Ending Vertical Line, and Horizonal column location positions are 3 and 7.
4. What Is The Starting And Ending Location Of Line Items? There are twelve input screens in this program. The first requires you to designate the beginning and ending vertical line settings for line item fields.
This becomes the virtual starting point that directs your printer to a physical location where line item literal or data information is printed. In every subsequent related Line Item input screen, you specify only the relevant Line Item position of a given entry field.
5. How Many Lines Of Information Are To Be Printed For Each Line Item? You need to specify the amount of line item information to be printed for each transaction.
6. How Many Characters Are To Be Printed In Each Field? Each data field prints a predetermined number of characters. For example the Vendor Name Data field will print 30 alphanumeric characters.
This rule has the same significance when defining a Literal Field. For example, if you want to print ***** DUPLICATE ORDER ***** at a given location position, the literal field must support at least 27 characters. If only 20 characters were supported, the printed message would appear as:
***** DUPLICATE ORDE
Finally, the Form Setup program can print a detailed or summary report of all forms on file.
Run Instructions
Select Form Setup from the pull down PO Util_setup window. The following screen will then be displayed:
The following options are available:
* Change the form definition * Copy the form definition * Delete a form definition * Print a detail or summary report listing all forms on file. * Print a sample of the form you are defining. * Reset the application to the default form definition * Print a grid
To return to the menu bar, press the ESC or F10 key. To leave this application, press X for EXIT when positioned at the menu bar.
Entry Field Descriptions
Screen 1
Screens 2-12
Copy Form
Delete
List
Grid
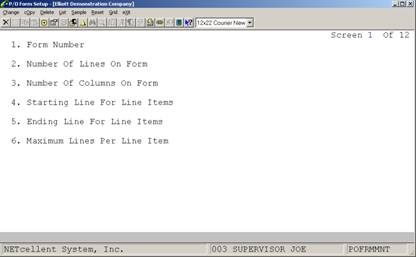
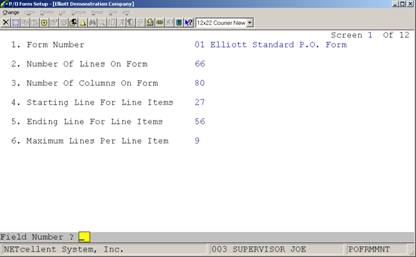
Purchase Order Form Setup Screen 1
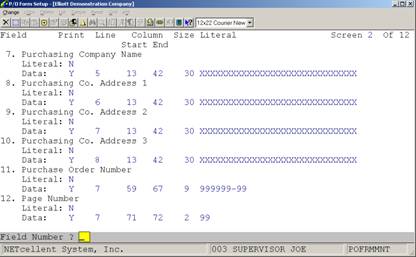
Purchase Order Form Setup Screen 2
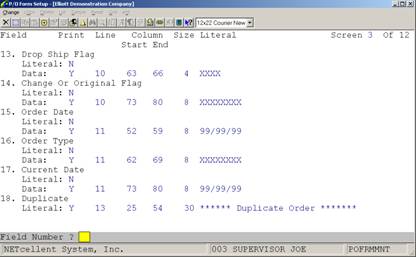
Purchase Order Form Setup Screen 3
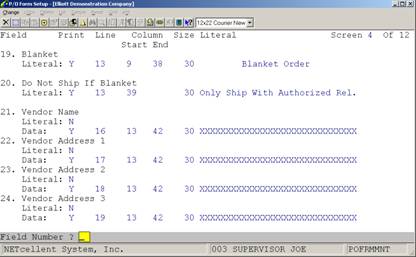
Purchase Order Form Setup Screen 4
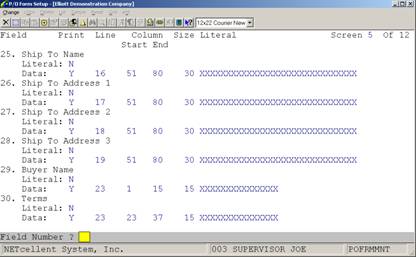
Purchase Order Form Setup Screen 5
Purchase Order Form Setup Screen 6
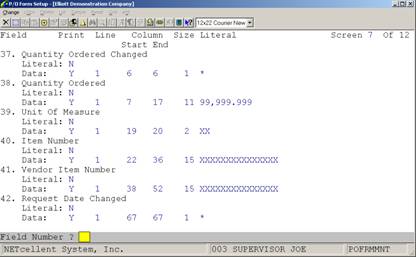
Purchase Order Form Setup Screen 7
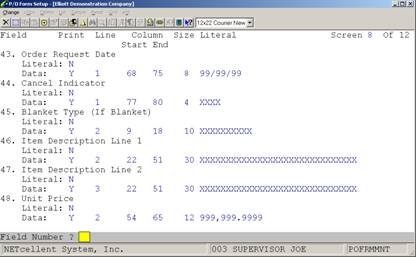
Purchase Order Form Setup Screen 8
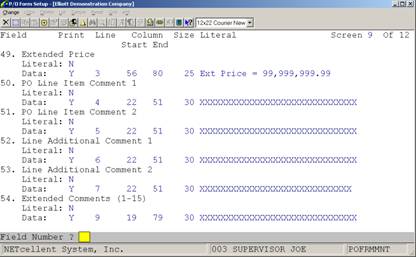
Purchase Order Form Setup Screen 9
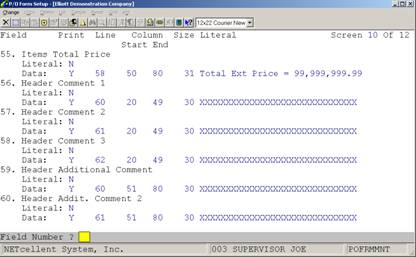
Purchase Order Form Setup Screen 10
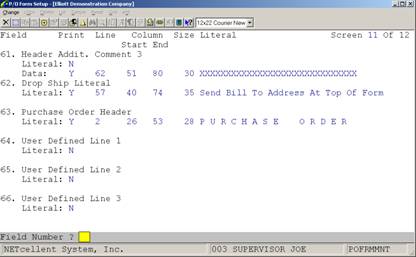
Purchase Order Form Setup Screen 11
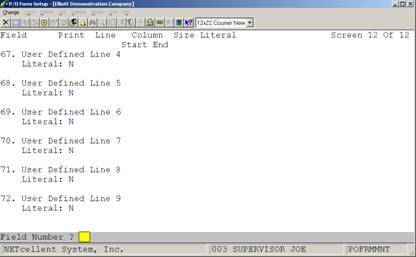
Purchase Order Form Setup Screen 12
XXXXXXXXXXXXXXXXXXXXXXXXXXXXXX XXXXXXXXXXXXXXXXXXXXXXXXXXXXXX XXXXXXXXXXXXXXXXXXXXXXXXXXXXXX 999999‑99 99 XXXXXXXXXXXXXXXXXXXXXXXXXXXXXX
XXXX XXXXXXXX 99/99/99 XXXXXXXX 99/99/99
XXXXXXXXXXXXXXXXXXXXXXXXXXXXXX XXXXXXXXXXXXXXXXXXXXXXXXXXXXXX XXXXXXXXXXXXXXXXXXXXXXXXXXXXXX XXXXXXXXXXXXXXXXXXXXXXXXXXXXXX XXXXXXXXXXXXXXXXXXXXXXXXXXXXXX XXXXXXXXXXXXXXXXXXXXXXXXXXXXXX XXXXXXXXXXXXXXXXXXXXXXXXXXXXXX XXXXXXXXXXXXXXXXXXXXXXXXXXXXXX
XXXXXXXXXXXXXXX XXXXXXXXXXXXXXX XXX XXX XXXXXXXXXXXX XXXXXXXXXXXXXXX XXX
999 *99,999.999 XX XXXXXXXXXXXXXXX XXXXXXXXXXXXXXX *99/99/99 XXXX XXXXXXXXXX XXXXXXXXXXXXXXXXXXXXXXXXXXXXXX 999,999.9999 XXXXXXXXXXXXXXXXXXXXXXXXXXXXXX Ext Price = 99,999,999.99 XXXXXXXXXXXXXXXXXXXXXXXXXXXXXX XXXXXXXXXXXXXXXXXXXXXXXXXXXXXX XXXXXXXXXXXXXXXXXXXXXXXXXXXXXX XXXXXXXXXXXXXXXXXXXXXXXXXXXXX
XXXXXXXXXXXXXXXXXXXXXXXXXXXXXX 999 *99,999.999 XX XXXXXXXXXXXXXXX XXXXXXXXXXXXXXX *99/99/99 XXXX XXXXXXXXXX XXXXXXXXXXXXXXXXXXXXXXXXXXXXXX 999,999.9999
12345678901234567890123456789012345678901234567890123456789012345678901234567890 2........|.........|.........|.........|.........|.........|.........|.........2 3........|.........|.........|.........|.........|.........|.........|.........3 4........|.........|.........|.........|.........|.........|.........|.........4 5........|.........|.........|.........|.........|.........|.........|.........5 6........|.........|.........|.........|.........|.........|.........|.........6 7........|.........|.........|.........|.........|.........|.........|.........7 8........|.........|.........|.........|.........|.........|.........|.........8 9........|.........|.........|.........|.........|.........|.........|.........9 10_______|_________|_________|_________|_________|_________|_________|________10 11.......|.........|.........|.........|.........|.........|.........|........11 12.......|.........|.........|.........|.........|.........|.........|........12 13.......|.........|.........|.........|.........|.........|.........|........13 14.......|.........|.........|.........|.........|.........|.........|........14 15.......|.........|.........|.........|.........|.........|.........|........15 16.......|.........|.........|.........|.........|.........|.........|........16 17.......|.........|.........|.........|.........|.........|.........|........17 18.......|.........|.........|.........|.........|.........|.........|........18 19.......|.........|.........|.........|.........|.........|.........|........19 20_______|_________|_________|_________|_________|_________|_________|________20 21.......|.........|.........|.........|.........|.........|.........|........21 22.......|.........|.........|.........|.........|.........|.........|........22 23.......|.........|.........|.........|.........|.........|.........|........23 24.......|.........|.........|.........|.........|.........|.........|........24 25.......|.........|.........|.........|.........|.........|.........|........25 26.......|.........|.........|.........|.........|.........|.........|........26 27.......|.........|.........|.........|.........|.........|.........|........27 28.......|.........|.........|.........|.........|.........|.........|........28 29.......|.........|.........|.........|.........|.........|.........|........29 30_______|_________|_________|_________|_________|_________|_________|________30 31.......|.........|.........|.........|.........|.........|.........|........31 32.......|.........|.........|.........|.........|.........|.........|........32 33.......|.........|.........|.........|.........|.........|.........|........33 34.......|.........|.........|.........|.........|.........|.........|........34 12345678901234567890123456789012345678901234567890123456789012345678901234567890
|