|
Manual Transaction Processing
Manual Transaction Processing is used to add, change, delete,
and print an edit list of manual payroll transactions. It should be used to
enter any payroll transactions (handwritten checks, adjustments to previous
payroll checks or historical figures kept on the Employee's record, or
adjustments to General Ledger distributions or job distributions) that
take place outside of the normal payroll processing run (via the Time
Transaction Processing application). A minimum of validation is done on
the data entered here, since it is assumed in general that the manual
transaction has already taken place.
Non‑Employees
All compensation for employees
of employee type N (non‑employee) must be entered through this
application. Suitable earnings codes should be entered onto the Deduction/Earning
Code File to cover compensation for non‑employees, and this
compensation should be entered in one of the Other D/E fields on the Manual
Transaction Processing screen.
The Payroll package
prevents a non‑employee from being paid as a part of the normal payroll
run. Tax deductions and voluntary payroll deductions are not meaningful for a
non‑employee, and even though they will be stored on the non‑employee's
Employee record if entered in this application, they will generally not appear
on any tax or deductions reports within the package.
G/L Distribution
The second screen of this
application, the distributions screen, will appear if Payroll Setup
Distribute Pay To G/L? question is answered A, or if it is answered S
and the Employee's record contains a Y or S in the Distrib?
field (denoting detailed distribution to G/L).
If detailed distribution has not
been requested, the regular, overtime and special pay amounts entered here will
be automatically distributed to the employee's Wage account as entered on the
Employee record. Vacation, holiday and sick pay amounts will be distributed to
Default accounts made up of the Expense account in Payroll Setup, as the
main account, and the profit center account of the employee's Wage account.
If the employee has been marked
for detailed distribution to G/L, the operator will be required to
distribute all of the following amounts to selected G/L Distribution
accounts before being allowed to terminate the screen:
Regular Hours Regular
Pay
Overtime Hours Overtime
Pay
Special Hours Special
Pay
Vacation Hours Vacation
Pay
Holiday Hours Holiday
Pay
Sick Hours Sick
Pay
If the employee is salaried and
the regular hours are zero, the program assumes the employee was paid a salary,
and distributes it on the basis of the percentage of salary, to 100 percent.
The basic reason that the hours
must be distributed as well as the dollar amounts is the tracking of hours
worked on specified jobs. If job number usage is not selected when setting up
the Payroll package (while entering Payroll Setup), the operator
will still be required to distribute the hours before leaving the second
screen.
The hours and dollar amounts may
be distributed independently. That is, the dollar amount entered for a
particular distribution is not constrained to be equal to the hours times the
rate entered. This is to allow the Manual Transaction Processing
application sufficient flexibility to handle any kind of adjustments the user
may wish to make to the permanent Payroll files.
Even if no pay or hours have
been entered on the first screen, if the employee is marked for detailed
distribution to General Ledger, the program will proceed to the second
screen anyway. In this way, adjustments to General Ledger
distributions or distribution to jobs can be made without affecting the
employee's payroll figures.
If an employee is flagged for
shift differential distributions in the Employee File, the user will have the
option of entering a shift code during entry of distributions. This code will
calculate differences in pay rates between shifts. For more information on
shift codes, refer to the Shift Code File Maintenance section of this
manual.
If your state uses Labor and
Industry codes for calculating employee contributions to worker's compensation,
the user may enter an L and I code following each distribution. This code will
calculate the employee and employer L and I premiums for the distribution based
on information entered in the L And I Code File Maintenance
application. For more information, refer to that section of this manual.
To display or change
distributions entered, the user can press the F1 key when positioned for
entry of the distribution type. Pressing of the F1 key will cause the
first distribution to be found and displayed and the Any Change? question to be
asked. Answer Y to change or delete the distribution. To delete the
distribution press the RETURN key when the cursor is positioned for
entry of the hours or percent.
If you press the F1 key
for the type and answer N to Any Change? the distribution will roll down
on the screen. Pressing the F1 key again will then pull up the next
distribution on file. In this way you can display or change all the
distributions on file.
In change mode, you can also
change a distribution by entering its type, account number, and job. Then the
first distribution matching the type, account number, and job will have its
hour, rate and amount displayed and the Right Distribution? question will be
asked. If you answer Y, you can then change the distribution. If you
answer N the next distribution with that type, account number and job is
displayed. If there are no more distributions which match, the question No
More Distributions ‑ Do You Wish To Add? is asked. Then you can add a
new distribution.
Select Manual Transaction
Processing from the pull down PR Pro
Manual Transaction Processing Entry Screen
The following options are
available:
* Select the
desired mode from the Manual Transaction Processing menu bar
* In the add and
change modes of operation, the second screen (Distribution screen) will only
appear if Payroll Setup Distribute Pay To G/L? question is answered A
or if it is answered S and the employee has been flagged for detailed General
Ledger distribution (by having a Y or S answer to the
Distrib? question on the Employee record).
* Enter the data
requested on the screen
To return to the menu bar, press
the ESC or F10 key. To leave this application, press X for
EXIT when positioned at the menu bar.
Entry Field Descriptions
First Screen
|
Name
|
Type
|
Description
|
|
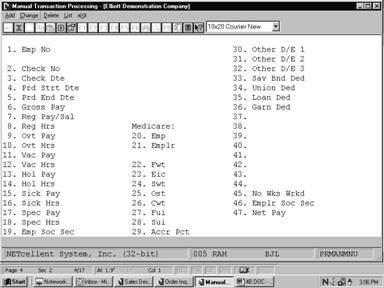
1. Emp No
|
4 numeric digits (9999).
|
The employee must exist on
the Employee File. After the employee number is entered, the employee
record is read and the employee name and employee type are automatically
displayed. If adding a transaction for an employee who is terminated (if a
termination date was entered in the Employee File) the Employee Terminated
‑ Add Anyway? question appears.
Press the F7 key for
employee search by number or press the F8 key for employee search by
name.
|
|
2. Check No
|
6 numeric digits (999999).
|
Not all manual transactions entered will be for
manually written checks. For adjustment type transactions with no net pay
involved, enter a control number here, such as 99999. There will be
no conflict within the package if the employee has an actual check with the
same number as this control number.
|
|
3. Check Dte
|
A date in the standard date format.
|
Defaults to the system date.
If there is no real check
associated with this transaction, enter the transaction date you wish to use
for posting to the General Ledger and then default the next date (4)
below to this date.
|
|
4. Prd Strt Dte
|
A date in the standard date format.
|
Defaults to the check date
above.
The pay period starting date
defaults to the check date. It is used for accounting purposes, and is a key
for the Payroll History Reports and for posting to the General Ledger
Distribution File.
|
|
5. Prd End Dte
|
A date in the standard date format.
|
Defaults to the check date
above.
The pay period ending date defaults to the check date.
It is used for accounting purposes, and is a key for the Payroll History
Reports and for posting to the General Ledger Distribution File.
|
|
6. Gross Pay
|
8 numeric digits, with 2 decimal places and optional
minus sign (999,999.99‑).
|
This is the total gross pay
associated with this manual transaction.
The program verifies that the gross pay is equal to the
sum of its component parts before allowing the user to exit from the Field
Number? question. The gross pay must be equal to the sum of:
Regular Pay or Salary +
Overtime Pay + Vacation Pay + Holiday Pay + Sick Pay + Special Pay + all Other
or Permanent Earnings (excluding meals and reported tips, for a restaurant).
|
|
7. Reg Pay/Sal
|
8 numeric digits, with 2 decimal places and optional
minus sign (999,999.99‑).
|
The Regular Pay or Salary field would include
supplemental wages for the employee.
|
|
8. Reg Hrs
|
5 numeric digits, with 2 decimal places and optional
minus sign (999.99‑).
|
|
|
9. Ovt Pay
|
7 numeric digits, with 2 decimal places and optional
minus sign (99,999.99‑).
|
|
|
10. Ovt Hrs
|
5 numeric digits, with 2 decimal places and optional minus
sign (999.99‑).
|
|
|
11. Vac Pay
|
7 numeric digits, with 2 decimal places and optional
minus sign (99,999.99‑).
|
|
|
12. Vac Hrs
|
5 numeric digits, with 2 decimal places and optional
minus sign (999.99‑).
|
The vacation hours entered here are not validated against
the vacation hours due kept on the employee's record.
|
|
13. Hol Pay
|
7 numeric digits, with 2 decimal places and optional
minus sign (99,999.99‑).
|
|
|
14. Hol Hrs
|
5 numeric digits, with 2 decimal places and optional
minus sign (999.99-)
|
|
|
15. Sick Pay
|
7 numeric digits, with 2 decimal places and optional
minus sign (99,999.99‑).
|
|
|
16. Sick Hrs
|
5 numeric digits, with 2 decimal places and optional
minus sign (999.99‑).
|
|
|
17. Spec Pay
|
7 numeric digits, with 2 decimal places and optional
minus sign (99,999.99‑).
|
|
|
18. Spec Hrs
|
5 numeric digits, with 2 decimal places and optional
minus sign (999.99‑).
|
|
|
19. Emp Soc Sec
|
6 numeric digits, with 2 decimal places and optional
minus sign (9,999.99‑).
|
This is the employee's portion of Social Security for this
manual transactions.
|
|
Medicare: Fields 20 and 21
|
|
|
|
20. Emp
|
6 numeric digits, with 2 decimal places and optional
minus sign (9,999.99-).
|
This is the employee's portion of Medicare for this
manual transaction.
|
|
21. Emplr
|
6 numeric digits, with 2 decimal places and optional
minus sign (9,999.99-).
|
This is the employer's portion of Medicare for this
manual transaction.
|
|
22. Fwt
|
7 numeric digits, with 2 decimal places and optional
minus sign (99,999.99‑).
|
This is Federal Withholding Tax.
|
|
23. Eic
|
6 numeric digits, with 2 decimal places and optional
minus sign (9,999.99‑).
|
This is the Earned Income Credit associated with this
manual transaction.
|
|
24. Swt
|
6 numeric digits, with 2 decimal places and optional
minus sign (9,999.99‑).
|
This is state withholding tax.
|
|
25. Ost
|
6 numeric digits, with 2 decimal places and optional
minus sign (9,999.99‑).
|
This is other state tax.
|
|
26. Cwt
|
6 numeric digits, with 2 decimal places and optional
minus sign (9,999.99‑).
|
This is city withholding tax.
|
|
27. Fui
|
6 numeric digits, with 2 decimal places and optional
minus sign (9,999.99-).
|
|
|
28. Sui
|
6 numeric digits, with 2 decimal places and optional
minus sign (9,999.99-).
|
|
|
29. Accr Pct
|
5 numeric digits with 2
decimal places (999.99).
|
Enter the percent of the
employee's pay to be accrued for the current financial period. The remainder
will be accrued for the following period.
For example, if the pay period runs Monday through
Friday and the month ends on Tuesday, 40% would be accrued to the current
month and 60% would be accrued to next month.
Defaults to 100% if no
previous transactions have been entered, otherwise defaults to the previously
entered percent.
|
Fields 30, 31, 32
For the other
deduction/earnings, enter the Deduction/Earning code first, as a two‑character
alphanumeric field. The program will verify that this code is on the Deduction/
Earning Code File. You will then be allowed to enter the amount of the
deduction or earning.
|
Name
|
Type
|
Description
|
|
30. Other D/E 1
|
2 alphanumeric characters.
|
Pressing the F7 key will allow a search for the
Deduction/Earning Codes on file.
|
|
31. Other D/E 2
|
2 alphanumeric characters.
|
Pressing the F7 key will allow a search for the
Deduction/Earning Codes on file.
|
|
32. Other D/E 3
|
2 alphanumeric characters.
|
Pressing the F7 key will allow a search for the
Deduction/Earning Codes on file.
|
|
33. Sav Bnd Ded
|
6 numeric digits, with 2 decimal places and optional
minus sign (9,999.99‑).
|
This is the savings bond deduction.
|
|
34. Union Ded
|
6 numeric digits, with 2 decimal places and optional
minus sign (9,999.99‑).
|
The union deduction will only be allowed if the
employee has a valid union deduction account on his employee record.
|
|
35. Loan Ded
|
6 numeric digits, with 2 decimal places and optional
minus sign (9,999.99‑).
|
This field enables you to specify a loan deduction.
|
|
36. Garn Ded
|
6 numeric digits, with 2 decimal places and optional
minus sign (9,999.99‑).
|
This field enables you to specify a garnishment
deduction.
|
Fields 37‑44
As soon as the user enters the
employee number (screen item #1), the Employee's record will be read from the Employee
File and the descriptions of his permanent deductions and earnings will be
displayed automatically. The
program will only allow entry of an amount if the screen item shows a valid
deduction or earning. If there is no permanent deduction/earning
corresponding to the screen item, the program automatically displays *NO D/E*
for the deduction/earning description.
|
Name
|
Type
|
Description
|
|
37‑44. Permanent
Deduction
Amount
|
6 numeric digits, with 2 decimal places and optional
minus sign (9,999.99‑).
|
|
|
45. No Wks Wrkd
|
4 numeric digits, with 2 decimal places and optional
minus sign (99.99‑).
|
This is the number of weeks worked associated with this
manual transaction.
|
|
46. Emplr Soc Sec
|
6 numeric digits, with 2 decimal places and optional
minus sign (9,999.99‑).
|
This is the employer portion
of SOC SEC for this manual transaction.
If SOC SEC was entered in
field 8 above, this does not mean that the employer's portion of FICA will be
automatically calculated. You must enter this figure here if you wish it to
be posted to the proper files.
|
|
47. Net Pay
|
8 numeric digits, with 2 decimal places and optional
minus sign (999,999.99‑).
|
The program verifies that
the net pay is correct before allowing the user to exit from Any Change?
mode.
The net pay must be equal to:
Gross Pay ‑ Employee
Social Security-Employee Medicare ‑ FWT ‑ SWT ‑ OST ‑
CWT ‑ Sav Bond Deductions ‑ Union Deductions ‑ Loan
Deductions ‑ Garnish Deductions ‑ All Permanent and Other
Deductions + EIC
|
|
48. Tip Cr
|
6 numeric digits, with 2 decimal places and optional
minus sign (999,999.99-).
|
Tip credits should be entered only if the employer is a
restaurant and it is applicable for this transaction.
|
|
49. Excess Pay
|
6 numeric digits, with 2 decimal places and optional
minus sign (9,999.99-).
|
Excess pay will only be entered if the employee’s
hourly wage plus tips is below the federal minimum wage requirement.
|
Second Screen
|
Name
|
Type
|
Description
|
|
Typ
|
1 alphabetic character.
|
The choices for distribution
type are:
R = Regular
S = Salary
O = Overtime
X = Special
V = Vacation
H = Holiday
K = Sick
Pressing the RETURN
key defaults to the last distribution type entered. The valid distribution
types for this transaction will display at the bottom of the screen.
|
|
Account
|
An account number in the standard account number
format.
|
As soon as the General Ledger account number is
entered, the record corresponding to it is read from the G/L Account
file, and the account description is automatically displayed.
|
|
Account (continued)
|
|
The account number must
already exist on the G/L Account file.
The account number defaults to the Wage account number
on the employee record, if the F1 key is pressed.
Pressing the F7 key
will allow you to search for an account by number or pressing the F8
key will allow you to search for an account by description.
|
|
Job-No
|
6 alphanumeric characters.
|
The Job number screen header
will not appear if the employer does not use job numbers, as indicated in Payroll
Setup.
If the employer does use job numbers, then entry of the
job number to assign this distribution to will be requested. If you do not
wish to assign it to a job, press RETURN. If you enter a job number,
the program checks to see that the job exists on the Job Code File.
Press the F7 key to
search for jobs.
|
|
Shop-#
|
6 alphanumeric characters.
|
This field and the next one will only appear if PR
Setup is set to use job numbers and the Job Costing package is in
use. If the distribution is assigned a job number, the user has the option
to enter a shop order number to associate the distribution with a specific
shop order. This allows for more accurate tracking of payroll expenses. The
shop order number entered must be on file in Job Costing under the job
number entered in the previous field.
|
|
Op-#
|
4 numeric digits.
|
If a job number and a shop order number have been
entered, the user must enter an operation that is on file in Job Costing
under the previously entered job and shop order numbers. If these conditions
are not met, a message will display and the cursor will return to the Shop-#
field.
|
|
Hours
|
5 numeric digits, with 2 decimal places and optional
minus sign (999.99‑).
|
The hours or percent to distribute can be the total
hours entered on the first screen or varying amounts to different accounts.
|
|
Hours (continued)
|
|
A percentage is entered when
distributing salary starting at 100% and payment being made for the 100% to
one account or broken up to varying ones.
The default will always be
the number of hours or percent remaining for the type of distribution
selected. Since holiday hours are not entered on the first screen, this will
be a percent for holiday pay.
|
|
Shift Differential
|
3 alphanumeric characters.
|
This field will appear on a
pop-up window only if the employee is flagged for shift differential
distributions in the Employee File.
Enter a valid shift code to calculate a shift
differential for the employee. If no shift differential needs to be
calculated, leave the field blank.
Press the F7 key to
search for shift codes.
|
|
Rate
|
6 numeric digits, with 3 decimal places and optional
minus sign (999.999‑).
|
The hourly rate will default to the value on the
Employee record if the F1 key is pressed.
|
|
Rate (continued)
|
|
For a regular distribution
it will default to the regular rate, for an overtime distribution to the
overtime rate, and for a special distribution to the special rate.
For a holiday distribution,
no rate will be requested. For a vacation or sick distribution, the F1
key will default the rate to the employee's regular rate.
|
|
Amount
|
7 numeric digits, with 2 decimal places and optional
minus sign (99,999.99‑).
|
The amount distributed will default on pressing the F1
key to the hours distributed times the rate entered.
|
|
L And I Code
|
6 alphanumeric characters.
|
If the employee is flagged
as distributed in the Employee File, and the employee's home state has
an L and I code on file, you will be prompted to enter an L and I code.
Enter a valid Labor and Industry code to calculate
employee and employer premiums for this distribution. If no L and I premium
needs to be calculated, leave the field blank.
L and I codes are not supported for any
secondary states the employee has in the Employee Tax Code File.
Press the F7 key to
search for L and I codes.
|
 Screens Screens
Manual Transaction
Processing
Manual Transaction
Processing (Distribution)
REPORTS
M A N U A L P A Y R O L L T R X E D I T L I S T
Employee
Types: H = Hourly S = Salaried N = Non‑Employee
Distribution
Types: R = Regular S = Salary O = Overtime X = Special V = Vacation H
= Holiday K = Sick
Checks
Posted By Check Date
Journal
Number:
Emp#
Name Type Check# Chk‑Date Ppd‑Date
Gross‑Pay Reg‑Pay/Sal Ovtm‑Pay Vac‑Pay Hol‑Pay
Hol‑Hrs
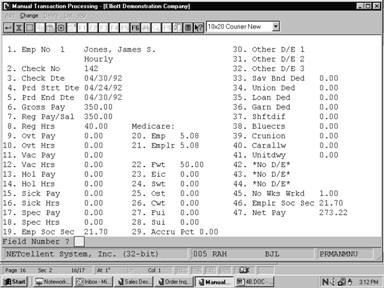
1
Jones, James S. H 142 04/30/89 04/30/89 350.00
350.00
Soc‑Sec
Sick‑Pay
Spec‑Pay Reg‑Hrs Ovt‑Hrs Vac‑Hrs
Sck‑Hrs Spc‑Hrs Medicare Fwt Eic Swt Ost
21.70
.00 40.00 .00 .00
5.08 50.00 .00 .00
Empr‑Soc‑Sec
Cwt Sav‑Bnd Union Loan Garnish Shftdif Bluecrs Crunion
Carallw Unitdwy Wks‑Wrk Net‑Pay Empr‑Medic
21.70
.00 273.22 5.08
Emp#
Name Type Check# Chk‑Date Ppd‑Date
Gross‑Pay Reg‑Pay/Sal Ovtm‑Pay Vac‑Pay Hol‑Pay
Hol‑Hrs
2
Smith, Sally H 143 04/30/89 04/30/89 350.00
350.00
Soc‑Sec
Sick‑Pay
Spec‑Pay Reg‑Hrs Ovt‑Hrs Vac‑Hrs
Sck‑Hrs Spc‑Hrs Medicare Fwt Eic Swt Ost
21.70
.00 40.00 .00 .00
5.08 50.00 .00 .00
Empr‑Soc‑Sec
Cwt Sav‑Bnd Union Loan Garnish Shftdif Bluecrs Crunion
Blueshl Supalow Wks‑Wrk Net‑Pay Empr‑Medic
21.70
1.00 273.22 5.08
Pension Carallw
The Post Manual Transactions
application automatically updates your employee's payroll record and General
Ledger files with the following conditions.
1. The manual transaction
amounts are posted to the Employee record.
Any vacation or sick
hours entered for the employee are subtracted from his vacation or sick hours
due, and vacation hours are added to this vacation hours paid amount. If the
Number of Weeks Worked field is non‑zero, then vacation and sick hours
are accrued on the basis of the number of regular hours or weeks worked
entered.
2. The Manual
transactions are posted to the Payroll History file.
3. If check reconciliation
has been included in the package, any manual payroll transaction for which the
net pay amount is greater than zero is posted to the Payroll Check
Reconciliation file.
4. All distributions
(including automatic distributions mentioned above) are posted to the Payroll
Distribution file.
5. If the use of job
numbers has been included in the package, all distributions made to job numbers
are posted to the Job History file.
NOTE: Employer FICA liability
and worker’s compensation are posted to the Employee file, if applicable, but a
Worker's Compensation Premiums due are not posted. These have to be entered
manually via the General Ledger package, or entered as amounts to a
liability and an expense account in two balancing distributions for the check. The
latter method would keep the Worker's Compensation Premium posting accountable
by check within payroll but requires you to do detailed distribution of pay for
the transaction.
If no employee wage accrual
account number has been entered in PR Setup or if it has been entered as
all zeros, the user has the option of posting as of the check date or the pay
period ending date. If an accrual account number has been entered in PR
Setup, posting will be done according to the accrual percentages entered in
the Manual Transaction Processing application.
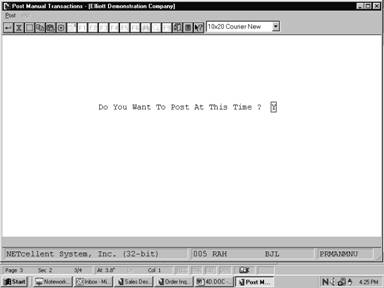
Select Post Manual
Transactions from the pull down PR Processing window. The
following screen will then be displayed:
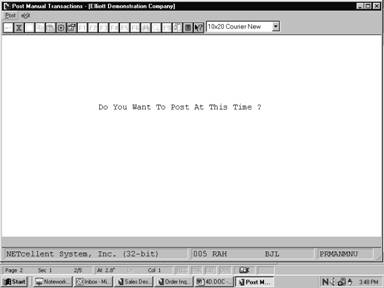
Post Manual Transactions Entry Screen
The following options
are available:
* Enter
the data requested on the screen
To return to the menu bar, press
the ESC or F10 key. To leave this application, press X for
EXIT when positioned at the menu bar.
Entry Field Descriptions
|
Name
|
Type
|
Description
|
|
Do You Want
To Post At This Time?
|
Y or N.
|
Enter Y
to post manual transactions or N decline.
|
|
Post Check
To G/L With Which Date?
|
1 alphabetic
character.
|
This field will only appear if no accrual account number has been
entered in PR Setup, or if it has been entered as all zeros.
Valid
entries are:
P = Pay
Period End Date
C = Check Date
|
Screens
Post Manual Transactions
|
