The Select And Print Financial Statements
application encompasses two major processes that enable your company to select
and print standard or customized financial statements.
These processes are statement specifications and financial
statements.
Statement Specifications
This process maintains Standard or Custom statement
specifications. It controls which financial statements are to be printed on the
next statement run and stores other information concerning the appearance and
content of these important documents. The decision of whether to select a
standard or custom specification is dependent on your specific objectives.
Before proceeding further you should consider whether they are better suited to
a standard or customized statement specification. You may also begin with
standard statements and progress to customized statements.
In general, standard specifications are appropriate when
your primary objective is to generate a standard column format that
incorporates standard definitions in the Statement Layout File. But if
the job requires greater flexibility, and powerful features such as printing up
to 13 columns of financial information, defining specialized financial
specifications, and numerical rounding then select the customized
specifications option. In this section the benefits of these two unique
procedures are discussed.
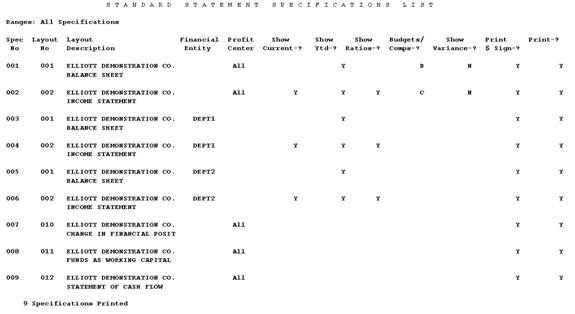
Standard Specifications
The Standard Specifications feature enables you to
select add, change, or delete records on file. It will additionally enable the
generalized clearing and selection of Standard Statement Specifications that
are to be printed on the next financial statement run as well as a listing of
these specifications.
The format and appearance of individual financial
statements is determined by the statement's layout entered in the Statement
Layout File. However, a statement defined by a particular layout must be
selected before it can be printed. In addition to selecting the layout other
information is required by the programs that print financial statements. This
application provides for the selection of layouts and the entry of that
additional information.
It is advisable to group statement specifications
numerically to facilitate access when selecting them to be printed. One
example of such logical grouping is to reserve specification numbers 1 through
100 for statements with the level of detail required for month‑end
administrative reporting. Numbers 101 through 200 might then be reserved for
quarterly reports and 201 through 300 for those statements which you wish to
make public. Another such logical organization would be to group the
specifications according to the types of statements to which they pertain. For
instance, specification numbers 1 through 50 might be reserved for Profit and
Loss Statements, numbers 51 through 100 for Balance Sheet Statements, etc.
Each user's priorities are somewhat different. Some may
choose to ignore profit center and financial entity capabilities while others
rely heavily upon frequent, in‑depth analysis of the activities at these
levels of the company. Some users may wish to get by with one or two versions
of the Balance Sheet and P&L while others may desire many versions from the
highly detailed to concise summaries. Whatever your priorities, this file can
be accessed and maintained most easily if it is structured according to some
convenient numbering system.
When selecting specifications for the next financial
statement run, unless you intend to print the same statements that were printed
on the last run, you will need to modify the selections. You will probably
find it most convenient to first clear all previous selections utilizing the Clear
function of this application. This will set the Print Next Run? field
for each specification to N.
Once all selections have been cleared it would be helpful to
get a listing of specifications on file so that you could review your options
and note, which specifications are to be selected.
When you know which specifications are to be selected you
must then change the Print Next Run? answer for each of them to Y.
If there are a small number of specifications to be selected it would be easy
to access each of them individually in order to select them. You can access
them in change mode by bringing them up one at a time using the F1 key
option and selecting the appropriate specifications to print.
If there are a great many specifications on file and they
are grouped numerically in logical order you will wish to utilize the Generalized
statement selection function. This will permit you to select a range of
specifications to be printed and specify which profit centers and/or financial
entities are to be allowed.
When running Generalized statement selection you
must enter the starting and ending specification numbers. Only specifications
within this range will be considered for selection. You will then have one or
more of these options for the selection criteria on which specifications will
be selected within the starting and ending number range. You may choose to
select specifications for which the profit center is All (consolidated
statements); you may choose to select those specifications for a specific
profit center or financial entity; and/or, you may choose to select
specifications for All individual profit centers and all financial
entities. Whichever options are chosen, only those specifications, which fall
within the range that was entered, and which match the profit center and/or
financial entity designations will be selected to print on the next financial
statement run.
If you do not maintain profit centers in this General
Ledger package you must choose the selection of specifications for
consolidated statements only, when running Generalized Statement Selection.
Once the specifications have been selected you may wish to get a printout
showing all selected specifications. To do this run List and request to
show selected specifications only.
Custom Specifications
The Custom Specifications feature also enables you
to select add, change, or delete records on file. It additionally permits the
generalized clearing and selection of Custom Statement Specifications that are
to be printed on the next financial statement run as well as a listing of the
specifications on file.
However, Custom Specifications provides a more
flexible alternative than the previous selection. To begin with, it doesn't
incorporate the same redundant variables that were present in Standard
Specifications. Instead the specification is entered directly from two
input screens. In the first you may assign a custom number, layout number,
financial entity, profit center, and specify whether to print the $ sign, zero
balances, bracket non-typical balances, or print during the next financial
statement run.
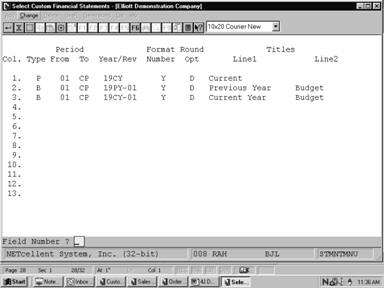
The second input screen contains 13 areas numbered from 1
to 13., that define the columns of your financial statement.
Period Format
Rounding Titles
Col. Type From
To Year/Rev Number Option
Line 1 Line 2
As illustrated above, each column consists of six
variables that interact to define a unique setting. They include Type, Period,
Year/Rev, Format Number, Rounding Option, and Title Header. Each of these
affect the information subsequently displayed in each column. The following
pages examine statement type options, and explore some practical applications
for defining a custom specification. They provide an example of how the
variables work together to help you achieve your desired objective.
Suppose that in the first column of the custom statement
you want to display the actual year to date amounts associated with current G/L
accounts.
Period
Format Rounding Titles
 Col. Type From To Year/Rev
Number Option Line
1 Line 2
Col. Type From To Year/Rev
Number Option Line
1 Line 2
1. P 01
CP CY Y M
Current
The P Type option indicates Present
accounts.
The From To is set to delineate period 01
to the current period CP.
The Year/Rev is set to indicate the current year CY.
The resulting values will be formatted and rounded to the M
millions.
The present statement type variable P references
corresponding account amounts that reside in the Account Balance File.
To define this column enter P as the Type. Then specify the Period
to range From 01 To the current period CP, and the Year
automatically displays the current year CY.
You can optionally conserve horizontal form space by
decreasing the column width. This is accomplished by specifying an appropriate Rounding
and Format Number option. In this column the Format Number is
set to Y and the Rounding Option will round all resulting column
values to the millions.
Finally, the Titles variable labels two lines of
text that serves to identify the column. In the illustration above, Line 1
is labeled as "Current". These titles will print on financial
statements each time an LEG command is inserted in the statement layout
file.
In the second and third columns suppose that you want to
display the budget for the current period versus last years budget for the same
period.
Period Format
Rounding Titles
Col. Type From To
Year/Rev Number Option Line 1
Line 2
1. P
01 CP CY Y M
Current
2. B 01
CP CY-01 Y N Current
Budget
3. B
01 CP PY-01 Y N Prev Budget
Column #1 displays the Present accounts from period
1 to the current period.
Column #2 displays the Budget amounts from Period
01 to Current Period of the first revision, for current year.
Column #3 displays the Budget amounts from Period
01 to Current Period of the first revision for the previous year.
All resulting column amounts are formatted.
The rounding option is set to N .
When the budget Type option B is entered all
corresponding amounts associated with Budgets in the Budget File
are considered. This option enables you to specify the budget period, (CP
for current period), (CB for current budget with highest revision
number), or budget year (CY for current year) and budget revision
number.
In our example, column #2 displays the budget B From
Period 01 To the current period CP, for the current year CY,
and revision number 01. A revision number of CB could also be
used for current budget. The current budget (CB) is determined as the
last budget revision number created in Budget File Maintenance for the
account for the year. If an account had a revision number 1 and 2 on file for
the budget year then revision 2 would be the current budget selected. All
accounts do not have to have the same budget revision.
In Column # 4, suppose you want to display variance
between the present G/L account information displayed in column #1 and
the budget values displayed in column #2. By selecting the variance type V
and specifying a range From 1 To 2, as illustrated below this
information is displayed.
Period Format
Rounding Titles
Col. Type From To Year/Rev
Number Option Line 1 Line
2
4.
V 1 2 Y
N Variance
Column #4 displays the variance between the values entered
in Column #1 and Column #2.
All resulting column amounts are formatted.
The rounding option is set to N.
When using variances, the base value of the calculation
should always be entered in the "To" column.
In the next three columns you could then display
comparative amounts for the years 1990, 1989, and 1988. Remember that if your
fiscal year differs from the calendar year, calculate the previous year, PY,
by subtracting one from the year of the last period in the Accounting
Period File.
To display the comparative amounts it will be necessary to
delineate a comparative C Type, and then to specify the Period
to range From 01 To the current period, CP for each year you want
to compare.
In our example, Column #5, will display the Comparative
amounts from the previous year PY, Column #6, the Comparative
amounts for 1989, and Column #7, the Comparative amounts for 1988.
Period
Format Rounding Titles
Col. Type From To Year/Rev Number Option
Line 1 Line 2
5. C 01
CP PY Y N
1990 Comp
6.
C 01 CP 89 Y
N 1989 Comp
7.
C 01 CP 88 Y
N 1988 Comp
Column #5 displays the Comparative account amounts From
period 01 to the current period CP of the previous year PY.
Column #6 displays the Comparative account amounts
from period 01 of 1989 to the current period of 1989.
Column #7 displays the Comparative account amounts
from period 01 of 1988 to the current period of 1988.
All resulting column amounts are formatted.
The rounding option is set to N.
Finally, if your objective is to define a Profit &
Loss statement, the appropriate starting ratio SR and ending ratio
account ER ranges are specified in the Statement Layout File.
You can then define a column that displays the Ratio R for these
accounts.
Period
Format Rounding Titles
Col. Type From To Year/Rev Number Option
Line 1 Line 2
1. P CP
CP CY Y N
Current
2. R CP
CP N N
Ratio
Column #1 displays the Present account amounts From
the current period CP to the current period CP.
Column #2 displays the Ratio of account amounts
displayed in column #1,if the SR and ER was previously defined in
your Statement Layout File.
Formatting and Rounding are not permitted in the Ratio
column.
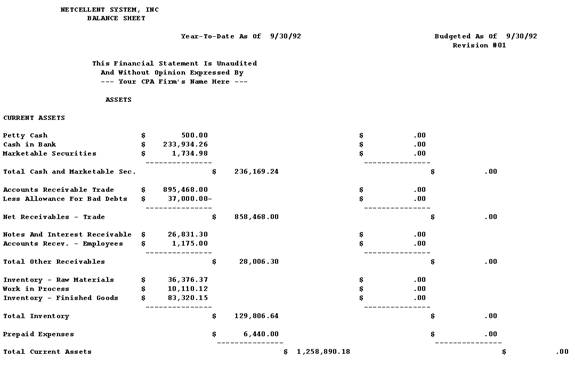
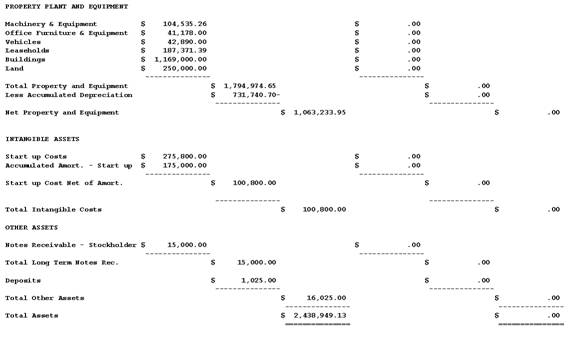
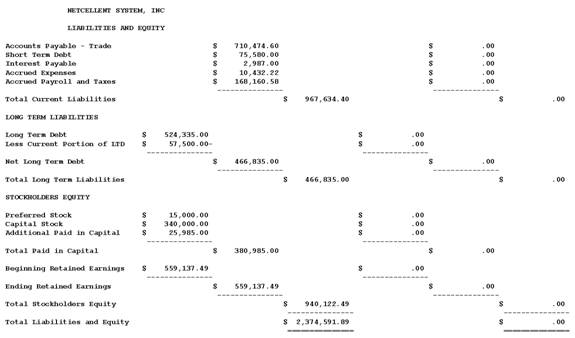
Financial Statement Printing
The second process prints Standard or Custom statements
that were specified in the previously discussed applications.
Print Standard Statements
In Print Standard Statements you will first enter
the appropriate range of starting and ending dates for the period in which the
statements are to be printed. Then the net income figures and account balances
accessed by the financial statement programs are automatically calculated.
Once this process is complete, your statements are printed according to the
selections made in the Standard Specifications application.
When you enter the start and end dates the program looks
up the dates entered to see if they have been entered in the last run. If both
dates are the same, a question is also asked whether you have posted entries
since last printing statements. If no new transactions have been posted to the
General Ledger Transaction file there is no need to recalculate account
balances.
Budgets or comparatives will not be calculated or printed
on any financial statement, even if requested, if you are running the
statements for a set of start and end dates which are not contained in the Period
File.
The net income balances for the whole company and for each
profit center are calculated, as well as the balances for every account. These
are written into a Period work file. These balances are derived from the
values that are reflective of the Period Account Balance File for each account.
The balances are for current period (within the dates selected), year‑to‑date
(from the beginning of the year up to and including transactions dated on the
ending date selected), and a final balance derived from all transactions on
the General Ledger Transaction file date on or before the ending date
selected. These total balances for each account can then be used for any
financial statement in which the accounts might appear.
Needlessly answering yes to the recalculate question will
slow down processing time in getting the first financial statement. It will
only be necessary to recalculate the balances if you run statements for a
different period than the previous run or if new transactions have been added
since the balances were last calculated.
The application will process all the financial statements
from the specifications you have selected to print for the run.
Print Custom Statements
When you are ready to Print Custom Statements
select the appropriate option from Select And Print Financial Statements
menu bar. The resulting custom financial statement is then calculated according
to the accounting periods of your Period File, and reflects the bucket
or period account balance of each account.
Please Note: The period work is recalculated prior
to printing each custom financial statement. This is due to the ability to
custom select period and year-to-date information on each custom financial
statement. Generally speaking, custom financial statement printing will most
likely run longer than standard statement printing. You will not be asked for
the date range when printing custom statements. The current period in the
Accounting period file is the date range that will print.
Select Select And Print Financial Statements from
the pull down G/L Processing window. The following screen will
then be displayed:
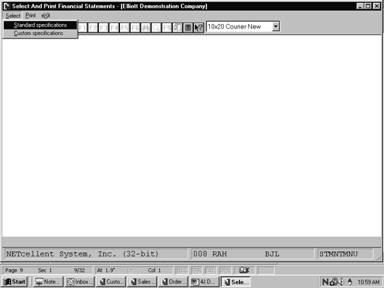
Select and Print Financial Statements Entry Screen
The following options are available:
* Select
the desired mode from the Select And Print Financial Statements menu bar
* Enter the data requested on the
screen
* To
exit press the ESC or F10 key when the cursor is positioned for
entry of the first field on the screen
To return to the menu Bar, press the ESC or F10
key. To leave this application, press X for EXIT when positioned
at the menu Bar.
Entry Field Descriptions
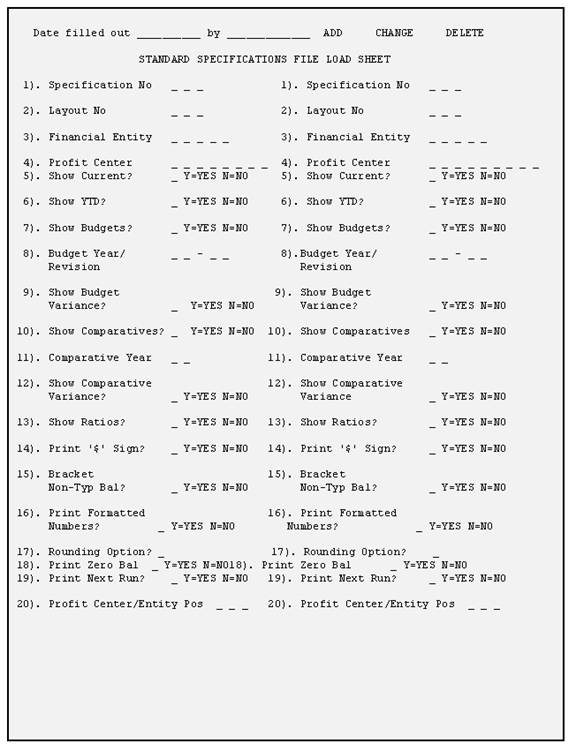
Standard Specifications
|
Name
|
Type
and Description
|
|
1.
Specification No
|
3
numeric digits. This identifies the specification.
Press
the RETURN key in the change or delete mode for next specification on
file or press the F7 key in the change or delete mode for
specification search by number.
|
|
2.
Layout No
|
3
numeric digits. In order to use this application you must first define an
appropriate layout in the Statement Layout File application.
When
you enter a specific layout number this application defaults to the
description and settings that define the layout.
Press
the F7 key in add, change, or delete modes to search for a layout.
|
|
3.
Financial Entity
|
5
alphanumeric characters. The entity must already be on file in the Financial
Entity file. Entry of a non‑blank financial entity will override
any entry of an individual profit center in the next field.
See
also the description in 4 below, which is applicable to financial entities as
well as profit centers.
Press
the F7 key in add, change, or delete modes for search for financial
entity.
|
|
4.
Profit Center
|
A
standard profit center number in the standard profit center number format.
The profit center must have a record defining it in the Chart of Accounts
file. Press the RETURN key to default to All profit centers.
Selection
of a profit center is allowed in order to reduce the number of layouts that
are required to be on file. A single layout may be created that includes all
accounts for a particular statement type ("P", for
instance). If you wish that layout to be printed with all accounts ignored
except those for a specific profit center you may do so by specifying here
the profit center that is to be printed. You may print a consolidated profit
center statement by pressing the RETURN key for a default to All
profit centers.
|
|
Profit Center (continued)
|
When
a specific profit center is entered, only those accounts in the layout with a
number matching the profit center are considered during the printing of the
financial statement.
The
financial statements program will print a special legend whenever it
encounters a legend code in the Statement Layout file. This legend
will identify the profit center. For consolidated statements there will be
no such special legend.
A
specification may be created in the Statement Layout File for each
version of a particular layout that you might routinely select. For
example, the layout for your Profit and Loss Statement contains all accounts.
You may define one specification for the consolidated statement ("All"
profit centers) and one additional specification for each of the profit
centers represented in the layout. You must then select which of these
specifications is to be considered during the next financial statement run by
answering Y to the question PRINT NEXT RUN ? associated with
each specification.
|
|
5.
Show Current?
|
Y or N. RETURN
defaults to Y.
If
you answer Y to this question, figures for the current period will be
shown on the financial statement. This only applies to the Profit and Loss
Statement and its supporting schedules.
An
entry for this field will not be requested if the layout is not a P&L
format.
|
|
6.
Show Ytd ?
|
Y or N. Press RETURN
to default to Y.
This
question only applies to P&L format layouts. See the description for
the Show Current? field above.
|
|
7.
Show Budgets?
|
Y or N. Enter Y
to show budgets or N to decline.
|
|
8.
Budget Year/Revision?
|
2
alphanumeric characters. If you entered Y in the previous field,
specify the budget year and revision number. This field defaults to CY
for the current year, and no default for the current budget. CY is
assigned by the system to be equal to the last year of the last period in the
period file.
|
|
9.
Show Budget Variance ?
|
Y or N. If you
answer Y to this field, the statement will display the difference
between the amount you entered in the Budget File, and the actual
amount present in the General Ledger File.
|
|
10.
Show Comparatives ?
|
Y or N. Enter Y
to show comparatives or N to decline.
|
|
11.
Comparative Year
|
2
numeric digits. If you entered Y in the previous field enter a year
between 00 and 99 that you want to compare, or PY to indicate the
previous year.
If
your fiscal year differs from the calendar year, calculate the previous year
by subtracting one from the last period in the Accounting Period File. If
the last period in the file is in the year 1991, the previous year will be
assigned a year of 1990.
|
|
12.
Show Comparative Variance ?
|
Y or N. If you
answer Y to this field, the statement will display the difference
between the period balance amounts present in the Comparative File,
and the actual amount in the General Ledger File.
|
|
13.
Show Ratios ?
|
Y or N. RETURN
defaults to N.
Your
response to the Show Ratios ? question will determine whether or not
ratios are to be printed on the financial statement that is defined for the
layout number you entered.
Ratios
are a feature of the Profit and Loss Statement and the P&L Supporting
Schedules only, so if ratios are requested for any other type of statement,
the request will be ignored when the statement is printed.
For
a complete explanation of what ratios are and what effect they have on the
financial statements, refer to the documentation for the Statement Layout
File.
|
|
14.
Print `$' Sign ?
|
Y or N. RETURN
defaults to Y.
The
answer to the Print '$' Sign ? question determines if dollar signs
will be printed on the selected financial statement.
|
|
15.
Bracket Non-Typical Balances?
|
Y or N. Enter Y
to place brackets around non-typical balances, or N to decline.
|
|
16.
Print Formatted Numbers?
|
Y or N. Enter Y
to print formatted numbers or N to decline.
For
example, if you answer Y to this question a formatted number
(99,999,999.99) will appear. If you answer N the same number would
print without the formatting attributes such as 99999999.99.
|
|
17.
Rounding Option?
|
1
alphabetic character. Enter one of the following to delineate a rounding
option.
N = No
Rounding
D = To
Dollar
T = To
Thousand
M = To
Million
This
field defaults to N that indicates no rounding.
|
|
18.
Print Zero Balances?
|
Y or N. Enter Y
if you want to print PAT or SUB accounts with zero balances.
Enter N to decline.
|
|
19.
Print Next Run?
|
Y or N. RETURN
defaults to N.
The
answer to the Print Next Run? question determines if this
specification will be consulted the next time financial statements are run.
If the answer is Y then a statement will be printed for the layout
and financial entity or profit center specified and ratios and budgets or
comparatives will be shown as the instructions dictate.
When
you select to print financial statements there will be a statement printed
for each specification, which has a Y in this field. It is for this
reason that we provide three easy means of changing the field's value. In
addition to utilizing change mode, you may select the CLEAR option
which sets the print answer for all specifications to N or Generalized
Statement Selection which sets the print answer for certain
specifications to Y. See the Application Overview of this
application for more information about these features.
|
|
20.
Profit Center/Entity Pos
|
3
numeric digits. Enter the starting print position of the Profit Center or Entity name. This option is only applicable when printing for a specific Profit Center or Entity and printing the legend using the LEG command on the financial
statements. If 0 is entered, the name will float above the columns.
If 1 is entered, the name will be one position from the left of the
report. A 2 will position the name two spaces from the left, and so
on.
|
Generalized Statement Selection
|
Name
|
Type
and Description
|
|
1.
Starting Specification No
|
3
numeric digits. Enter the starting specifications no. range, or press RETURN
to default to All specifications.
|
|
2.
Ending Specification No
|
3
numeric digits. Enter the ending specifications no. range, or press RETURN
to default to the same value as entered for the starting specification
number.
|
|
3.
Select Consolidated Statements?
|
Y or N. RETURN
defaults to N.
For
purposes of this accounting package, a consolidated statement is understood
to be a statement for which all accounts, regardless of profit center or
financial entity designation, are included. This would be the statement for
the entire company.
When
the question Select Consolidated Statements? is answered Y,
specifications for which All profit centers have been chosen are
selected to be printed on the next run. Conversely, if the question is
answered N, any specification with All for the profit center
designation will be passed over. This feature allows you to very quickly
select from the specifications you have on file those that pertain to
consolidated company activity.
|
|
4.
Select Statements For Financial Entity
|
5
alphanumeric characters. Press the RETURN key to default to All
financial entities (i.e., all specifications within a non‑blank
entity).
The
financial entity is looked up on the Financial Entity file, and the
description is automatically displayed. The entry will not be allowed if the
entity is not on file.
Similar
considerations apply here as do for the entry for 5 below.
|
|
5.
Select Statements For Profit Center
|
A
standard profit center number in the standard profit center number format.
Press the RETURN key to default to All profit centers.
If
you wish to select statements for a specific profit center, enter the number
of that profit center here. All specifications within the range that you
entered with that profit centers designation will be selected.
For
example, if you wish to print out all statements and supporting schedules for
profit center 0010, you must enter 0010 in this field. In order for the
entry to be accepted, profit center 0010 must be defined in the G/L
Account File. Refer to the Run Instructions for G/L Account File
Maintenance if you are not sure how to do this.
Pressing
the RETURN key here defaults the entry to All. This means that
all specifications with the designation of a particular profit center will be
selected.
This
is not to be confused with the selection of consolidated statements. For
instance, there are specifications on file for three profit centers (00100,
00200 and 00300) as well as specifications for consolidated statements. All
specifications for profit centers 00100, 00200 and 00300 would be selected.
Specifications for consolidated statements (All profit centers) would
be ignored, as well as specifications for specific financial entities.
This
feature allows you to select from the file of Statement Specifications
each and every financial statement and supporting schedule that pertains to a
specific profit center without requiring you to step through the entire file
in change mode to set the Print Next Run ? response to Y for
the desired specifications.
|
List
|
Name
|
Type
and Description
|
|
1.
Starting Specification No
|
3
numeric digits. Enter the starting specifications range or press RETURN
to default to All specifications.
|
|
2.
Ending Specification No
|
3
numeric digits. Enter the ending specifications range or press RETURN
to default to the same value as entered for the starting specification number.
|
|
3.
For Financial Entity
|
5
alphanumeric characters. Press RETURN if you wish to print all
specifications in the above range regardless of financial entity.
If
a financial entity is entered, it must exist on the Financial Entity file.
|
|
4.
Show Selected Specs
Only ?
|
Y or N. RETURN
defaults to N.
If
you answer Y to the question Show Selected Specs Only? the
report will show only those specifications for which the answer to Print
Next Run ? in the Statement Specifications file is Y. This
allows you to see very easily which specifications will be considered on your
next financial statements run.
|
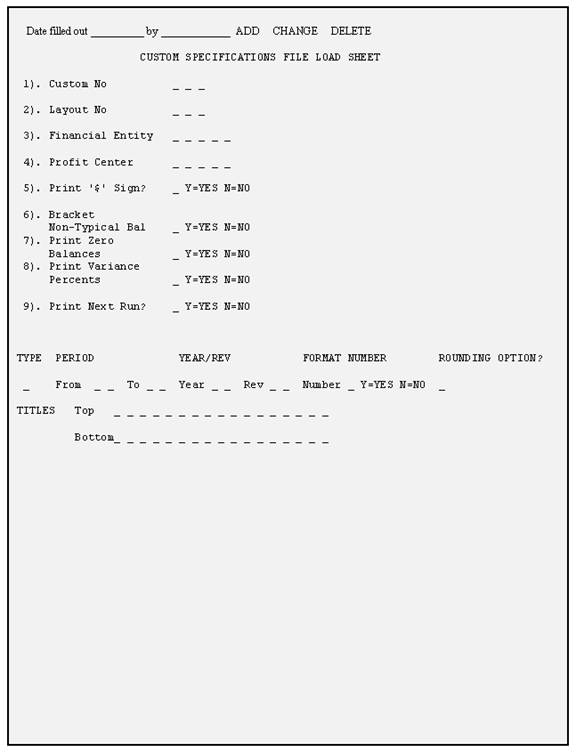
Custom Specifications
First Screen
|
Name
|
Type
and Description
|
|
1.
Custom No
|
3
numeric digits. This identifies the custom specification.
Press
the RETURN key in the change or delete mode for next specification on
file or press the F7 key in the change or delete mode for
specification search by number.
Note: You are not permitted to
enter a valid standard specification number.
|
|
2.
Layout No
|
3
numeric digits. This identifies the layout that corresponds to this
specification. The custom layout must already be on file.
Press
the F7 key in add, change, or delete modes for search for layout.
|
|
3.
Financial Entity
|
5
alphanumeric characters. The entity must already be on file in the Financial
Entity file. Entry of a non‑blank financial entity will override
any entry of an individual profit center in the next field.
See
also the description in 4 below, which is applicable to financial entities as
well as profit centers.
Press
the F7 key in add, change, or delete modes for search for financial
entity.
|
|
4.
Profit Center
|
A
standard profit center number in the standard profit center number format.
The profit center must have a record defining it in the Chart of Accounts
file. Press the RETURN key to default to All profit centers.
Selection
of a profit center is allowed in order to reduce the number of layouts that
are required to be on file. A single layout may be created that includes all
accounts for a particular statement type ("P", for
instance). If you wish that layout to be printed with all accounts ignored
except those for a specific profit center you may do so by specifying here
the profit center that is to be printed. You may print a consolidated profit
center statement by pressing the RETURN key for a default to All
profit centers.
When
a specific profit center is entered, only those accounts in the layout with a
number matching the profit center are considered during the printing of the
financial statement.
The
financial statements program will print a special legend whenever it
encounters a legend code in the Layout file. This legend will
identify the profit center. For consolidated statements there will be no
such special legend.
A
specification may be created for each version of a particular layout that
you might routinely select. For example, the layout for your Profit and Loss
Statement contains all accounts. You may define one specification for the
consolidated statement ("All" profit centers) and one
additional specification for each of the profit centers represented in the
layout. You must then select which of these specifications is to be
considered during the next financial statement run by answering Y to
the question Print Next Run? associated with each specification.
|
|
5.
Print `$' Sign?
|
Y or N. RETURN
defaults to Y.
The
answer to the Print '$' Sign? question determines if dollar signs are
allowed on the selected financial statement.
|
|
6. Bracket
Non-Typical Balances
|
Y or N. Enter Y
to place brackets around non-typical balances, or N to decline.
|
|
7.
Print Zero Balances
|
Y or N. Enter Y
if you want to print accounts with zero balances or N to decline.
|
|
8.
Print Variance Percents
|
Y or N. Enter Y
to print percents with variance amounts on the financial statement or N
to decline.
|
|
9.
Print Next Run?
|
Y or N. RETURN
defaults to N.
The
answer to the Print Next Run? question determines if this
specification will be consulted the next time financial statements are run.
If the answer is Y then a statement will be printed for the layout and
financial entity or profit center specified and ratios and budgets or
comparatives will be shown as the instructions dictate.
When
you select to print financial statements there will be a statement printed
for each specification, which has a Y in this field. It is for this
reason that we provide three easy means of changing the field's value.
In
addition to utilizing change mode, you may select Clear Statement
Selections which sets the print answer for all specifications to N
or Generalized Statement Selection which sets the print answer for
certain specifications to Y. See the Application Overview of
this application for more information about these features.
|
Second Screen
|
Column Name
|
Type
and Description
|
|
(Type)
|
1
alphabetic character. Enter one of the following to delineate the Custom
Statement Type.
P = Present
B = Budget
C = Comparative
V = Variance
R = Ratio
Note
: Type R Ratio is valid for Profit & Loss Statements only.
In
change mode if a space is entered for an existing TYPE the following message
will be displayed.
Entering
Space In Type Will Delete Entry. Ok to Continue? "Y" to delete
the column.
|
|
(Period)
From
|
2
alphanumeric characters. Enter CP to delineate the Current Period
or the Period Number (1-13) that you want to define.
If
type V (Variance) was entered in the previous field, specify the
column numbers to be included in the variance.
The
"To" column should contain the base value for the variance
calculation.
|
|
(Period)
To
|
2
alphanumeric characters. Enter CP to delineate the Current Period
or the Period Number (1-13). that you want to define.
|
|
(Year/Rev)
Year/Rev
|
2
alphanumeric characters. Enter one of the following:
PY = Previous
Year
CY = Current
Year
NY = Next
Year
Or
If
the column has been defined as a Type C (comparative) enter the
Year that you want to compare. For example, 89 for (1989), and 90 (1990) or PY
for Previous Year. If the column has been defined as a type P, R
or C this field entry is skipped.
If
a relative year assignment of PY, CY or NY is used it is
referenced to the year of the last period in the period file. For example if
the year of the last period was 1991 then CY would equal 1991, PY
would equal 1990 and NY would equal 1992.
Note: The information entered
into the REV field applies to budgets only, since comparatives do not
have revisions.
|
|
(Format
Number)
Print
Formatted Numbers?
|
Y or N. Enter Y
If you want to print formatted numbers or N to decline.
An
example of a formatted number is 9,999,999,99.
An
example of an unformatted number is 9999999.99.
|
|
(Rounding)
Option
|
1
alphabetic character. Rounding enables you to decrease the column width to
conserve horizontal space.
Enter
one of the following:
N = No
Rounding
D = To
Dollar
T = To
Thousand
M = To
Million
If
this column is an R statement Type (Ratio), entry is not permitted.
|
|
(Titles)
Line
1
|
17
alphanumeric characters. Enter the title to appear on the first line of the
column each time an LEG command is encountered in the layout file.
|
|
(Titles)
Line
2
|
17
alphanumeric characters. Enter the title to appear on the second line of the
column each time an LEG command is encountered in the layout file.
You
may additionally specify a period ending date by entering the % sign followed
by the period date. For example, %99/99/99.
If
you are working in a B (Budget) type column, enter % RR to reference a budget
revision number.
|
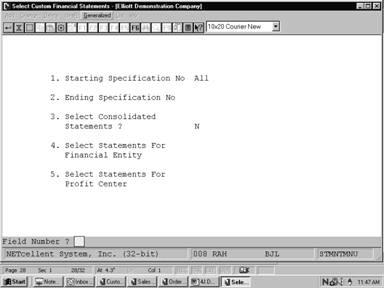
Generalized Statement Selection
|
Name
|
Type
and Description
|
|
1.
Starting Specification No
|
3
numeric digits. Enter the starting specifications no. range, or press RETURN
to default to All specifications.
|
|
2.
Ending Specification No
|
3
numeric digits. Enter the ending specifications no. range, or press RETURN
to default to the same value as entered for the starting specification
number.
|
|
3. Select
Consolidated Statements?
|
Y or N. RETURN
defaults to N.
For
purposes of this accounting package, a consolidated statement is understood
to be a statement for which all accounts, regardless of profit center or
financial entity designation, are included.
This
would be the statement for the entire company.
When
the question Select Consolidated Statements? is answered Y,
specifications for which All profit centers have been chosen are
selected to be printed on the next run. Conversely, if the question is
answered N, any specification with All for the profit center
designation will be passed over.
This
feature allows you to very quickly select from the specifications you have on
file those that pertain to consolidated company activity.
|
|
4. Select Statements
for Financial Entity
|
5
alphanumeric characters. Press the F1 key to default to ALL
financial entities (i.e., all specifications within a non-blank entity).
The
financial entity is looked up on the Financial Entity File, and the
description is automatically displayed. The entry will not be allowed if the
entity is not on file.
Similar
considerations apply here as do for the entry for 5 below.
|
|
5.
Select Statements For Profit Center
|
A
standard profit center number in the standard profit center number format.
Depending on the format of the profit center in the G/L account
number. Press the F1 key to default to ALL profit centers.
If
you wish to select statements for a specific profit center, enter the number
of that profit center here. All specifications within the range that you
entered with that profit center's designation will be selected.
For
example, if you wish to print out all statements and supporting schedules for
profit center 0010, you must enter 0010 in this field. In order for the
entry to be accepted, profit center 0010 must be defined in the G/L
Account File. Refer to the Run Instructions for G/L Account File
Maintenance if you are not sure how to do this.
Pressing
the RETURN key here defaults the entry to All. This means that
all specifications with the designation of a particular profit center will be
selected. This is not to be confused with the selection of consolidated statements.
For
instance, there are specifications on file for three profit centers (00100,
00200 and 00300) as well as specifications for consolidated statements. All
specifications for profit centers 00100, 00200 and 00300 would be selected.
Specifications
for consolidated statements (All profit centers) would be ignored, as
well as specifications for specific financial entities.
This
feature allows you to select from the file of Statement Specifications
each and every financial statement and supporting schedule that pertains to a
specific profit center without requiring you to step through the entire file
in change mode to set the Print Next Run? response to Y for the
desired specifications.
|
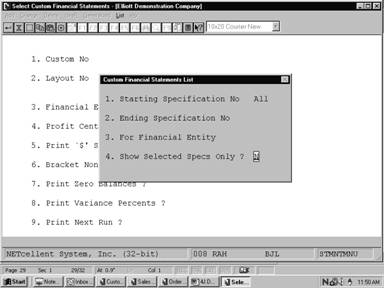
List
|
Name
|
Type
and Description
|
|
1.
Starting Specification No
|
3
numeric digits. Enter the starting specifications range or press RETURN
to default to All specifications.
|
|
2.
Ending Specification No
|
3
numeric digits. Enter the ending specifications range or press RETURN
to default to the same value as entered for the starting specification
number.
|
|
3.
For Financial Entity
|
5
alphanumeric characters. Press RETURN if you wish to print all
specifications in the above range regardless of financial entity.
If
a financial entity is entered, it must exist on the Financial Entity file.
|
|
4.
Show Selected Specs
Only?
|
Y or N. RETURN
defaults to N.
If
you answer Y to the question Show Selected Specs Only ? the
report will show only those specifications for which the answer to Print
Next Run ? in the Statement Specifications file is Y. This
allows you to see very easily which specifications will be considered on your
next financial statements run.
|
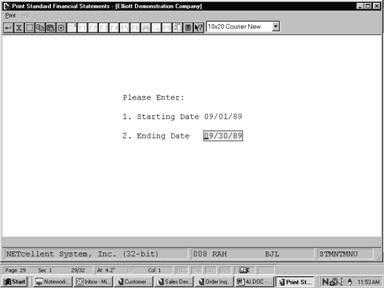
Print Standard Statements
|
Name
|
Type
and Description
|
|
1.
Starting Date
|
A
standard date in the standard date format.
The
starting and ending dates entered will determine for which date the financial
statement will print.
The
date will default to the current period starting date contained the G/L
Accounting Period file if you press RETURN. You will be warned if
the starting date entered does not correspond to a regular accounting period
entered in the G/L Accounting Period file.
|
|
2.
Ending Date
|
A
standard date in the standard date format. This is the ending date for which
financial statements will be printed.
It
will default to the current period ending date contained in the G/L
Accounting Period file.
|
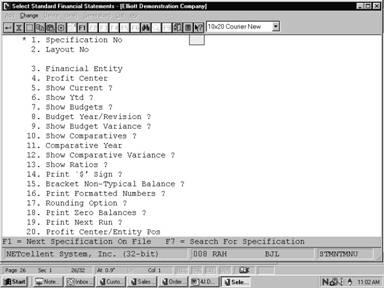
Select Standard Financial Statements
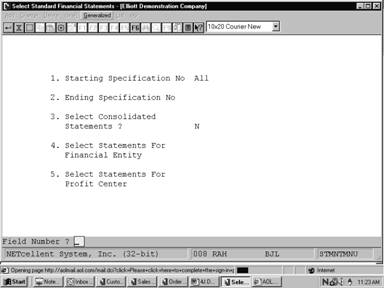
Select Standard Financial Statements (Generalized)
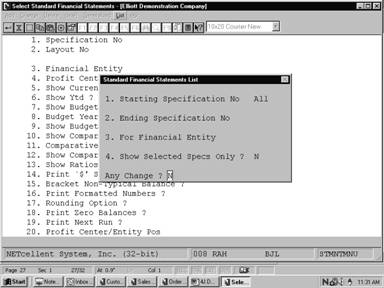
Standard Financial Statements (List)
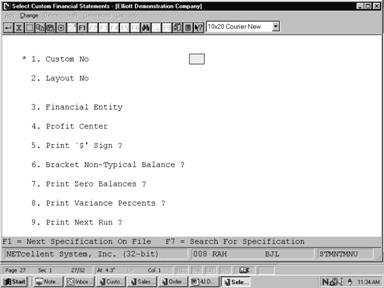
Select Custom Financial Statements
Select Custom Column Definitions
Select Custom Financial Statements (Generalized)
Select Custom Financial Statements (List)
Print Standard Financial Statements